7.3. Configuring a Domain Name ServerDomain name service (DNS) is like a telephone-directory service for TCP/IP networks. When a program such as a browser or mail server needs to contact a machine for which it has a hostname, it uses DNS to convert that name to a numeric network address. DNS can also do the reverse: convert a numeric address to a hostname. It is necessary to have DNS set up before you can serve data to the Internet. Although you can contract for DNS service from an external provider, Fedora Core provides a nameserver that you can easily set up to provide your own DNS capability. 7.3.1. How Do I Do That?Fedora provides the named domain name server, which is the Berkeley Internet Name Domain (BIND). named serves two roles:
The named service is not run by default. Once you configure it to run (see Lab 4.6, "Managing and Configuring Services"), it will act as a caching nameserver:
To configure named as an authoritative nameserver for your domain, you just have to give it the information about your domain that you want it to serve to other systems. Usually at least two authoritative nameservers are set up for each domain; one is configured as the master, and the others are slaves. Changes to the DNS data are made on the master, and the slaves update themselves periodically. You can configure an authoritative nameserver graphically or by editing configuration files and datafiles. 7.3.1.1. Configuring named graphically
Select the menu option System Figure 7-6. BIND configuration GUI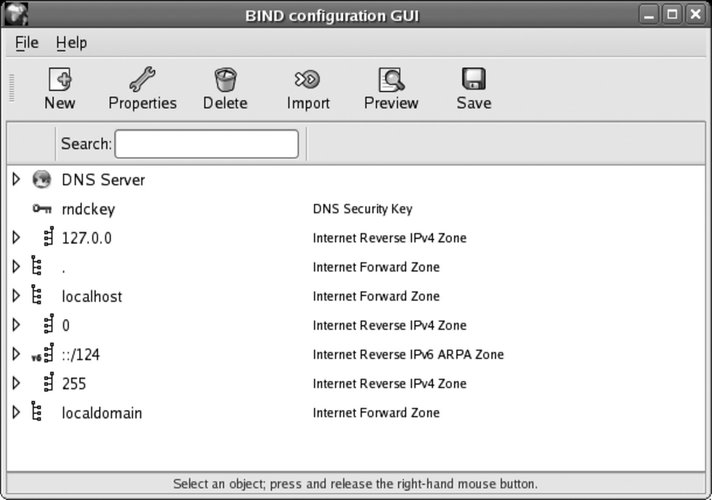
To add a zonewhich can be a complete domain or a subdomainclick on the DNS Server entry to highlight it, click the New button, and then select "zone" from the menu that appears. Figure 7-7 shows the small dialog box that appears. Figure 7-7. New Zone dialog box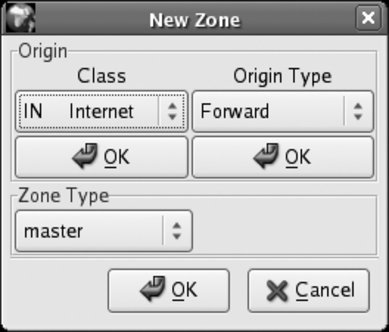
Click OK under Class, and then click OK under Origin Type. The dialog's controls will change to let you type in the Forward Zone Origin, as shown in Figure 7-8. Enter the name of the domain with a period at the endfor example, fedorabook.com. Figure 7-8. Zone Origin entry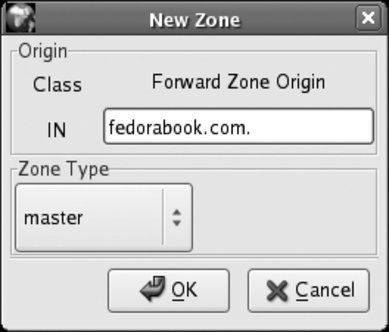
Click OK to create the zone. The window in Figure 7-9 will appear. Don't be alarmed by the number of controls! Figure 7-9. Zone Authority configuration window
This window sets several overall values for the zone. Many of these are time values:
Leave these values at their defaults to start. If you are setting up DNS for a heavily used domain, you should go back and change the Cache Time to Live to the three-day recommended minimum (or longer) once you've confirmed that your configuration works correctly; you'll also need to change the TTL on each resource record in this zone (which I will come to in a minute). Beside the time fields, there are only four pieces of information to fill in:
Click OK to save this information. You will see the domain listed in the main window, as in Figure 7-10; click on the arrow to the left of the domain name to see the entries within that domain. Figure 7-10. A new zone entry in the main configuration window
Note that two entries have been created: a Start of Authority (SOA) record, which contains basic information about the domain, plus an NS record, which contains information about the authoritative nameserver for the zone. You'll now need to add resource records (RR) for the machines in this zone. Most domains need four types of records:
To add these records, highlight the new zone you've created, click the Add button, and select the record type from the drop-down list that appears. One of the four windows shown in Figure 7-11 will appear, according to the type of resource record you are adding. Figure 7-11. Resource record windows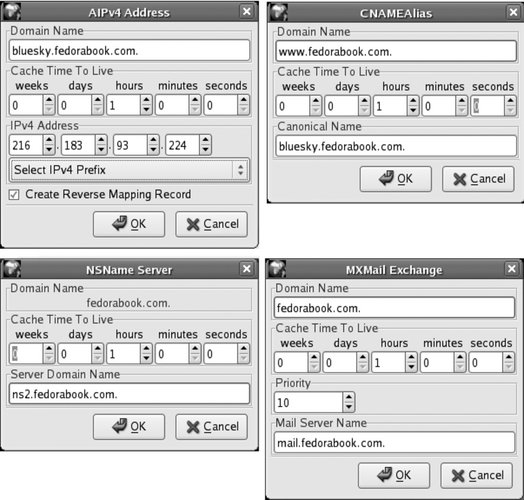
Once you have entered all of the resource records you want, click Save to save the information. If named is already running, it will be reloaded so that the changes take effect immediately. 7.3.1.2. Configuring named through configuration files and datafilesnamed can also be configured by directly editing the configuration files and datafiles, which is the approach used by many experienced users. The overall operation of named is controlled by the file /etc/named.conf. This is the default configuration installed by the BIND package: //
// named.conf for Red Hat caching-nameserver
//
options {
directory "/var/named";
dump-file "/var/named/data/cache_dump.db";
statistics-file "/var/named/data/named_stats.txt";
/*
* If there is a firewall between you and nameservers you want
* to talk to, you might need to uncomment the query-source
* directive below. Previous versions of BIND always asked
* questions using port 53, but BIND 8.1 uses an unprivileged
* port by default.
*/
// query-source address * port 53;
};
//
// a caching-only nameserver config
//
controls {
inet 127.0.0.1 allow { localhost; } keys { rndckey; };
};
zone "." IN {
type hint;
file "named.ca";
};
zone "localdomain" IN {
type master;
file "localdomain.zone";
allow-update { none; };
};
zone "localhost" IN {
type master;
file "localhost.zone";
allow-update { none; };
};
zone "0.0.127.in-addr.arpa" IN {
type master;
file "named.local";
allow-update { none; };
};
zone "0.0.0.0.0.0.0.0.0.0.0.0.0.0.0.0.0.0.0.0.0.0.0.0.0.0.0.0.0.0.0.ip6.arpa" IN {
type master;
file "named.ip6.local";
allow-update { none; };
};
zone "255.in-addr.arpa" IN {
type master;
file "named.broadcast";
allow-update { none; };
};
zone "0.in-addr.arpa" IN {
type master;
file "named.zero";
allow-update { none; };
};
include "/etc/rndc.key";The options section sets up the basic file and directory locations for the server. controls limits which machines can control named (in this case, only programs running on the localhost, and only if they have the correct security key); and the include line at the end accesses that encryption key from another file and causes named to act as though it's included in this file. The rest of this file consists of zone sections. The first zone section is for the entire Internet and refers to the file /var/named/named.ca, which contains the names and addresses of the master domain name servers, called the root servers. The extension .ca stands for cache.
The remaining zone sections are used to resolve standard requests, such as the address of localhost and localhost.localdomain (always 127.0.0.1), and the reverse of those requests. To create a new zone, add it to the end of this file (you can copy an existing zone entry and then modify it): zone "fedorabook.com" IN {
type master;
file "fedorabook.com.db";
allow-update { none; };
};This specifies the name of the zone (exactly the same as the name of the domain) and the file in which this zone's information can be found. You can enter any filename you want, but names based on the domain and ending with .db or hostssuch as fedorabook.com.db or fedorabookhostsare traditional. Next, create the file for the zone. This is a standard text file with a very exact syntax. The file starts with the default TTL for the zone: $TTL 3D The value here represents three days. You can use any combination of numbers suffixed with W, D, H, M, or S (representing units of weeks, days, hours, minutes, and seconds) concatenated together, or you can specify the time in seconds; some examples are shown in Table 7-5.
The zone file then contains the Start of Authority (SOA) resource record: @ SOA ns1
chris.global.proximity.on.ca. (2007201702,3D,1H,3D,1H)The @ sign means "this zone", and SOA is the record type. The values are the authoritative master nameserver (ns1), followed by the administrative email contact, with the @ converted to a period (therefore, usernames containing periods cannot be used for administrative contacts).
The values in parentheses at the end of the record are the serial number and the time values for this record. It's helpful (and common practice) to split this information across several lines and add comments to label which time value is which: @ SOA ns1
chris.global.proximity.on.ca. (
2007201702 ; serial number
3D ; refresh
1H ; retry
3D ; expire
1H ) ; minimumNotice that comments start with a semicolon. The time values used here are the same ones configured using the graphical tool. The rest of the zone file contains resource records. We need NS records to indicate the nameservers for this domain: IN NS bluesky
IN NS darkday
The first field is blank; the line must be indented at least one space. The next field value, IN, specifies that these records are related to the Internet (TCP/IP address family). NS indicates the record type (nameserver), and the last field is the hostname of the nameserver. We also need A records to indicate the IP address of each computer:
bluesky IN A 216.183.93.224
darkday IN A 216.183.93.225
The first field in each record is the hostname, followed by the address family (IN) and the record type (A), and then the IP address. Next we have MX records for mail exchangers: IN MX 10 bluesky
IN MX 20 global.proximity.on.ca.
These have a blank first field, followed by the address family (IN) and record type (MX), followed by the mail server priority (lower numbers are higher priority), and then the mail server hostname. Note that global.proximity.on.ca is outside of this zone, so the hostname is written as a fully qualified domain name (FQDN) ending with a period. We also need some aliases for common hostnames:
mail IN CNAME bluesky
ftp IN CNAME darkday
www IN CNAME bluesky
ww IN CNAME bluesky
wwww IN CNAME bluesky
These records are like A records, except that the record type is set to CNAME and the last field contains the canonical (true) hostname. It is possible to override the default TTL by inserting it between the address family (IN) and the record type in each record. For example, you could set the TTL for the last CNAME record to five minutes:
wwww IN 5M CNAME bluesky
Putting this all together and adding some comments gives us the complete zone file: ; Zone file for 'fedorabook.com'
; Default TTL is 1 hour
$TTL 1H
; Start of authority
@ SOA ns1 chris.global.proximity.on.ca. (
2007201705 ; serial number
3D ; refresh
1H ; retry
3D ; expire
1H ) ; minimum
; Nameservers
        IN      NS      bluesky
        IN      NS      darkday
; Addresses of hosts
                  bluesky IN      A       216.183.93.224
                  darkday IN      A       216.183.93.225
; Mail exchangers
IN MX 10 bluesky
IN MX 20 darkday
; Nicknames/aliases
mail IN CNAME bluesky
www IN CNAME bluesky
ww IN CNAME bluesky
wwww IN CNAME blueskyThe filename for this data is /var/named/fedorabook.com.db, to match the file enTRy that we made in /etc/named.conf. 7.3.1.3. Testing DNS entriesOnce you have your DNS entries configured, reload the named service. The end of the system message logfile, /var/log/messages, will look something like this: Mar 4 22:14:58 core5 named[10977]: starting BIND 9.3.2 -u named Mar 4 22:14:58 core5 named[10977]: found 1 CPU, using 1 worker thread Mar 4 22:14:58 core5 named[10977]: loading configuration from '/etc/named.conf' Mar 4 22:14:58 core5 named[10977]: listening on IPv4 interface lo, 127.0.0.1#53 Mar 4 22:14:58 core5 named[10977]: listening on IPv4 interface eth0, 172.16.97.100#53 Mar 4 22:14:58 core5 named[10977]: command channel listening on 127.0.0.1#953 Mar 4 22:14:58 core5 named[10977]: zone 0.in-addr.arpa/IN: loaded serial 42 Mar 4 22:14:58 core5 named[10977]: zone 0.0.127.in-addr.arpa/IN: loaded serial 1997022700 Mar 4 22:14:58 core5 named[10977]: zone 255.in-addr.arpa/IN: loaded serial 42 Mar 4 22:14:58 core5 named[10977]: zone 0.0.0.0.0.0.0.0.0.0.0.0.0.0.0.0.0.0.0.0.0.0.0.0.0.0.0.0.0.0.0.ip6.arpa/IN: loaded serial 1997022700 Mar 4 22:14:58 core5 named[10977]: zone fedorabook.com/IN: loaded serial 2007201705 Mar 4 22:14:58 core5 named[10977]: zone localdomain/IN: loaded serial 42 Mar 4 22:14:58 core5 named[10977]: zone localhost/IN: loaded serial 42 Mar 4 22:14:58 core5 named[10977]: running Mar 4 22:14:58 core5 named[10977]: zone fedorabook.com/IN: sending notifies (serial 2007201705) If there is an error in your zone file, an error message will appear here. Read the error message carefully, and then edit your zone file to correct the error and try again (the most common errors are simple syntax errors in the configuration or zone files). Once named has started without errors, test the nameserver using the dig command: $ dig bluesky.fedorabook.com @localhost any ; <<>> DiG 9.3.2 <<>> bluesky.fedorabook.com @localhost any ; (1 server found) ;; global options: printcmd ;; Got answer: ;; ->>HEADER<<- opcode: QUERY, status: NOERROR, id: 43031 ;; flags: qr aa rd ra; QUERY: 1, ANSWER: 1, AUTHORITY: 2, ADDITIONAL: 1 ;; QUESTION SECTION: ;bluesky.fedorabook.com. IN ANY ;; ANSWER SECTION: bluesky.fedorabook.com. 3600 IN A 216.183.93.224 ;; AUTHORITY SECTION: fedorabook.com. 3600 IN NS bluesky.fedorabook.com. fedorabook.com. 3600 IN NS darkday.fedorabook.com. ;; ADDITIONAL SECTION: darkday.fedorabook.com. 3600 IN A 216.183.93.225 ;; Query time: 17 msec ;; SERVER: 127.0.0.1#53(127.0.0.1) ;; WHEN: Sat Mar 4 22:18:08 2006 ;; MSG SIZE rcvd: 108 The argument @localhost tells dig to use the local nameserver instead of the one your machine is normally configured to use. The any argument instructs named to report any information that it finds about the requested server or domain (the default is to show only A records). You can substitute a record type such as soa or mx to see those specific resource records. The line highlighted in bold the output shows the correct address for the requested hostname, which proves that named is configured correctly. You can also test the nameserver with the host or nslookup commands (don't include the @ sign in front of the nameserver name localhost when using these commands): $ host bluesky.fedorabook.com localhost Using domain server: Name: localhost Address: 127.0.0.1#53 Aliases: bluesky.fedorabook.com has address 216.183.93.224 Using domain server: Name: localhost Address: 127.0.0.1#53 Aliases: $ nslookup bluesky.fedorabook.com localhost Server: localhost Address: 127.0.0.1#53 Name: bluesky.fedorabook.com Address: 216.183.93.224 To test the caching capabilities of the nameserver, look up a hostname that is not in any of your local zones: $ dig fedora.redhat.com @localhost ; <<>> DiG 9.3.2 <<>> fedora.redhat.com @localhost ; (1 server found) ;; global options: printcmd ;; Got answer: ;; ->>HEADER<<- opcode: QUERY, status: NOERROR, id: 41999 ;; flags: qr rd ra; QUERY: 1, ANSWER: 1, AUTHORITY: 3, ADDITIONAL: 0 ;; QUESTION SECTION: ;fedora.redhat.com. IN A ;; ANSWER SECTION: fedora.redhat.com. 300 IN A 209.132.177.50 ;; AUTHORITY SECTION: redhat.com. 600 IN NS ns1.redhat.com. redhat.com. 600 IN NS ns2.redhat.com. redhat.com. 600 IN NS ns3.redhat.com. ;; Query time: 401 msec ;; SERVER: 127.0.0.1#53(127.0.0.1) ;; WHEN: Sat Mar 4 22:28:53 2006 ;; MSG SIZE rcvd: 105 7.3.1.4. Configuring a slave nameserverOnce you have configured a master nameserver for a zone, you can configure another computer to fetch the zone information from that master nameserver and serve it to other machines. This can be done to share the workload for extremely busy domains or (more often) to provide some redundancy in case the master server is down or unreachable.
This type of nameserver is called a slave, but it is still considered authoritative for the domain if there is an NS record for it in the zone.
To configure a slave nameserver graphically, start the graphical configuration tool (Figure 7-6), highlight the DNS Server entry, click on the New icon, and then click on the Zone option from the pull-down list. Create the zone in the same way you did on the master server, but set the Zone Type to "slave." Click OK, and the window shown in Figure 7-12 will appear. Figure 7-12. Slave zone configuration window
Click on IPV4 Address, and the window will change to include fields for the IP address, as shown in Figure 7-13. Figure 7-13. Slave zone configuration window with address fields
Enter the IP address of the master nameserver, and then click on the upper OK button followed by the lower OK button. Click on the Save button on the main window, and the slave zone will be created. To configure a slave zone by editing the configuration files, add a section to /var/named.conf that looks like this: zone "fedorabook.com" IN {
type slave;
file "fedorabook.com.db";
masters { 216.183.93.224; };
};The zone and file values are the same as for a master zone. The type must be set to slave, and the masters value is a semicolon-separated list of zone master nameservers, enclosed in curly braces. Once you have configured the slave zone, restart or reload named on the same machine. The initial zone transfer should be recorded in /var/log/messages: zone fedorabook.com/IN: Transfer started.
transfer of 'chris.com/IN' from 216.183.93.224#53:
connected using 47.52.6.120#55096
zone fedorabook.com/IN: transferred serial 27.3.1.5. Using your nameservers locallyOnce the nameserver is working, you can configure your local clients to use it:
If you configure only your local clients to use your nameserver, any zones that you have configured are accessible only to those clients. 7.3.1.6. Serving domain information to the InternetIn order to make your domain information accessible to other systems on the Internet, it is necessary to register your domain and give the IP address of your nameserver(s) to your domain registrar. There are many registrars available; to find one, simply search for "domain registration" on any search engine. Be sure to read the fine print of the registrar's contract because some registrars will try to lock you into their service by charging you exorbitant transfer fees if you try to switch to another registrar at a later date. Most registrars now offer a myriad of different packages with domain forwarding, web hosting, or email management features. If you are planning to do your own web serving and email hosting, you can forgo those features and sign up for the most basic registration service. Give the IP address of all of your named servers to your registrar as the nameservers for your domain. Once your domain registration is complete, the nameservers for your top-level domain (TLD)such as .com or .orgwill start forwarding queries about your domain to your nameservers. It takes a short while for your domain information to circulate to all of the nameservers for your TLD, so be patient! To test whether your domain name service is accessible to the Internet, use the dig command with your ISP's nameserver: $ dig somehost.yourdomain.com @nameserver.yourisp.com 7.3.1.7. Reverse mappingDNS is also capable of performing reverse mapping, which translates an IP address into a domain name. However, unless your ISP has provided you with a block of IP addresses that is a power of 256that is, either 256, 65,536, or 16,777,216 addressesreverse mapping is particularly difficult to set up. If you really need reverse mapping controlled by your nameserver, you'll need to find out how your ISP has configured this and whether they are willing to delegate the reverse mapping to you. If you have a small number of Internet-accessible hosts, most ISPs prefer to enter your hostnames and IP addresses into their reverse-mapping tables rather than go through the arduous task of connecting a portion of their reverse map to your nameserver. 7.3.2. How Does It Work?Domain name service is based on the concept of referrals. When a client program (such as a web browser) needs to convert a hostname into an IP address, it uses query functions in a resolver library. The resolver looks in the local hosts file (/etc/hosts on Fedora, other Linux, Unix, and Mac OS X systems; c:\windows\system32\drivers\etc\hosts on Windows 2000, Windows Server 2003, and Windows XP), and if the hostname is not found in that file, it queries one of the caching nameservers specified in the operating system's network configuration. On a Fedora system (like most other Linux and Unix systems) the nameservers to be used are listed in /etc/resolv.conf.
The caching nameserver first checks its cache to see if it already has the answer to the query, and if it does, it returns that answer to the client. Otherwise, it contacts one of the root nameservers (listed in /var/named/named.ca) by sending a UDP packet to port 53. The root nameserver sends back a reply referring the caching nameserver to the authoritative nameserver for the appropriate top-level domain (TLD). The caching nameserver then sends another query, this time to the TLD nameserver, which replies with a referral to the next nameserver down the chain. This happens recursively until a nameserver that knows the answer is foundor until the possibilities are exhausted and a nameserver finally returns an NXDOMAIN (nonexistent domain) response. Slave zones are transferred from master zones when the master zone notifies the slave of the need for an update, or when an update is mandated by the refresh time value in the zone's SOA record. The transfer is always initiated by the slave side. In addition to the resource records discussed in this lab, DNS supports a number of other record types that can be used to serve information, such as host hardware and OS configuration, geographical locations, email server authorization (Sender Policy Framework), and more, but these records are much less commonly used. Reverse address resolution is performed by reversing the bytes of the dotted-quad IP address and using that as a domain name within the in-addr.arpa TLD. The resource record returned is a pointer (PTR) record. For example, to discover the hostname of 216.183.93.224, a query is made for 224.93.183.216.in-addr.arpa: $ dig 224.93.183.216.in-addr.arpa ptr ; <<>> DiG 9.3.1 <<>> 224.93.183.216.in-addr.arpa ptr ;; global options: printcmd ;; Got answer: ;; ->>HEADER<<- opcode: QUERY, status: NOERROR, id: 10860 ;; flags: qr rd ra; QUERY: 1, ANSWER: 1, AUTHORITY: 1, ADDITIONAL: 1 ;; QUESTION SECTION: ;224.93.183.216.in-addr.arpa. IN PTR ;; ANSWER SECTION: 224.93.183.216.in-addr.arpa. 38204 IN PTR global.proximity.on.ca. ;; AUTHORITY SECTION: 93.183.216.in-addr.arpa. 38204 IN NS ns1.scratchtelecom.com. ;; ADDITIONAL SECTION: ns1.scratchtelecom.com. 172567 IN A 216.183.93.250 ;; Query time: 1 msec ;; SERVER: 127.0.0.1#53(127.0.0.1) ;; WHEN: Sun Mar 5 00:21:39 2006 ;; MSG SIZE rcvd: 133 The host or nslookup commands will automatically convert an IP address into this type of query: $ host 216.183.93.224 224.93.183.216.in-addr.arpa domain name pointer global.proximity.on.ca. $ nslookup 216.183.93.224 Server: 127.0.0.1 Address: 127.0.0.1#53 Non-authoritative answer: 224.93.183.216.in-addr.arpa name = global.proximity.on.ca. Authoritative answers can be found from: 93.183.216.in-addr.arpa nameserver = ns1.scratchtelecom.com. ns1.scratchtelecom.com internet address = 216.183.93.250 The Fedora graphical configuration tool for DNS is called system-config-bind. 7.3.3. What About...7.3.3.1. ...changing from one nameserver to another?Be sure that you never leave an obsolete nameserver active. For example, if your name service was provided by an ISP and you take over the name service, ensure that the ISP's nameserver no longer contain entries for your domain; otherwise, customers of that ISP may not be able to reach your system because they will receive obsolete DNS information. 7.3.4. Where Can I Learn More?
|

 Administration