Hack 20. Scrap X11 for Fancy Login Consoles
Qingy is an attractive replacement for X Windows-based graphical login managers such as XDM, GDM, and KDM. Qingy is an alternative login screen developed by Michele Noberasco (http://qingy.sourceforge.net/news.php). Qingy uses the graphical frame-buffer console capability in Linux to paint an attractive and powerful session login screen on one or more virtual terminals. Unlike XDM, GDM, and KDM, Qingy does not use X11. Despite this, Qingy has as many features as these traditional graphical login screens, if not more (see the sidebar, Frame-Buffer Versus X11 Graphics). You can choose your preferred session type, such as KDE, GNOME, WindowMaker, Fluxbox, or just a text console. You can include buttons on the Qingy login screen that will start the screensaver, put your computer in sleep mode, reboot, shut down, and many other options. And of course, you can change the Qingy graphical theme.
Qingy stands for "Qingy Is Not GettY." getty is the text-based terminal program that greets you with a login prompt. You have several of these text-based virtual consoles (terminals) on your machine, and you can switch between them by pressing Ctrl-Alt-F1, Ctrl-Alt-F2, Ctrl-Alt-F3, and so on. (You can omit the Ctrl key if you're not switching to a text console from a graphical desktop.) Each desktop is a virtual terminal that uses a version of getty as a terminal emulator. Various Linux distributions use alternatives, such as agetty, mingetty, and others; despite a few feature differences, they all amount to the same thinga text-based terminal console. Qingy replaces getty with an attractive graphical login screen that can automatically launch any one of your favorite graphical desktops or a text console. You can start Qingy on more than one virtual console, which means two or more people can use Qingy to log in and start their own desktops. Qingy also has some built-in security. You can configure Qingy to make it impossible for another user to get to your desktop without knowing your password. A number of themes are available for Qingy. Figure 3-1 is based on the theme called "biohazard." Figure 3-1. Qingy login screen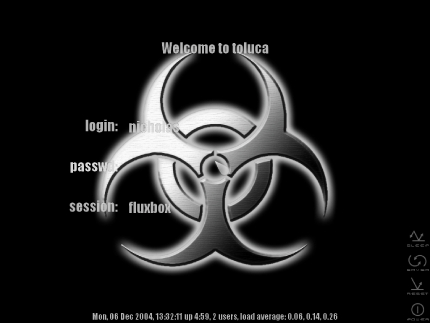 3.6.1. Prepare to Install QingyIt is not difficult to install Qingy. First, you must have frame-buffer support and frame-buffer console support compiled into your Linux kernel (you do not need boot splash support compiled into the kernel, however). [Hack #8] and [Hack #9] include instructions for compiling frame-buffer support and frame-buffer console support into the kernel. Once you have modified your kernel, reboot so that these changes will take effect. If your system automatically launches a graphical login manager, such as GDM, KDM, or XDM, the first thing you want to do is disable it. You won't need to use it anymore after you have Qingy working. You can turn off these login managers in several ways. This command is one way you can do it on a Debian system: # update-rc.d -f kdm remove Removing any system startup links for /etc/init.d/kdm ... /etc/rc0.d/K01kdm /etc/rc3.d/S99kdm /etc/rc4.d/S99kdm /etc/rc6.d/K01kdm On Gentoo, the command should be as follows: # rc-update del xdm default A generic approach also exists that should work with almost every Linux distribution (it doesn't work for Fedora). First, check to see what the default run level is for your system. You can do this by examining the file /etc/inittab. Look for a line that reads like this: id:3:initdefault: This tells you the default run level is 3. For most Linux systems, this means you want to log in as root and change to the directory /etc/rc3.d. If the default run level turned out to be 5, you would change to the directory /etc/rc5.d. Then look for any symbolic links to kdm, gdm, or xdm and delete them. For example: # cd /etc/rc3.d # ls -l *dm lrwxrwxrwx 1 root root 17 Nov 17 2003 S99xdm -> ../init.d/xdm # rm S99xdm 3.6.2. Install QingyIf your Linux distribution has a Qingy package, install it via your package manager. If you can install Qingy from a package manager, it will likely place configuration files in the /etc/qingy directory, place theme files in /usr/share/qingy/themes, and install the qingy program in /sbin.
If you do not have a Qingy package for your Linux distribution, you have to download and compile the code yourself. Download the latest version of Qingy from http://qingy.sourceforge.net/news.php. Log in as root, and change to an appropriate directory (such as /usr/local/src). Extract the code, change to the source directory, configure, compile, and install the program. (Consider that by the time you read this, a more recent version of Qingy might be availableuse that version instead of 0.5.2.) Here is an example of how to perform the preceding steps: $ su - # cp qingy-0.5.2.tar.bz2 /usr/local/src # cd /usr/local/src # tar jxvf qingy-0.5.2.tar.bz2 # cd qingy-0.5.2 # ./configure # make # make install You can specify an alternate prefix when you run ./configure. The prefix tells the build session where to install the files. For example, if you want Qingy to install in /usr/sbin, you would type: # ./configure --prefix=/usr The default setting will install the qingy program in /usr/local/sbin, and store the settings file in /usr/local/etc/. This installs the default theme to /usr/local/share/qingy/themes. 3.6.3. Configure Linux to Use QingyIf you took the preceding advice, you have already compiled and are running a Linux kernel that supports frame-buffer consoles. This means you can see the immediate results of any changes to your console settings. To avoid any potential complications, make all of these changes from a virtual console that is not going to be configured for Qingy. For this example, only the first two virtual consoles will be configured as Qingy login screens. If you are logged in to virtual console 1 or 2, press Ctrl-Alt-F1 and log out of the first virtual console, then press Ctrl-Alt-F2 and log out of the second virtual console. If you don't log out of these consoles, the changes you make will not take effect immediately. Then press Ctrl-Alt-F3 to go to the third virtual terminal (which will not run Qingy), and log in as root there. Now use your favorite editor to edit your /etc/inittab file. Find the section that looks something like this: # TERMINALS c1:12345:respawn:/sbin/agetty 38400 tty1 linux c2:12345:respawn:/sbin/agetty 38400 tty2 linux c3:12345:respawn:/sbin/agetty 38400 tty3 linux c4:12345:respawn:/sbin/agetty 38400 tty4 linux c5:12345:respawn:/sbin/agetty 38400 tty5 linux c6:12345:respawn:/sbin/agetty 38400 tty6 linux You need to change one or more lines to spawn qingy instead of the agetty terminal program. (Your Linux distribution might use something other than agetty, such as getty or mingetty. This doesn't matter.) It isn't necessary or even desirable to change every virtual terminal to use Qingy. If something goes wrong, you want at least one terminal to behave normally so that you can log in and diagnose the problem. In this example, change just the first two virtual terminals to use Qingy. Edit the /etc/inittab file to look more like this: # TERMINALS c1:12345:respawn:/usr/local/sbin/qingy tty1 --screensaver 0 c2:12345:respawn:/usr/local/sbin/qingy tty2 --screensaver 0 c3:12345:respawn:/sbin/agetty 38400 tty3 linux c4:12345:respawn:/sbin/agetty 38400 tty4 linux c5:12345:respawn:/sbin/agetty 38400 tty5 linux c6:12345:respawn:/sbin/agetty 38400 tty6 linux Obviously, if you installed Qingy from a package that placed the qingy executable in the /sbin directory modify the absolute path to Qingy appropriately. The --screensaver 0 switch at the end of the line turns off the Qingy screensaver. The screensaver is sometimes triggered after a few minutes even if you're actively typing on a non-Qingy console, which can be annoying. Qingy is young yet. Perhaps this quirk will be fixed in a future version. Save the /etc/inittab file. Now execute the following commands: # init Q # killall agetty The first command tells Linux to reexamine the /etc/inittab file. It does not automatically turn off the agetty sessions for any of the virtual consoles, though. That is why you need the second command. This kills every version of agetty that might be running except the one you are currently using. Instead of respawning (restarting) agetty in virtual consoles 1 and 2, Linux will respawn qingy. If your version of Linux uses something other than /sbin/agetty for normal terminal sessions, substitute the name of your version of agetty in the killall command. For example, if your Linux distribution uses getty, issue these commands instead: # init Q # killall getty Press Ctrl-Alt-F1 and now you should see the Qingy login screen. Use the Tab key or your mouse to move from one input field to another. When you select the session field, you can change the session setting by pressing the up and down arrows. Select whichever window manager you prefer or the text console. Once you have typed in your username and password and you've selected your desired session, press Enter. You should see your selected session start up. If you start up a window manager or desktop environment, such as KDE or GNOME, Qingy has to start X11 from scratch. Therefore, you might notice it takes a bit longer to start up than if you were running the KDE or GNOME login manager, which load faster because X11 was already running. If someone else wants to use the computer and you don't want to close your session, press Ctrl-Alt-F2 to get to the second Qingy login screen. Allow the other user to log in and start her separate session. You can switch between sessions by pressing Ctrl-Alt-F1 and Ctrl-Alt-F2. Virtual consoles are still available on Ctrl-Alt-F3 through F6. 3.6.4. When Qingy Doesn't Offer Session ChoicesOne common occurrence is that Qingy doesn't display any window managers or desktop environments in its session field. By default, Qingy looks in the /etc/X11/Sessions directory for a list of files, each representing a window manager or desktop available on your system. The name of the file appears in the Qingy sessions list. These session files contain a single line, a full path to the executable to the window manager or desktop. For example, the file named /etc/X11/Sessions/KDE might contain the line /usr/bin/startkde, and the file /etc/X11/Sessions/WindowMaker should contain a single line such as /usr/bin/wmaker. If you don't see any window managers available from the Qingy login screen, you have one of two problems. Your session files are stored somewhere other than /etc/X11/Sessions or your system simply doesn't work that waythere is no single directory of session files. If your system stores the session files somewhere other than /etc/X11/Sessions, edit the Qingy configuration file /usr/local/etc/qingy/settings so that it points to the directory where your system keeps its session files. Locate the following line: x_sessions = "/etc/X11/Sessions/" and change it to the absolute path to your Sessions directory. If your system doesn't have a Sessions directory, here's an easy way to create one and fill it with session files for each window manager and desktop you have installed. Before you create each session file, check to see if the window manager executable (the file that actually starts up the window manager) exists. If the which command reports back a path to the file you're looking for, create the session file by redirecting the output of the which command to a session file. If the output can't find the executable for a window manager (the following example shows that blackbox is not available), don't create a session file for it. Table 3-1, earlier in this chapter, lists the common window manager executable filenames. You can name the session file anything, so pick a name that is meaningful to you. For example, the WindowMaker executable is /usr/bin/wmaker, but you can use "wmaker" or "WindowMaker" if you like. The following example shows how to use the which command and command redirection to create your session files: # mkdir /etc/X11/Sessions # which wmaker /usr/bin/wmaker # which wmaker > /etc/X11/Sessions/WindowMaker # which twm /usr/X11R6/bin/twm # which twm > /etc/X11/Sessions/TabWM # which blackbox which: no blackbox in (/usr/bin:/usr/local/bin:/etc...) # which fluxbox /usr/bin/fluxbox # which fluxbox > /etc/X11/Sessions/Fluxbox # which startkde /usr/bin/startkde # which startkde > /etc/X11/Sessions/KDE # which gnome-session /usr/bin/gnome-session # which gnome-session > /etc/X11/Sessions/GNOME These sessions should appear automatically on your Qingy login screen as you create each session file. There is no need to restart anything. |
