Flash MX 2004 introduced a new way of creating animation and visual effects. Rather than manually placing symbol instances on the Stage and inserting tweens on the Timeline, you can simply select an item (shape or symbol) on the Stage and choose a static or animated effect from the Timeline Effect menu. The specific functionality of manual tweens and the differences between Shape tweens and Motion tweens are relatively easy to explain. Timeline effects are a bit more of a muddle. They can be used for effects on static graphics or for adding multiframe animation. Some Timeline effects can only be added to symbols, but most can be added to either shapes or symbols. By default, most Timeline effects render as Graphic symbols on the Timeline, but if they're applied to a Movie Clip symbol, they will inherit that behavior. The only definitive thing we can say about Timeline effects is that they offer some very intriguing possibilities for noncoders to add more sophisticated graphics to their projects. With prebuilt JavaScript-Flash code, Timeline effects make it possible to select an item on the Stage and control its appearance and motion by simply making selections in a Settings dialog box. After you preview and apply your chosen settings, Flash automatically converts the selected item to a Graphic symbol and renders a nested symbol on the Stage and frames on the Timeline to hold the finished Effect or animation. Easy so far, right?
The Timeline effects listed in the application menu under Insert ⇨ Timeline Effects (or in the contextual menu if you have an item selected on the Stage) each invoke their own dialog box. You can tweak settings for these effects and preview the final result before you choose to apply it to a shape or a symbol. With just a few selections in the Settings dialog box, you can add animation or effects that would have taken considerable time to create manually.
The magic of Timeline effects is simply that they can save you a lot of time and make it much less painstaking to change the timing or placement of a rendered animation or visual effect. The mayhem of Timeline effects comes in when you look in your project Library. Macromedia has done a great job of organizing this automated process, but you may still be a little confused by all the symbols and folders that show up in the Library panel after you've applied a few Timeline effects.
If you're planning to just apply some effects, publish an .swf file and move on; you needn't worry about understanding the symbol structures and editing "rules" for Timeline effects. However, if you plan to integrate Timeline effects with other animation that you've created, or if you decide you want to edit an item after an effect has been rendered — which of course you will! — we hope this section makes the process a little less mysterious.
You can do great things with Timeline effects. But before you vow never to use a manual Motion tween again, we'd like to give you a few cautionary notes to consider:
Symbols with Timeline effects added to them cannot be opened in Edit mode without breaking the settings option. You can still edit the nested symbols in a Timeline effect, but you have to open them from the Library list rather than from the instances on the Stage. Unfortunately, the changes you make to the source symbol may not always be carried over to all instances in the nested effect symbol until you preview it again in the Settings dialog box.
Practically, you are limited to the options available in the Settings dialog box for each Timeline effect. So for example, if you decide you prefer to have a skewed drop-shadow, you will either have to break the settings option to edit the symbols individually, or you'll have to make your own layered symbol instances.
In order to layer multiple Timeline effects (such as adding a fade Transition to an item with a Drop shadow), you have to manually nest the Timeline effect Graphic symbols inside of other symbols.
Timeline effects are generally rendered as nested Graphic symbol structures. The benefit is that you can see animated effects by scrubbing the Timeline. The drawback is that you will end up with redundant symbols in your Library if you apply a Timeline effect to an existing Graphic symbol. Also, your animation will be tied to the Timeline unless you nest it inside a Movie Clip symbol.
Timeline effects add auto-named symbols and layers to your project file, which can make it harder to keep your naming systems consistent and meaningful.
You can rename generic symbols and folders in your Library and layers in your Timeline that have been generated by a Timeline effect. However, if you edit the settings on any of your Timeline effects, these items will revert to the generic naming sequence.
You must apply (or reapply) Behaviors after you have added Timeline effects. Timeline effects added to an item with an assigned Behavior will nullify the action controlled by the Behavior because it changes the symbol type of the item.
Now, if that wasn't enough to dissuade you from using Timeline effects — and it shouldn't be, unless you are a symbol structure and naming purist — we'll move on to investigate some of the animated Timeline effects that are included with Flash 8.
The Timeline effects that ship with Flash 8 are organized into three categories in the Timeline Effects menu (under Insert in the application menu or in the contextual menu for items selected on the Stage):
Assistants: These Effects give you a more streamlined way to complete authoring tasks that you could otherwise accomplish using the Transform and Align panels with Color effects or filters.
Copy to Grid: This makes it possible to duplicate and distribute multiple copies of an item in rows and/or columns. This effect does not make any change to the appearance of the item, but it gives you the controls you need to create an organized layout of multiples (see Figure 12-18).
Distributed Duplicate: This effect, demonstrated in Figure 12-19, creates a series of copies of an item, distributed along a tangent that can be set by entering the x and y offsets. The copied items can also be shifted in scale, color, and transparency.
Effects: These Effects modify the graphic content of your original item:
Blur: Adds something similar to an animated soften fill edges effect with settings for duration, scale, resolution, and direction. Could also be described as an animated "glow" or "drag" effect.
Drop shadow: Adds a static duplicate "shadow" with settings for color, alpha, and offset. This sounds as if it's an effect that you would use a lot, but the truth is, you will most likely get better-looking drop-shadows if you use the new Drop shadow filter or make them manually.
Expand: This is hard to describe, but the best analogy we can give in print is filling a balloon with water. You can specify the direction and amount for an item to stretch and/or squash over a given span of frames. If you want to make an item look as if it is breathing, this is the effect to use.
Explode: If you've been waiting to blow up some logos in Flash, now's your chance! You can specify the size and direction of the pieces and even how far and how fast they fly.
Transform/Transition: These Effects are used to add animated changes to the display or position of your original item over a specified range of frames. The most subtle and flexible group of Effects, these are the two that you'll use most often to save production time.
Transform: Change position, scale, rotation, color, and/or alpha.
Transition: Wipe and/or Fade an item in or out.
The static Timeline effects include those listed in the Assistants category, plus the Drop shadow effect. The new Drop shadow filter produces better visual results and is easier to edit than the Drop Shadow Timeline effect, so for all practical purposes, this Timeline effect is deprecated.
The Timeline effects in the Assistants category are still useful and easy to apply:
Select an item on the Stage — it can be a shape, Drawing Object, or symbol. As with tweens, it is best to apply Timeline effects to items that exist on their own layer.
Use the Insert menu (or the contextual menu) to access Timeline effects. Choose a category and select the effect you want to apply.
The specific result of frames and symbols rendered by different Timeline effects will vary, but the steps for adding a Timeline effect are consistent.
To add an animated Timeline effect to a shape or symbol, follow these steps:
Select an item on the Stage — it can be a shape or a symbol. In our example, we used an imported bitmap. As with Shape or Motion tweens, it is best to apply effects to items that exist on their own layer.
| Caution |
Although you can select an item in the first keyframe of an existing Motion or Shape tween and apply a Timeline effect to it, in most cases the tween will be broken when the Timeline effect is rendered because the item will be moved to a new layer. As we discuss later in this section, it is best to render the Timeline effect on a separate timeline if you want to combine animation methods. |
Use the Insert menu (or the contextual menu) to access Timeline effects. Choose a category and select the effect you want to apply. For this example, we'll apply the Transition effect (as shown in Figure 12-20).
In the Settings dialog box, a preview of the animation will be rendered with the default settings. Modify the settings and use the Update Preview button to test the result until you achieve an effect that you like. (Our Transition example is shown in Figure 12-21.)
Click OK to close the Settings dialog box and render the effect.
If you have applied a complex Timeline effect, it may take a few seconds for Flash to render the symbols and insert the frames on your Timeline to hold the effect.
| Note |
If there is no other artwork on the layer with the item to which you added a Timeline effect, Flash simply renames the layer when the effect is applied. If there are other symbols or artwork on the layer with the item to which you added the Timeline effect, Flash moves the item to a new layer when the effect is applied. This can lead to duplicate layer names that should be manually changed to keep the structure of your document clear. |
After the effect is finished, you will see a layer in your Timeline auto-named to indicate the effect that was rendered and the sequence that it was rendered in during your project authoring process. In our example, the layer is named Transition 1 (see Figure 12-22).
| Tip |
If you have created an animation that starts with an alpha setting of 0, you won't see anything on the Stage in the first frame of the new animated frame span. However, if you click the frame, you will see the blue selection box on the Stage to indicate the position of your "invisible" artwork. |
A frame span will extend on the Main Timeline for the duration of the animation if you applied an animated effect to a shape, bitmap, Graphic symbol, or Button symbol. You can preview the animation by scrubbing the Timeline in the authoring environment.
| Note |
If you apply an animated Timeline effect to a Movie Clip symbol, the animation span is rendered on a Movie Clip timeline, so you will not see frames added to the Main Timeline and you will have to preview the animation in Test Movie mode. |
As shown in Figure 12-22, you will also find new symbols that Flash rendered to create the Timeline effect added to your Library list. These symbols are given default names that will indicate the type of effect applied and the sequence that it was created in during an edit session.


| Caution |
This is the only time in this book that we will advise you not to change the default symbol and layer names right away. If you decide to edit the settings for your animated effect, the symbols and layers rendered by Flash will be renamed anyway. The best approach is to rename these items only as a final step in your editing process. |
And there you have it — a lovely fade transition that can be adjusted without touching the Timeline or moving any keyframes. If you want to change the pacing or the look of the Timeline effect, use the Edit Effect option in the Timeline effects menu to open the Settings dialog box again. If you decide that the effect is not really what you wanted, use the Remove Effect option in the Timeline effects menu to get rid of it without deleting your original item.
| Cross-Reference |
Samuel Wan's tutorial, "Using Custom Timeline Effects," explains how to install and use a custom Timeline effect. The script files for Sam's "Jitter" effect are included in the TFX_custom folder in the ch12 folder of the CD-ROM. |
If you are accustomed to working with tweened animation or compound symbol structures that you have made manually, there are a few differences that will come up when you start working with Timeline effects. Although the symbols added to your Library when you apply a Timeline effect have the same icon as any other Graphic symbol, there are some special rules about how they can (or cannot) be modified.
Flash renders an effect based on the settings you enter in the Timeline Effect dialog box, so once the Graphic symbols for the effect have been rendered, you cannot edit the top-level Graphic symbol directly. Although you can't open the top-level Graphic symbol (with the final rendered effect) in Edit mode without disabling the Edit Effect option, you can edit the nested Graphic symbols that are stored in the Effect folder. In most cases, the changes you make to the nested Graphic symbol are passed on to all instances used in the final rendered effect. However, in cases where the effect required incremental mathematical adjustments (such as on a Color Change), you have to use the Edit Effect command to open the Settings dialog box so that the effect can be re-rendered in the Preview window (it will automatically update to include any changes you made to the nested symbols in the Library). You can make additional changes to the effect using the options in the Settings dialog box, or you can simply click OK to close it and go back to the Stage — where you should now see the changes passed on to all of the instances of the effect.
You can also use the instance-editing options available in the Property inspector and the Transform panel to adjust the appearance of a rendered (or top-level) Timeline effect symbol without disabling the Edit Effect option. With the Free Transform tool added to the mix, you should be able to squish, stretch, rotate, tint, and otherwise adjust rendered Timeline effect symbols to suit your fancy. If you are working with a Timeline effect nested in a Movie Clip, you can also use the new Flash 8 filters to increase your creative options.
Using Custom Timeline Effects, by Samuel Wan
Authors' Note: Although it is beyond the scope of this book to describe the steps involved in actually scripting your own Timeline effects, we can tell you how to use custom effects that other developers have made. One of the developers making cool effects is Samuel Wan. He has kindly agreed to let us include the code for one of his very first Flash Timeline effects on the CD-ROM. This brief tutorial is adapted from Sam's notes on how to install and use his "Jitter" effect. We hope you will be able to follow these same steps to use other custom effects available from Macromedia or from generous developers in the Flash community.
The first step to using a custom Timeline Effect is to find the files that Flash needs to make the Effect Settings appear in the authoring environment and to render the final Effect. Unless you happen to know some brainy coders, the best place to look for new Timeline Effects is on the Macromedia Web site.
The two files you will need to install any custom effect are
An XML file that describes the parameters or "properties" of the effect and how the parameters can be customized. These files can be recognized by the .xml file extension.
A JavaScript-Flash file that implements the required methods for manipulating the Flash-authoring tool based on parameters specified by the XML file. These files can be recognized by the .jsfl file extension.
| On the CD-ROM |
We have included Jitter.xml and Jitter.jsfl on the CD-ROM in the TFX_custom subfolder of the ch12 folder. To see the rendered effect, open JitterSample.fla (or .swf) from the same location. |
Both of these files have to be saved in your Flash 8 Effects folder so that a custom effect can be applied in the authoring environment:
The standard directory path on Windows is:
C:\Documents and Settings\(username)\Local Settings\Application
Data\Macromedia\Flash 8\(language)\Configuration\Effects
The standard directory path on Mac is:
HD\Users: (username)\Library: Application Support\Macromedia\Flash
8\(language)\Configuration\Effects
After you save the XML file and the JSFL file to the Effects folder on your system, you will need to restart Flash to see the custom effect in the Timeline Effect menu.
The steps for applying a custom Timeline effect are the same as the steps for applying a built-in Timeline effect, but the settings available for the effect will be unique. To apply the Jitter effect, follow these steps:
Select an item on the Stage (a shape or a symbol).
Access the Timeline Effect menu from the Insert menu or from the contextual menu. As shown in Figure 12-23, a new category of effects has been added — Sam's Super Duper Effects are now listed along with the other categories that were described earlier in this chapter. Select Sam's Jitter effect.
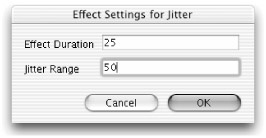
A Settings dialog box appears on Stage so that you can enter values to control the rendered Jitter effect (refer to Figure 12-24).
| Note |
As shown in Figure 12-24, the Settings dialog box for the Jitter effect looks quite different than the Settings dialog box used to apply the Transition Timeline effect we showed you earlier in this chapter (see Figure 12-21). This is one of the quirks of custom Timeline effects. Some developers will include an .swf control for the settings that generates a dynamic preview of the effect, while others will only build the .jsfl and .xml files, which results in a more generic-looking Settings dialog box — similar to the dialog box for drawing tool settings. The purpose and effect of the settings are the same in either interface. The main difference is that you can't preview the effect before you apply it unless you're using an .swf settings dialog box. Fortunately, it is easy to remove an effect at any time, so the generic settings box is not a huge problem — most custom effects will be worth the extra trouble of testing and removing a few different settings before you decide what works best. |
After you enter values for the frame duration of the effect and the pixel offset, or the amount of jitter, click OK.
The animation will be rendered on the Timeline in a layer called "Jitter 1." If you look in the project Library, you will see that the original selected shape has been converted to a Graphic symbol ("Symbol 1") and nested in an animated Graphic symbol ("Jitter 1"), both now stored in the Library (refer to Figure 12-25).


| On the CD-ROM |
To see the final animated Jitter Effect, have a look at the JitterSample.swf file in the TFX_custom subfolder of the ch12 folder on the CD-ROM. |
That seems like a lot of steps, but it certainly takes less time to install a custom effect than it does to make one from scratch! We hope there will be many more useful and creative effects available that will open new possibilities for your Flash designs. You can continue to save other custom effects files to your Effects folder and they will be added to the Timeline Effects menu.
| Caution |
Obviously, it would be a big mistake to save a custom effect file to your Effects folder if it had the same name as an existing effect. Unless you want to overwrite existing Timeline effects, make sure you're using unique names for any custom effects that you add. If you'd rather not change the name of an effect, simply add a unique number to the effect name to avoid overwriting other files with the same name. |
If you decide you don't need an effect anymore, or if your Timeline Effect menu gets too cluttered, simply remove the relevant .xml and .jsfl files from the Effects folder (save them somewhere else if you liked the effect; trash them if you didn't). The next time you restart Flash, the effect will no longer show up in the menu.
| Web Resource |
We'd like to know what you think about this chapter. Visit www.flashsupport.com/feedback to fill out an online form with your comments. |

