7.11 Tabular Data
So far, you've learned about using tables for complex Web page designs, using tricks
like merging cells, invisible spacer images, and Dreamweaver's Layout mode. But what
about the original purpose of a tabledisplaying data in an orderly manner? You
can still do that, of course, and Dreamweaver provides a couple of tools to make the
process of dealing with tabular data run smoothly.
 |
You can directly import and Excel files into Dreamweaver for Windows, which converts the data into a
well-organized table. See Section 2.2.4.
|
|
7.11.1 Importing Data into a Table
Your boss emails you your company's yearly sales information, which includes data
on sales, profits, and expenses organized by quarter. She asks you to get this up on
the Web for a board meeting she's having in half an hour.
This assignment could require a fair amount of work: building a table and then
copying and pasting the correct information into each cell of the table, one at a time.
Dreamweaver makes your task much easier, because you can create a table and import
data into the table's rows and columns, all in one pass.
In order for this to work, the table data you want to display must begin life in a delimited
formata task that most spreadsheet programs, including Excel, or database
programs, such as Access or FileMaker Pro, can do easily. (Choosing File Export or
FileSave As in these programs usually does it.) Export or
FileSave As in these programs usually does it.)
In a delimited file, each line of text represents one table row. Each line is divided into
smaller units using a special character called a delimitermost often a tab, but possibly
also a comma or colon. Each unit represents a single cell in the row. In a colon-
delimited file, for example, the line Sales:$1,000,000:$2,000,000:$567,000:$12,500
would be converted by Dreamweaver into a row of five cells, with the first cell containing
the word Sales.
Once you've saved your boss's spreadsheet as a delimited file, you're ready to import
it into a Dreamweaver table:
Choose FileImportTabular Data.
The Import Table Data dialog box appears (see 7-26). Click Browse. In the Insert Tabular Data dialog box, find and open the delimited
text file you wish to import.
A delimited file is no longer a spreadsheet, but a plain text file. Navigate to and
double-click the file in the dialog box. From the pop-up menu, select the delimiter that was used to separate the data in
the text file.
The choices are Tab, Comma, Colon, Semicolon, or Other. If you select Other,
an additional field appears, in which you can type the character you used as the delimiter.
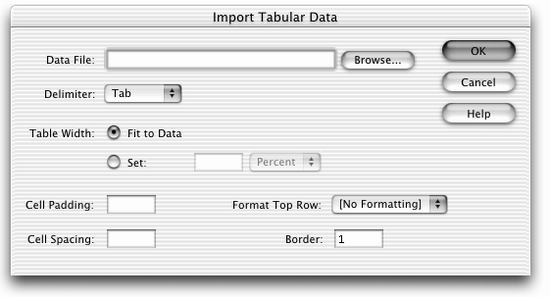
Select a table width.
Choose Fit to Data if you want the table to fit itself to the information you're
importingan excellent idea when you aren't completely sure how much information
the file contains. (You can always modify the table, if necessary, after
importing the data.) On the other hand, if your Web page needs a table of a certain size, you can specify
it by selecting the Set button and typing a value in the field next to it. Select pixel
or percentage value (see Section 7.3). Set Cell Padding, Cell Spacing, and Table Border, if you like.
See Section 7.3 for details. Select a formatting option for the top row of data.
If the first line in the text file has column headingsQuarter 1 Sales, Quarter 2
Sales, and so on, for exampleDreamweaver lets you choose Bold, Italic, or Bold
Italic to set this header row apart from the rest of the table. (No Formatting keeps
the top row consistent with the rest of the table.) Click OK to import the data and create the table.
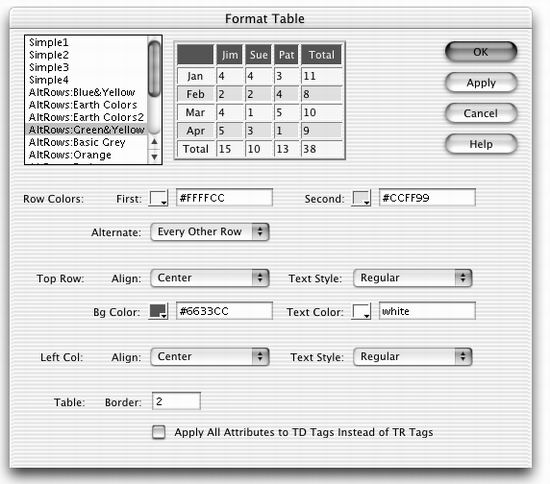
If you'd like to jazz up your table a bit, but are short on time, you can apply one of
Dreamweaver's preinstalled table designs (see Figure 7-27).
7.11.2 Sorting Data in a Table
If you have a table that lists employee names, you probably want to present that list in
alphabetical orderor alphabetically and by department. Dreamweaver's Sort Table
command takes a lot of the drudgery out of this task.
Select the table you wish to sort.
See Section 7.4.1 for some table-selection techniques. Choose CommandsSort Table.
The Sort Table dialog box appears (Figure 7-28). Using the Sort By pop-up menu, choose the column you wish to sort by.
You can choose any column in the table. For example, suppose you have a table
listing a bunch of products. Each row has the product name, number, and price. If you want to see the products listed from least to most expensive, you could sort by the column with the product prices. Use the next two pop-up menus to specify how you want the data sorted.
Data can be sorted alphabetically or numerically. To order the product list by price,
choose Numerically from the Order pop-up menu. However, if you're sorting a
Name column, choose Alphabetically. Use the second pop-up menu to specify that you want an Ascending sort (A - Z,
1-100) or Descending (Z - A, 100 - 1).
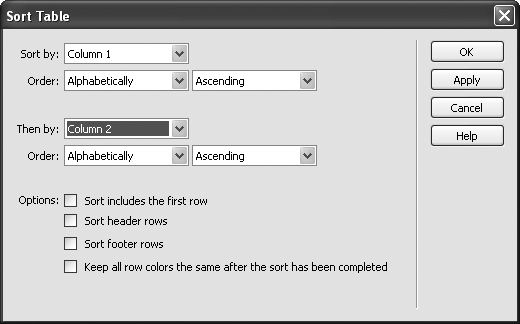
If you like, choose an additional column to sort by, using the Then By pop-up
menu.
This secondary sort can come in handy when several cells in the first sorting column
have the same value. For example, if several items in your product list are all
priced at $100, a sort by price would place them consecutively in the table; you
could then specify a secondary sort that would place the products in alphabetical
order within each price group. In this way, all of the products would be listed
from least to most expensive, and products that are the same price would be listed
alphabetically within their group. If the first row of the table contains data to be sorted, turn on Sort Includes First
Row.
If, however, the first row of the table contains headings for each column, don't
turn on this box. Choose whether to sort header rows and footer rows as well.
The <thead> (table header) and <tfoot> (table footer) tags are intended to allow
you to turn one or more rows into repeating headers and footers for long tables. Since Dreamweaver doesn't insert these tags for you, you'll most likely never use these options. Choose whether to keep row colors with the sorted row.
One way to visually organize a table is to add color to alternate rows. This everyother-
row pattern helps readers to stay focused on one row of information at a
time. However, if you sort a table that you had formatted in this way, you'd wind
up with some crazy pattern of colored and uncolored rows. The bottom line: If you've applied colors to your rows, and you'd like to keep those
colors in the same order, leave this checkbox off. Click Apply to see the effect of the sort without closing the dialog box.
If the table meets with your satisfaction, click OK to sort the table and return to
the document window. (Clicking Cancel, however, does not undo the sort. If you
want to return the table to its previous sort order, choose EditUndo Sort Table
after closing the sort window.)
7.11.3 Exporting Table Data
Getting data out of a table in Dreamweaver is simple. Just select the table and choose
FileExportExport Table. In the Export Table dialog that appears, select the type
of delimiter (tab, comma, space, colon, or semicolon) and operating system where
the file will be used (Mac, Windows, or Unix), and then click OK. Give the file a
name and save it on your computer. You can then import this delimited file into your
spreadsheet or database program.
|