Download source
Windows Application
Since I can't possibly cover Windows programming to any depth within the confines of this book, I will now switch to a bird's-eye view of how one might approach the task of writing a Windows application. As before, I will concentrate on the two main challenges of Windows programming: how the program should work and look like, and how to encapsulate and categorize various APIs. The mere number of Windows APIs is so overwhelming that some kind of classification (with C++ classes and namespaces) is a must.
After reading this chapter, I strongly suggest browsing the source code and studying the details of the implementation.
Porting the Calculator to Windows
Taking a command-line application, like our symbolic calculator, and making a minimal port to Windows could be quite easy. We have to find a way, other than std::cin, to get user input; and to display the results in a window. Error display could be dealt with using message boxes. A single dialog box with two edit fields--one for input and one for output--would suffice.
But this kind of port is not only primitive--it doesn't even cover the whole functionality of our original application. In the command-line calculator, the user was at least able to see some of his or her previous inputs--the history of the interaction. Also, in Windows, commands like load, save or quit are usually disengaged from text-based input and are available through menus, buttons, toolbars or accellerator keys. Finally, there are certain possibilities specific to Windows that can enhance the functionality of our program and are expected by the user. An obvious example would be the display the contents of the calculator's memory.
Some of these features don't require substantial changes to the calculator engine. Disengaging commands from text input will actually make the parsing simpler--the Scanner will have to recognize fewer tokens and the CommandParser object will become unnecessary. Other features, such as the display of memory, will require deeper changes inside the Calculator object (which, by the way, will play the role of a Model).
User Interface
Whether it's porting or designing an application from scratch, the first step is to envision the user interface.
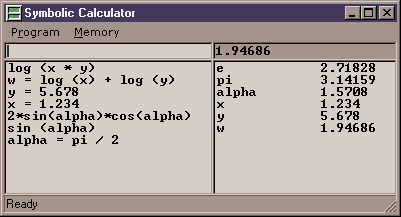
In our case, we obviously need an input field, where the user will type the expressions to be evaluated. We also need an output field, where the results of the calculations will appear. We'd also like to have one window for the history of user input, and another to display the contents of memory.
The design of the menu is a non-trivial problem. We know, more or less, what we will have there: Load, Save as well as the traditional About and Exit. We can also add one more command--Clear memory. The problem is how to organize these commands.
The traditional approach, which often leads to barely usable menu systems, is to follow the historical pattern. Menu commands are grouped under File, Edit, View, Tools, Window, Help, etc. Notice that some of these words are nouns, others verbs. Tradition also dictates arbitrarily that, for instance, Exit goes under File, About under Help, Search under Edit, Options under Tools, etc...
The more modern approach is to group commands under noun headings that describe objects upon which these command act. The headings are, as far as possible, ordered from general to specific. The first, most general menu item is Program. This is where you should put the commands About and Exit. The About command displays information about the Program, not the Help. Similarly, you Exit a Program, not a File.
The Program item is usually followed by such groups as Project, Document (or File); then View or Window, Edit and Search; then the elements of the particular display, such as All, Selection; and finally, Help. Even if the user is used to traditional groupings, he or she is likely to find this new arrangement more logical and easier to use.
In our calculator, we'll have the Program menu followed by the Memory menu. The operations one can apply to Memory are Clear, Save and Load. A more complete version would also have the Help menu.
Finally, it's nice to have a status bar at the bottom of the window to show the readiness of the calculator to accept user input, as well as little command help snippets when the user selects menu items.
Instead of showing you varius sketches, I'll present the final result--the actual screenshot of the calculator's user interface.
Child Windows
The calculator's main window is tiled with various sub-windows, or child windows. Some of these children--like the title bar, the menu bar, minimize/maximize buttons, etc.--are created and managed by Windows. Others are a programmer's responsibility.
A child window is owned by its parent window. Since there is often some confusion between the meaning of a "child" window vs. an "owned" window, here's a short summary.
- Child window: lives in the coordinate system of its parent and its clipped to its boundaries. A child cannot have a menu, but it can have an integer id (that's why the menu member of the CREATESTRUCT doubles as a child id). To create a child window, specify WS_CHILD as window style and initialize the hwndParent member of CREATESTRUCT to its parent's window handle.
- Owned window: always appears in front (on top) of its owner, is hidden when the owner is minimized, and is destroyed when the owner is destroyed. The handle to the owner window is passed in the hwndParent member of CREATESTRUCT. An owned window doesn't have to be a child window--when it's not, it doesn't use the owner's coordinate system and is not clipped to its boundaries.
You will probably want all windows in your applications to be owned by the top-level window. If, furthermore, you'd like them to be constrained to the client area of the top-level (or some other) window, you'll create them as children of their owners. (Examples of owned, but non-child, windows are dialog boxes and message boxes, about which I'll talk later.)
I introduced a separate class, Win::ChildMaker, derived from Win::Maker, to encapsulate the creation of child windows. You can have a child window based on any window class, as long as you know the class' name. For our purposes, however, we'll be creating windows based on classes that are pre-defined (and pre-registered) by Windows.
There are several useful window classes corresponding to standard controls. Instead of writing and testing new window procedures, we can get a lot of standard functionality by re-using these controls. That's why I created a subclass of Win::ChildMaker called Win::ControlMaker that can be used as base for the specialized contol makers, such as Win::EditMaker, Win::ListBoxMaker and Win::StatusBarMaker.
Before going into any more detail about controls, let's talk some more about the management of child windows. I made them part of the View object, whose constuctor uses various control makers to create them. There are two edit controls, one of them read-only. There are two listboxes that are particularly suited for displaying lists. Finally, there is a status bar control.
The first thing our program has to take care of is the proper positioning of these child windows. This is usually done in response to the WM_SIZE message sent to the top-level window. The first such message arrives just before the child windows are displayed, so that's a great time to size and position them for the first time. Then, every time the user resizes the top-level window, the WM_SIZE message is sent again. The parameters of WM_SIZE are the width and the height of the client area. All we have to do is to partition that rectangle among all the children. After doing some simple arithmetic, we tell the children to move to their new positions.
Next, we have to take care of the focus. Whenever the calculator is active, we would like the keyboard input to go directly to the input edit control. Since this doesn't happen automatically, we have to explicitly pass keyboard focus to this child window whenever the calculator gets focus. Fortunately, the top-level window is notified every time this happens. The WM_SETFOCUS message is sent to it whenever the window becomes active, including the time of its creation.
Windows Controls
A Windows control is a window whose class and procedure--the major elements of behavior--are implemented by the system. Controls vary from extremely simple, like static text, to very complex, like ListView or TreeView. They are ubiquitous in dialog boxes (about which we'll talk soon), but they can also be created as stand-alone child windows. The application communicates with a control by sending it messages. Conversely, a control communicates with its parent by sending messages to it. In addition to common messages, each type of control has its own distinct set of messages it understands.
I defined a class Win::SimpleCtrl that combines the attributes common to all controls. Since a control is a window, Win::SimpleCtrl inherits from Win::Dow. Like all child windows, controls can be assigned numerical ids, so that their parent can distinguish between them (although it may also tell them apart by their window handles). If a control is created standalone, using an appropriate maker, we can initialize the corresponding SimpleCtrl object directly with its window handle. Otherwise, we initialize it with the parent's window handle and the child id (this pair is immediately translated to the window handle using the GetDlgItem API).
The simplest control is called static text. It displays text in a simple frame. The corresponding object, Win::StaticText, is the simplest descendant of Win::SimpleCtrl. The program can modify the text displayed in it by calling the SetText method that Win::StaticText inherits from Win::Dow.
A little more interesting is the edit control. Its read-only version behaves just like static text, except that you can copy text from it into the clipboard (by selecting it and pressing Ctrl-C). The full-blown edit control can be used not only to display text, but also to read user input. It also supports several editing functions, like delete, copy, cut, paste, etc. In fact, a multi-line edit control is the engine behind the Windows own Notepad.
The most important thing that an application may want to get from an edit control is the text that's been input there by the user. The class Win::Edit, another descendant of Win::SimpleCtrl, provides two different ways of doing that. The low-level method GetText takes a buffer and a count (you can use GetLen method to enquire about the length first). The high-level method GetText takes no arguments and returns a std::string.
Controls keep sending messages to their parent windows. The interesting ones are WM_COMMAND and, for the newer generation of controls, WM_NOTIFY. It so happens that, for some historical reason, WM_COMMAND is not only used by controls, but also by menus and accellerators. Our generic window procedure sorts them out and calls, respectively, OnControl or OnCommand. OnControl is passed the control's window handle, its numerical id and the id of the command. For instance, every time the user changes the text in an edit control, a command message is set to the parent, with the command id EN_CHANGE (applications usually ignore this message).
The main question with edit controls is when it's a good time to retrieve their text. The user must have some way of telling the program that the input is ready--in our case, that the whole expression has been entered. We could have added a special button "Evaluate" for the user to click on. But that's not what the user expects. He or she will most likely press the Enter key on the keyboard and expect the program to take it as a cue that the input is ready. Surprisingly, this very basic feature is not easy to implement. There is no simple way to tell the edit control to notify the parent when the Enter key is pressed.
So what are we to do? We'll have to use the back-door approach called window subclassing. We have to write our own window procedure and plug it into the edit control. Fortunately, our window procedure doesn't have to implement all the editing functionality from scratch. All it has to do is to intercept the few messages we're interested in and pass the rest to the original, Windows-defined procedure.
I have conveniently encapsulated window subclassing in two Win::Dow methods, SubClass and UnSubClass. The SubClass method takes a pointer to the SubController object. It substitutes a generic SubProcedure in place of the old window procedure. For every message, the SubProcedure first calls the SubController to process it. If the SubController doesn't process it (i.e., returns false), it calls the old window procedure. Notice how the procedures are chained together. Each of them either processes a message or calls the next, until the last one calls the default window procedure.
The subclassing of the edit control proceeds as follows. We define a subclass of Win::SubController, and call it EditController. It overrides only one method, OnKeyDown, and processes it only if the key code corresponds to the Enter key (VK_RETURN). On intercepting the Enter key, it sends a message to the parent window. I decided to use a standard control message, WM_CONTROL, which could be processed by the OnControl method of the parent window. I had to pack the wParam and lParam arguments to mimic the control messages sent by Windows. As the control id I chose the pre-defined constant IDOK (thus immitating the pressing of the OK button in dialog boxes).
To perform the subclassing, we call the SubClass method of the edit window, passing it the EditController. We have to override the OnControl method of our main controller to intercept the IDOK message and react appropriately. In fact that's where all the code from our old main went. We retrieve the string from the edit control, encapsulate it in a stream, create the scanner and the parser and evaluate the result. At this point we display the result and update the history and memory displays (in case the calculation changed memory).
Displaying history is very simple. We just tell the ListBox to add a line to its window containing the string that was input by the user. ListBox will than take care of storing the string, displaying it, as well as scrolling and re-painting when necessary. We don't have to do anyting else. That's the power of Window controls.
Displaying memory, on the other hand, is not so simple. That's because, in that case, the display has to reflect the state of a data structure that constantly changes. New variables are added and the values of old variables are modified as a result of user actions. Only the parser has any understanding of these actions. It decides whether an expression entered in the input window modifies the calculator's memory or not. Thus the display has to change in response to a change in the model.
There are two approaches in dealing with the model-view feedback loop. The shotgun approach assumes that every user action that may change the state of the model requires the refreshing of the particular part of the view. In this scheme, display changes are controller-driven. The controller tells the view to refresh itself, and the view queries the model for the changes to be displayed. The model has no dependency on the view, as it shouldn't.
The notification approach, on the other hand, assumes that the model will notify the view directly. A notification might simply tell the view to refresh itself, or it might provide the exact information about what and how should be changed. The problem with this scheme is that it introduces a circular dependency. The view depends on the model, because it has to know how to query for data to be displayed. The model depends on the view, because it has to know how to notify it about changes. Now, if you look back at our definition of the model, you'll find that it was supposed to be unaware of the details of the user interface. It seems like we'll have to abandon this nice subdivision of responsibilities and break the simple hierarchy of dependencies in favor of a more entangled (and complex) system.
Don't despair yet! I'll show you how you can have a cake of hierarchies and eat it too with notifications. The trick is to give the model only a very minimal glimpse of the view. All the model needs is a "notification sink," and object that expresses interest in being notified about certain events. The model will have no clue about how these notifications are used. Furthermore, it will have no knowledge of the existence of the class View.
A notification sink should be a separate class that will encapsulate only the notification interface. The model will have to know about this class, have access to an object of this class and call its methods. The view could simply inherit from the notification sink and implement its virtual methods. When the model sends a notification to its notification sink object, it really sends it to the view. But it still lives in a state of ignorance about the details of the UI.
The absence of the dependency loop in this scheme is best illustrated by the hierarchy of includes. The header file that defines the notification sink is at the top of the hierarchy. It has to be included in view.h, because class View inherits from class NotificationSink. Some of the files that constitute the implementation of the model (the Calculator object) will also have to include it, because they call methods of NotificationSink. View.cpp will have to include calc.h, because it needs data from the model. The important thing is that no model file will have to include view.h. The graph of dependencies is a DAG--a directed acyclic graph--the sign of a good design.
Now that you have an idea how to implement the optimal solution, you might be pleased to learn that in the implementation of our calculator I voted for the simpler, shotgun approach. The controller calls View::RefreshMemory every time a new expression is processed by the parser. As you might recall, this is done in response to the IDOK command sent by the edit control after detecting the enter key.
In order not to be really crude (and not to cause too much screen flicker), I chose to update the memory display line-by-line, and modify only these entries which have changed since the last refresh. So in our port to Windows, the changes to the calculator not only require a new interface for memory listing, but also some mechanism to mark (and unmark) individual memory entries. This snippet of code shows how it works:
void View::UpdateMemory ()
{
    int count = _memoryView.GetCount ();
    for (int i = 0; i < count; ++i)
    {
        int id = _memoryView.GetData (i);
        if (_calc.HasValueChanged (id))
        {
            _calc.ResetChange (id);
            std::string varStr = FormatMemoryString (id);
            _memoryView.ReplaceString (i, varStr);
            _memoryView.SetData (i, id);
        }
    }
    int iNew;
    while ((iNew = _calc.FindNewVariable ()) != idNotFound)
    {
        _calc.ResetChange (iNew);
        std::string varStr = FormatMemoryString (iNew);
        int i = _memoryView.AddString (varStr);
        _memoryView.SetData (i, iNew);
    }
}
|
The member _memoryView represent the ListBox control that displays the contents of the calculator's memory.
Dialogs
The other, and indeed more common, application of Window controls is in the construction of dialog boxes. A dialog box is a pre-fabricated window that provides a frame for various controls specified by the programmer. The type of controls and their positions are usually described in the resource script (the same where we described the icon). Here's an example of such a description:
IDD_ABOUT DIALOG DISCARDABLE 0, 0, 142, 70
STYLE DS_MODALFRAME | WS_POPUP | WS_CAPTION
CAPTION "About Symbolic Calculator"
FONT 8, "MS Sans Serif"
BEGIN
DEFPUSHBUTTON "OK",IDOK,46,49,50,14
CTEXT "Bartosz Milewski � 2000",IDC_STATIC,10,33,121,14
ICON IDI_MAIN,IDC_STATIC,60,7,20,20
END
|
You don't really have to learn the language of resource scripts, because their creation is normally handled by the resource editor. The above script corresponds to the following dialog box:
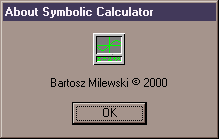
The "About" dialog of the Symbolic Calculator.
This dialog contains three controls, a default push button, a static text and a static icon. The button's id is IDOK, the two static controls have both the same id, IDC_STATIC. These particular ids are predefined, but in general you are free to assign your own ids to controls, as long as you define symbols for them in the resource header (resource.h, in our case).
The Load and Save dialogs (displayed after selecting Load or Save from the Memory menu) are a little more involved. They both have an OK button and a CANCEL button. The Save dialog, moreover, contains an edit control and the Load dialog has a ListBox. These are the same controls we used in the main window, but here it's up to the dialog box to create and position them according to the script. Not only that, the dialog makes sure that when the user presses the enter key, the result is the same as if he clicked on the OK button. There is no need for us to subclass the edit control in a dialog. You can also understand now why I chose the constant IDOK as the command identifier for the subclassed edit control in the main window.
Dialog box takes care of one more thing, the focus. In our main window, we had a very simple rule--the focus always went to the input edit control. It's not so simple when you can have more than one potentially active control. Suppose that you, as the user, have activated one of the controls (i.e., one of several edit boxes in the same dialog, for instance by typing something into it). You may want to temporarily switch focus to a different application, and then go back to finish the typing. You'd expect the focus to return to the same edit control you activated before. The dialog is supposed to remember which control had been active before losing focus, and give the focus back to it upon being reactivated. A dialog takes care of it, transparently. In contrast, if you arrange a few controls in an arbitrary (non-dialog) window, you'd have to add special logic to its controller, to take care of correct focus restoration.
There's more! A dialog provides means of navigation between various controls using the keyboard. You can move focus from one group to another by pressing the tab key, and you can move within one group (e.g., of radio buttons) by pressing the arrow keys.
So why, you might ask, didn't I make the top-level window of the calculator a dialog? It would have solved several problems all at once. Indeed, there are some applications that use a dialog as their main window--the Windows calculator comes to mind. But I wanted to write a more mainline Windows program, with a menu, a status bar and a resizable main window. Taking all this into account, it was simpler to just put together a few controls and stick them into a resizable parent window.
A dialog provides a generic way of handling all the controls it owns. But if you want the dialog to do something useful, you have to intercept some of the communications between the controls and the dialog. The least you can do is to end the dialog when the user presses the OK (or CANCEL) button. If there is some data the user inputs through the dialog, you might want to retrive it from one (or more) of its controls and pass it on to the caller. You might also want to mediate between some of the controls. All this is possible through the use of a dialog procedure.
A dialog procedure is a simplified version of a window procedure. All messages that the dialog receives from its controls are first filtered by this user-defined procedure. The main difference between a dialog procedure and a window procedure is that a dialog procedure doesn't call DefWindowProc, but instead returns FALSE when it doesn't care about a particular message. If, on the other hand, it does process a message, it is supposed to return TRUE. Notice that these are Windows-defined Boolean values, not the C++ true and false.
That's the theory behind dialogs--now we have to come up with a way to encapsulate them into something easier to use and less error-prone. A dialog is like a function that uses UI to get its data. You "call" a dialog with some initial data (the arguments) and it returns a result, presumbly obtained from the user. We can always encapsulate the in- and out- data into some user-defined data structure. But we also have to define the active part, some kind of a controller that could be plugged into the generic dialog procedure. We can even combine the in/out data with this controller, so that it can operate on them in response to control messages.
Here's the simplest example of how one may use this abstraction in order to display the About dialog.
AboutCtrl ctrl; Dialog::Modal dialog (_win, IDD_ABOUT, ctrl); |
The dialog object takes three arguments, the owner window (here, it's the top-level window), the dialog id (to identify the script in the resources), and the controller object. The controller is derived from the library class, Dialog::ModalController. In this absolutely minimal implementation, it only overrides the OnCommand method to intercept the OK button press.
bool AboutCtrl::OnCommand (int ctrlId, int notifyCode) throw (Win::Exception)
{
    if (ctrlId == IDOK)
    {
        EndOk ();
        return true;
    }
    return false;
}
|
The Save dialog has some more functionality. It contains a string, _path, that will store the path to be returned by the dialog. It has a Win::Edit object which it uses to communicate with the edit control present in the dialog box. The OK handler retrieves the string from the edit control and copies it into _path. The CANCEL handler just terminates the dialog by calling the method Dialog::ModalController::EndCancel.
bool SaveCtrl::OnCommand (int ctrlId, int notifyCode) throw (Win::Exception)
{
    if (ctrlId == IDOK)
    {
        SetPath (_edit.GetText ());
        EndOk ();
        return true;
    }
    else if (ctrlId == IDCANCEL)
    {
        EndCancel ();
        return true;
    }
    return false;
}
|
SaveCtrl ctrl;
Dialog::Modal dialog (_win, IDD_SAVE, ctrl);
if (dialog.IsOk ())
{
    std::string const & path = ctrl.GetPath ();
    Serializer out (path);
    _calc.Serialize (out);
}
|
The controller must also initialize the _edit object by providing it with the dialog window (which is the parent to this edit control) and a control id. This is done inside the OnInit method.
void SaveCtrl::OnInitDialog () throw (Win::Exception)
{
    _edit.Init (GetWindow (), IDC_EDIT);
}
|
Notice that we are using the same Win::Edit class that we used in the top-level window to encapsulate its edit control. The only difference is that here we don't use a maker to create the edit control. The dialog creates the control, and we can retrieve its window handle by calling GetDlgItem inside Win::Edit::Init.
The Load dialog is even more advanced. It has a ListBox control which is used to display the list of files in the current directory. It also has a static text control which is used by the ListBox to display the path to current directory. The ListDirectory method of the Win::ListBox takes care of the listing of the directory and the initialization of the static text.
void LoadCtrl::OnInitDialog () throw (Win::Exception)
{
    _listBox.Init (GetWindow (), IDC_LIST);
    _listBox.ListDirectory (GetWindow (), GetBuffer (), IDC_STATICPATH);
}
|
When the user clicks the OK button or double-clicks on an item, we try retrieve the full path of the selection from the ListBox. The method, GetSelectedPath, fills the buffer with data and returns true if the selection was a directory (not a file). If it's a directory, we change the current directory and re-initialize the ListBox. If it's a file, we end the dialog and let the caller retrieve the path from the buffer.
bool LoadCtrl::OnCommand (int ctrlId, int notifyCode) throw (Win::Exception)
{
    if (ctrlId == IDOK || ctrlId == IDC_LIST && notifyCode == LBN_DBLCLK)
    {
        if (_listBox.GetSelectedPath (GetWindow (),
            GetBuffer (), GetBufLen ()))
        {
            // directory selected
            ChangeDirectory ();
        }
        else if (_listBox.IsSelection ())
            EndOk ();
        else
            EndCancel ();
        return true;
    }
    else if (ctrlId == IDCANCEL)
    {
        EndCancel ();
        return true;
    }
    return false;
}
|
I must admit that this type of UI for retrieving files is somehow obsolete. For one, it doesn't display long file names. Also, navigation between directories is not very intuitive. There is a Windows API, called GetOpenFileName, which has all the functionality of our Load dialog and a much better user interface. I chose the old-fashioned way (still used in some applications) only to illustrate the use of dialog boxes with non-trivial controls.
Commands and Menus
Pointers to members.
In the command-line version of our program we had to use a special parser to decipher user commands. In Windows it is much simpler. Commands are entered mainly by making menu selections. The obvious advantage of such an approach is that the user doesn't have to remember the exact name and syntax of each command. They are listed and nicely organized in a system of menus. Even if a program offers other means of entering commands, like keyboard shortcuts or toolbars, menus still play an important role in teaching a newcomer what functionality is available.
It's relatively easy to equip a Windows program with a menu. You can define it in the resource script, which can be made really easy by using a resource editor. You give the menu a name, which you then pass to the Win::ClassMaker, or to each individual Win::Maker.
Each menu item is given a unique id, called command id. This id becomes one of the arguments to the WM_COMMAND message, which is sent whenever the user selects a menu item. All you have to do is to implement the OnCommand method of the top-level controller to respond to these commands.
The obvious implementation of OnCommand would be to write a big switch statement with a case for each command. Did I hear "switch"? Can't we come up with something better? Can we hide the switch in the library, just like we did with the window procedure? Not really--unlike Windows messages which are defined up-front by Windows and are not supposed to change, each menu comes with its own completely different set of commands and command ids.
On the other hand, a menu command doesn't come with a variable number and type of arguments. In fact a menu command has no arguments--the arguments, if needed, are later picked up by dialog boxes. So why not organize all commands into an array of pointers to functions that take no arguments, just like we organized built-in functions in the calculator. There is only one problem in such a scheme--commands would have to be free functions. On the other hand, most of them need to have access to the model (the Calculator). We don't want to make the calculator a global object and give commands the knowledge of its name. Such implicit dependency through global objects is a sign of bad design and will cause maintenance naightmares in more complex programs.
How about creating a separate object, Commander, whose methods would be the commands? Such an object can be made a member of TopController and be initialized in the controller's OnCreate method. We could easily give it access to the Calculator without making it global. We could create a vector of pointers to Commander methods, and use it for dispatching menu commands. This is the same scheme that we used for dispatching function calls in the calculator.
But what is a pointer to method? Unlike a free function, a (non-static) method can only be called in the context of an object, which becomes the provider of the this pointer. Also, a definition of a pointer to method must specify the class, whose method it might point to. A pointer to a Controller method is a different beast altogether than a pointer to a Commander method. This requirement is reflected in the declaration of a pointer to member. For instance, a pointer to the Commander method, pCmdMethod, that takes no arguments and has no return value will be declared like this:
void (Commander::*pCmdMethod) (); |
Such a pointer can be initialized to point to a particular method, e.g. Program_About, of the Commander.
pCmdMethod = &Commander::Program_About; |
Given an object, _commander, of the class Commander, we can call its method through the pointer to member.
(_commander.*pCmdMethod) (); |
Similarly, if _commander is a pointer rather than an object (or reference), the syntax changes to:
(_commander->*pCmdMethod) (); |
Let's define all the commands as members of Commander and give them names corresponding to their positions in the menu. The definition and initialization of the command vector would look something like this:
typedef void (Commander::*CmdMethod) ();

const CmdMethod CmdTable [] =
{
    &Commander::Program_About,
    &Commander::Program_Exit,
    &Commander::Memory_Clear,
    &Commander::Memory_Save,
    &Commander::Memory_Load,
    0 // sentinel
};
|
So how would our CmdTable work with a menu system? What happens when the user selects a menu item? First, the message WM_COMMAND is sent to the generic window procedure, which calls the OnCommand method of our TopController. This method should somehow translate the command id (defined in the resource script together with the menu) to the appropriate index into the CmdTable, and execute the corresponding method.
(_commander->*CmdTable [idx]) (); |
The translation from command id to an index is the weakest point of this scheme. In fact, the whole idea of defining your menu in the resource file is not as convenient as you might think. A reasonably complex application will require dynamic changes to the menu depending on the current state of the program. The simplest example is the Memory>Save item in the calculator. It would make sense for it to be inactive (grayed out) as long as there has been no user-defined variable added to memory. We could try to somehow re-activate this menu item when a variable is added to memory. But that would require the model to know something about the user interface--the menu. We could still save the day by making use of the notification sink. However, there is a better and more general approach--dynamic menus.
Dynamic Menus
First, let's generalize and extend the idea of a command table. We already know that we need there a pointer to member through which we can execute commands. We can also add another pointer to member through which we can quickly test the availability of a given command--this will enable us to dynamically gray out some of the items. A short help string for each command would be nice, too. Finally, I decided that it will be more general to give commands string names, rather than integer identifiers. Granted, searching through strings is slower than finding an item by id, but usually there aren't that many menu items to make a perceptible difference. Moreover, when the program grows to include not only menus, but also accelerators and toolbars; being able to specify commands by name rather than by offset is a great maintainability win.
So here's the definition of a command item, the building block of a command table.
namespace Cmd
{
    template <class T>
    class Item
    {
    public:
        char const * _name;            // official name
        void (T::*_exec)();            // execute command
        Status (T::*_test)() const;    // test commnad status
        char const * _help;            // help string
    };
}
|
If we want to reuse Cmd::Item we have to make it a template. The parameter of the template is the class of the particular commander whose methods we want to access.
This is how the client creates a command table and initializes it with appropriate strings and pointers to members.
namespace Cmd
{
    const Cmd::Item<Commander> Table [] =
    {
        { "Program_About",  &Commander::Program_About,
                            &Commander::can_Program_About,
          "About this program"},
        { "Program_Exit",   &Commander::Program_Exit,
                            &Commander::can_Program_Exit,
          "Exit program"},
        { "Memory_Clear",   &Commander::Memory_Clear,
                            &Commander::can_Memory_Clear,
           "Clear memory"},
        { "Memory_Save",    &Commander::Memory_Save,
                            &Commander::can_Memory_Save,
          "Save memory to file"},
        { "Memory_Load",    &Commander::Memory_Load,
                            &Commander::can_Memory_Load,
          "Load memory from file"},
        { 0, 0, 0}
    };
}
|
Here, Commander is the name of the commander class defined in the calculator.
Command table is used to initialize the actual command vector, Cmd::VectorExec, which adds functionality to this data structure. The relationship between Cmd::Table and Cmd::VectorExec is analogous to the relationship between Function::Array and Function::Table inside the calculator. As before, this scheme makes it very easy to add new items to the table--new commands to our program.
Cmd::VectorExec has to be a template, for the same reason Cmd::Items have. However, in order not to templatize everything else that makes use of this vector (in particular, the menu system) I derived it from a non-template class, Cmd::Vector, that defines a few pure virtual functions and some generic functionality, like searching commands by name using a map.
The menu provides acces to the command vector. In a dynamic menu system, we initialize the menu from a table. The table is organized hierarchicaly: menu bar items point to popup menus which contain commands. For instance, this is what the initialization table for our calculator menu looks like (notice that command that require further user input--a dialog--are followed by three dots):
namespace Menu
{
    const Item programItems [] =
    {
        {CMD,        "&About...", "Program_About"},
        {SEPARATOR,  0,           0},
        {CMD,        "E&xit",     "Program_Exit"},
        {END,        0,           0}
    };
    const Item memoryItems [] =
    {
        {CMD,        "&Clear",    "Memory_Clear"},
        {SEPARATOR,  0,           0},
        {CMD,        "&Save...",  "Memory_Save"},
        {CMD,        "&Load...",  "Memory_Load"},
        {END,        0,           0}
    };
    //---- Menu bar ----
    const BarItem barItems [] =
    {
        {POP,   "P&rogram", "Program",   programItems},
        {POP,   "&Memory",  "Memory",    memoryItems},
        {END,   0,          0,           0}
    };
}
|
Note that each item contains the display name with an embedded ampersand. This ampersand is translated by Windows into a keyboard shortcut (not to be confused with a keyboard accellerator). The ampersand itself is not displayed, but the letter following it will be underlined. The user will then be able to select a given menu item by pressing the key corresponding to that letter while holdnig the Alt key. All items also specify command names--for popup items, these are the same strings that were used in the naming of commands. Menu bar items are also named, but they don't have commands associated with them. Finally, menu bar items have pointers to the corresponding popup tables.
Similar tables can be used for the initialization of accelerators and toolbars.
The actual menu object, of the class Menu::DropDown, is created in the constructor of the View. It is initialized with the table of menu bar items, Menu::barItems, shown above; and a Cmd::Vector object (initialized using Cmd::Table). The rest is conveniently encapsulated in the library.
You might be interested to know that, since a menu is a resource (released using DestroyMenu API), the class Menu::Maker has transfer semantics. For instance, when we create a menu bar, all the popup menus are transfered to Menu::BarMaker, one by one.
But that's not the end of the story. We want to be able to dynamically activate or deactivate particular menu items. We already have Commander methods for testing the availability of particular commands--they are in fact accessible through the command vector. The question remains, what is the best time to call these methods? It turns out that Windows sends a message, WM_INITMENUPOPUP, right before opening up a popup menu. The handler for this message is called OnInitPopup. We can use that opportunity to manipulate the menu while testing for the availability of particular commands. In fact, since the library class Menu::DropDown has access to the command vector, it can implement the RefreshPopup method once and for all. No need for the client to write any additional code.
Displaying short help for each selected menu item is also versy simple. When the user moves the mouse cursor to a popup menu item, Windows sends us the message, WM_MENUSELECT, which we can process in the controller's method, OnMenuSelect. We just call the GetHelp method of the command vector and send the help string to the status bar.
Let's now review the whole task from the point of view of the client. What code must the client write to make use of our dynamic menu system? To begin with, he has to implement the commander, which is just a repository of all commands available in the particular program. Two methods must be implemented for each command: one to execute it and one to test for its availability.
The role of the commander is:
- if required, get data from the user, usually by means of a dialog box
- dispatch the request to the model for execution.
Once the commander is in place, the client has to create and statically initialize a table of commands. In this table all commands are given names and assigned short help strings. This table is then used in the initialization of the command vector.
The menu system is likewise initialized by a table. This table contains command names, display names for menu items and markers differentiating between commands, separators and bar items. Once the menu bar is ready, it has to be attached to the top-level window. However, don't try to attach the menu inside the constructor of View. Both View and Controller must be fully constructed before adding the menu. Menu attachment results in a series of messages sent to the top level window (most notably, to resize its client area), so the whole controller has to be ready to process them in an orderly manner.
Finally, the user must provide a simple implementations of OnInitPopup and, if needed, OnMenuSelect, to refresh a popup menu and to display short help, respectively.
Because major data structures in the menu system are initialized by tables, it is very easy to change them. For instance, reorganizing the menu or renaming menu items requires changes only to a single file--the one that contains the menu table. Modifying the behavior of commands requires only changes to the commander object. Finally, adding a new command can be done in three independent stages: adding the appropriate methods to the commander, adding an entry to the command table, and adding an item to the menu table. It can hardly be made simpler and less error-prone.
Fig 1. shows the relationships and dependencies between various elements of the controller.
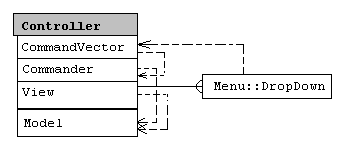
Fig 1. The relationships between various elements of the controller.
Because Commander doesn't have access to View, it has no direct way to force the refreshing of the display after such commands as Memory_Clear or Memory_Load. Again, we can only solve this problem by brute force (refresh memory display after every command) or some kind of notifications. I decided to use the most generic notification mechanism--sending a Windows message. In order to force the clearing of the calculator's memory display, the Commander sends a special user-defined message MSG_MEMCLEAR to the top-level window.
Remember, a message is just a number. You are free to define your own messages, as long as you assign them numbers that won't conflict with any messages used by Windows. There is a special identifier WM_USER which defines a number that is guaranteed to be larger than that of any Windows-specific message.
To process user-defined messages, I added a new handler, OnUserMessage, to the generic Win::Controller. This handler is called whenever the message is larger or equal to WM_USER.
One more change is necessary in order to make the menus work correctly. We have to expand the message loop to call TranslateMessage before DispatchMessage. TranslateMessage filters out these keyboard messages that have to be translated into menu shortcuts and turns them into WM_COMMAND messages. If you are also planning on adding keyboard accelerators (not to be confused with keyboard shortcuts that are processed directly by the menu system)--for instance, Ctrl-L to load memory--you'll have to further expand the message loop to call TranslateAccellerator.
Although we won't discuss modeless dialogs here, you might be interested to know that they also require a pre-processing step, the call to IsDialogMessage, in the message loop. It makes sense to stick all these accellerators and modeless dialog handles in a separate preprocessor object, of the class Win::MessagePrepro. It's method Pump enters the message loop and returns only when the top-level window is destroyed. One usually passes the preprocessor object to the top-level controller, to make it possible to dynamically switch accellerator tables or create and destroy modeless dialogs.
Exercises
- In response to the user's double-clicking on an item in the history pane, copy the selected string into the edit control, so that the user can edit and re-execute it.
- Add item "Function" to the menu bar. The corresponding popup menu should display the list of available built-in functions. When the user selects one, its name and the opening parentesis should be appended to the string in the edit control.
Hint: This popup menu should not be initialized statically. It should use the function table from the calculator for its initialization. - Add keyboard accelerators for Ctrl-L and Ctrl-S for invoking the Load and Save commands, respectively. Use a statically initialized accelerator table. Pass this table, together with the command vector (for command name to command id translation) to the accellerator maker. The API to create an accelerator table is called CreateAcceleratorTable. Since an accellerator table is a resource (released via DestroyAccelleratorTable), you'll have to apply resource management in the design of your classes.
To attach the accellerator, pass a reference to the message preprocessor from WinMain to TopController. After creating the accellerator, use the MsgPrepro::SetKbdAccelerator method to activate it.
Hint: Remember to change the display string in menu items to include the accellerator key. For instance, the Load item should read, "&Load...\tCtrl+L" (the tab marker \t right-aligns the accellerator string). - Convert the Load command to use GetOpenFileName for browsing directories.