Creating a Table Using a Wizard
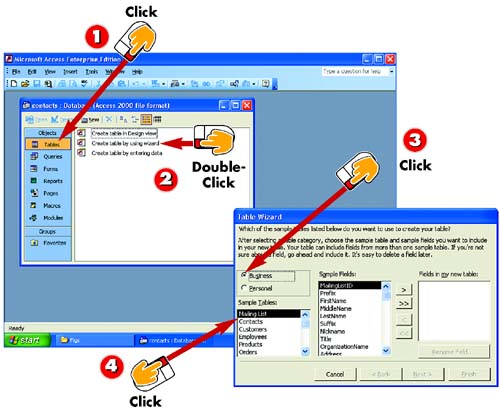
 | After you've created or opened the database for which you want to create a table, click the Tables option in the Objects bar in the database window. |
 | Double-click the Create table by using wizard option. |
 | The first screen of the Table Wizard opens. Click either the Business or the Personal option button to specify how your database will be used. |
 | The Sample Tables list contains available sample tables for the table type you selected in step 3. Click the type of table you want to create. |
|
The main structure of a database is a table. A database can contain any number of tables. Each table in a database consists of fields (an individual piece of data) and records (a set of fields). After you create a database, you then start building the tables it will contain. To help you get started, you can use one of Access's wizards, selecting from many common table types including mailing lists, contacts, products, orders, events, projects, and others. |
|
Opening the Database
If the database for which you want to create a table is not currently open, you can open it. See the preceding task to learn how. |
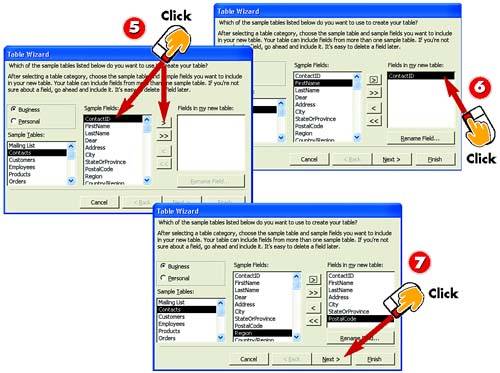
 | The Sample Fields list catalogs the available fields in the selected sample table. Click the first field you want to include in your table, and click the Add (right arrow) button. |
 | The field is added to the Fields in my new table list. Repeat step 5 to continue adding fields to your table until it contains all the fields you want to include. |
 | Click the Next button. |
|
Adding and Removing Fields
As you saw in step 5, the Sample Fields list catalogs the available fields in the selected sample table. To add all available fields to your own table in one fell swoop, click the Add All (double right arrow) button instead of adding the fields one by one. If you add a field by mistake, click the field in the Fields in my new table list, and then click the Remove (left arrow) button. |

 | Type a name for the table. |
 | Access asks whether you want the wizard to set the primary key for you; the default setting is Yes, set a primary key for me. Keep this option selected and click Next. |
 | The wizard prompts you to select the next action; the default setting is Enter data directly into the table. Keep this option selected and click Finish. |
 | The new database table is created and displayed onscreen, ready for you to begin entering records. (See Part 3 for help entering data.) |
|
Setting the Primary Key
As you saw in step 9, you can let Access set the table's primary key for you. The primary key is a field that uniquely identifies each record in the database and is used for sorting and indexing. If necessary, you can change the primary key or create a new one. See the task "Setting the Primary Key" later in this part for more information. |
|
Customizing Fields
If the table does not include all the fields you need, you can add new fields later. You can also delete and rename fields as needed. You'll learn how later in this part. |
|