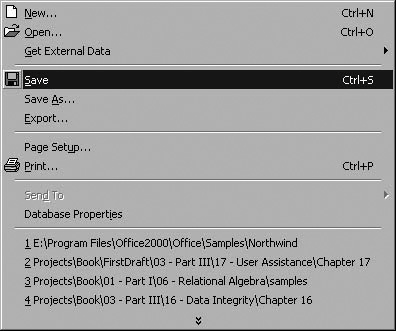
User LevelsWe have discussed three categories of people who will be using your systems. Beginning users need to know what the system does. Intermediate users need to know how to perform specific tasks, and expert users want to know how to perform tasks quickly. Different types of assistance are appropriate for each level of user. The introductory screens and guided tours that are so helpful to beginners will get in the way of intermediate users and drive advanced users to distraction. You must consider not only the support mechanisms that you will provide for each type of user, but also the best way for the various mechanisms to coexist. The introductory dialog box that you display for beginners on application startup, for example, should contain a "Don't show me again" check box that enables more advanced users to get the dialog box out of the way. The ToolTips and status bar messages that support intermediate users usually don't cause problems for more advanced users, but you might consider providing a mechanism for turning off ToolTips and status bar messages just to be sure. We'll discuss the customization of the user interface for different types of users in greater detail later in this chapter. In addition to the coexistence of support mechanisms, consider how your system can help a user move from one level of competence to another. You could rely on the system documentation and external training, but they're really not very effective mechanisms for increasing competence, for reasons we'll examine later. A better technique is to assist users from within the user interface itself. Most systems of even moderate complexity will provide multiple paths to each command. For example, saving changes to a record might be accomplished by choosing Save from the File menu, clicking a toolbar button, or typing Ctrl-S. Each of these paths is called a command vector, and each command vector is appropriate for a different level of user. Beginning and intermediate users tend to rely on menus to remind themselves of what functionality is available; intermediate users will make greater use of toolbar buttons; and experts will use the shortcut accelerator keys. To assist users in moving from one user level to another, you can consistently display all of these vectors for each command throughout the system. Figure 21-1 shows the default File menu in Microsoft Access. Note that the Save item shows all the command vectors for the command. The mnemonic keyboard access Alt-F-S is indicated by the underlined capital letter S in the word Save. (The F in the File menu name is also underlined.) The icon used for the command on toolbars is also shown, as is the Ctrl-S accelerator. By displaying all the command vectors on the menu, the user interface itself helps users learn faster ways of performing tasks. Figure 21-1. The Default File Menu in Microsoft Access 2000 Displays All the Command Vectors for the Save Command
Note Visual Studio .NET doesn't allow toolbar icons on its intrinsic menus, although implementing an OwnerDraw menu that displays them isn't too difficult. Additionally, there are several third-party controls available that do support icons on their menus. The menu creation paradigm in Microsoft Access allows you to include icons, but the selection of built-in icons is so ridiculously small that you'll almost certainly have to use the Button Editor to draw your own. Both Visual Studio and Access make it easy to create accelerators that are automatically displayed on the menu. Displaying multiple command vectors doesn't present any coexistence problems because it is a passive mechanism. All user assistance mechanisms can be divided into passive mechanisms that form part of the user interface, reactive mechanisms that are invoked in response to some user action, and proactive mechanisms that attempt to anticipate a user's needs. We'll discuss each of these mechanisms in turn in this chapter and end with a brief discussion of training materials and user customization. |