


Enterprise Architect diagrams support a Swimlanes Matrix for all diagram types, based on the Zachman Framework.
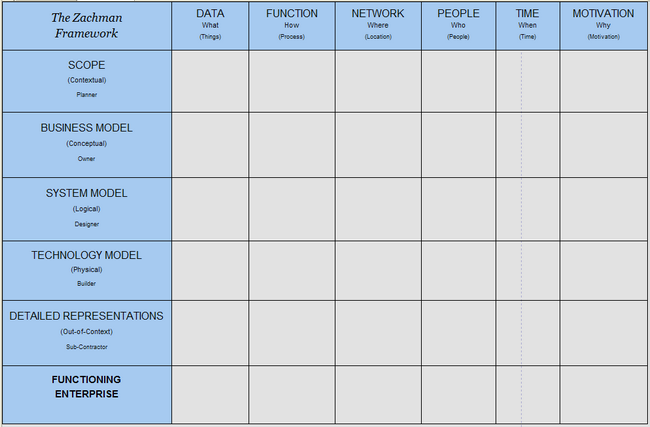
The Swimlanes Matrix divides the diagram into cells of vertical columns and horizontal rows. The cell in the top left corner of the Swimlanes Matrix contains the heading of the matrix. The first cell at the top of each column contains the column title text. The first cell at the left of each row contains the row title text.
Set up Swimlanes Matrix
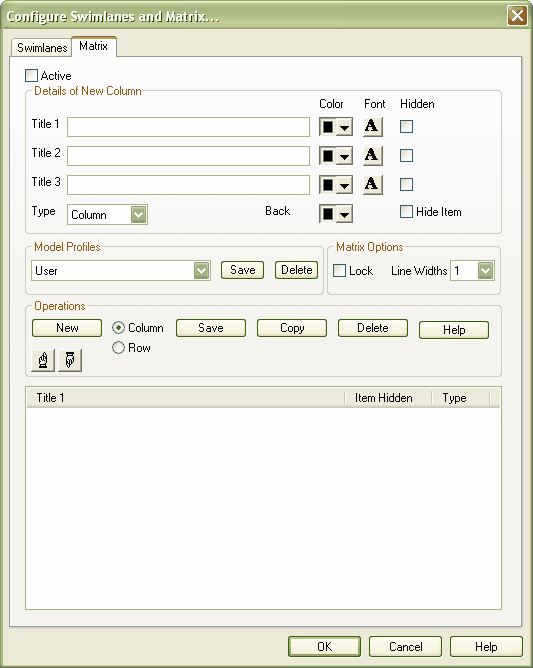
To set up and manage the Swimlanes Matrix, select the Diagram | Configure Swimlanes menu option to display the Configure Swimlanes and Matrix dialog. Click on the Matrix tab.
Activate the Matrix
To activate the Swimlanes Matrix, select the Active check box.
At the same time, you can define the line width for all lines on the matrix; in the Line Widths field, click on the drop-down arrow and select the appropriate width.
Create the Heading of the Swimlanes Matrix:
To define the heading for the matrix, follow the steps below.
| 1. | Click on the New button. |
| 2. | In the Type field, in the Details of New Column panel, click on the drop-down arrow and select Heading. |
| 3. | In one or more of the Title fields, type the heading name. You can enter up to three text strings as heading text. |
| 4. | If necessary, click on the Color, Font and Back options and select the heading text font, color and background color. |
| 5. | Click on the Save button in the Operations panel. The Heading cell displays on the diagram. |
Note: The heading is the first item in the list; you create only one heading.
Create Columns and Rows:
To define the column and row headings for the matrix, follow the steps below.
| 1. | Click on the New button. |
| 2. | In the Type field, in the Details of New Column panel, click on the drop-down arrow and select either Column or Row as appropriate. |
| 3. | In one or more of the Title fields, type the column or row name. You can enter up to three text strings as title text. |
| 4. | If necessary, click on the Color, Font and Back options and select the title text font, color and background color. |
| 5. | Click on the Save button in the Operations panel. The column or row heading cell and column or row lines display on the diagram. |
Note: When you define columns and rows, you define the header or title cells. The properties of these cells do not reflect on the matrix cells themselves. For example, the intersection cell of a column and row has a transparent background and therefore takes the color and shading effect of the diagram background.
Lock the Matrix
To lock the matrix so that it cannot be edited on the diagram, on the Configure Swimlanes and Matrix dialog select the Lock checkbox.
Edit items in the list:
As you create the heading, column and row title cells, they are added to the list in the bottom of the dialog. To edit an item, follow the steps below.
| 1. | Click on the required item in the list. |
| 2. | Make the relevant changes in the Edit Selected ... panel. |
| 3. | Click on the Save button in the Operations panel. |
Delete items from the list:
To delete the heading or a column or row from the matrix, follow the steps below.
| 1. | Click on an item in the list. |
| 2. | Click on the Delete button in the Operations panel. |
Model Profiles:
After creating a Swimlane Matrix, you can save it into a Model Profile and apply it to other diagrams. Model Profiles are available on any diagram in your model.
Save a Model Profile:
To save a Model Profile, follow the steps below.
| 1. | In the Model Profiles panel, click on the Save button. The Save Model Profile dialog displays. |
| 2. | In the Name field, type the name of your profile. |
| 3. | Click on the OK button. |
The profile is now visible in the profile name drop-down list here and on other diagrams.
Apply a Model Profile:
Note: By applying a Model Profile, you replace the current profile. Save the current profile to avoid losing it.
To apply a Model Profile to a diagram, follow the steps below.
| 1. | In the Model Profiles panel, click on the drop-down arrow of the profile name field, and select the required profile from the list. The list contains a predefined Zachman profile, as well as an empty profile should you want to replace the current profile with one that you create on the spot. |
| 2. | A confirmatory prompt displays. Click on the OK button to display the profile details on the Configure Swimlanes and Matrix dialog. |
| 3. | Click on the OK button at the bottom of the Configure Swimlanes and Matrix dialog to apply the profile to the matrix on the diagram. |
Size the Matrix
To size the rows and columns, drag the row and column borders on the diagram.
Elements placed inside each cell are shifted when sizing. To prevent the elements shifting, press and hold [Ctrl] while sizing.
See Also