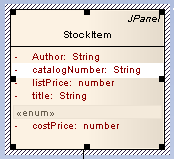
To use the options that are available through the in-place editing menu, follow the steps below:
| 1. | Open the diagram containing the element. |
| 2. | Click on the element, and on the item to manipulate within the element. The item line is highlighted in a lighter shade (the default is white), to indicate that it has been selected. |
| 3. | Edit and manipulate the items in the element, either by pressing the appropriate keyboard keys or by right-clicking on the highlighted item and choosing a task from the Element Items menu. The following commands are available: |
To... |
Select menu option... |
Or press... |
Change the name, scope or stereotype of the element or element item |
Edit Selected |
[F2] |
Display the dialog containing details of the element |
[Enter] |
|
Insert a new item in the element |
Insert New After Selected |
[Insert] |
Add an attribute to the element |
Add Attribute |
[Ctrl]+[Shift]+[F9] |
Add an operation to the element |
Add Operation |
[Ctrl]+[Shift]+[F10] |
Insert a feature on the specific element item, such as Maintenance features and Testing features |
Add Other |
[Ctrl]+[F11] |
Delete the selected item from the model |
[Delete] |
|
Navigate Diagram Selection, to navigate the diagram between elements without having to use the mouse |
|
[Ctrl]+[Shift]+[arrow key] |
Toggle element highlight option on and off |
|
[Shift]+[Enter] |
Other options that are available while in editing elements mode in a diagram (when an attribute or operation is highlighted) include:
To... |
Press... |
Accept current changes |
[Enter] |
Accept current changes and open a new slot to add a new item |
[Ctrl]+[Enter] |
Abort the edit, without save |
[Esc] |
Display the context menu for in-place editing |
[Shift]+[F10] |
Invoke the Classifier dialog |
[Ctrl]+[Space] |


