Windows includes more than 20 built-in control types that programmers can use to conserve development time and give applications a look and feel that is consistent with other Windows applications. Push buttons and list boxes are examples of controls; so are tree views, toolbars, and status bars. Controls have been a staple of the Windows operating system since version 1, and the roster has grown over the years to include a rich and varied assortment of control types.
The System.Windows.Forms namespace provides managed wrappers around the built-in Windows controls and throws in a few controls of its own that have no direct analogue in the operating system. The following table lists them all. Each class exposes properties that vastly simplify control programming. Want to create a stylized button with a bitmapped background? No problem. Just wrap an image in a Bitmap object and assign it to the button’s BackgroundImage property. Another example involves control colors. Ever tried to customize the background color of an edit control? Other developers have, because I get e-mail asking about doing this all the time. In Windows Forms, it’s easy: you just write the color to the control’s BackColor property and then sit back and let the .NET Framework do the rest.
|
Class |
Description |
|
Button |
Push buttons |
|
CheckBox |
Check boxes |
|
CheckedListBox |
List boxes whose items include check boxes |
|
ComboBox |
Combo boxes |
|
DataGrid |
Controls that display tabular data |
|
DataGridTextBox |
Edit controls hosted by DataGrid controls |
|
DateTimePicker |
Controls for selecting dates and times |
|
GroupBox |
Group boxes |
|
HScrollBar |
Horizontal scroll bars |
|
Label |
Label controls that display static text |
|
LinkLabel |
Label controls that display hyperlinks |
|
ListBox |
List boxes |
|
ListView |
List views (display flat lists of items in a variety of styles) |
|
MonthCalendar |
Month-calendar controls |
|
NumericUpDown |
Spinner buttons (up-down controls) |
|
PictureBox |
Controls that display images |
|
PrintPreviewControl |
Controls that display print previews |
|
ProgressBar |
Progress bars |
|
PropertyGrid |
Controls that list the properties of other objects |
|
RadioButton |
Radio buttons |
|
RichTextBox |
Rich-edit controls |
|
StatusBar |
Status bars |
|
TabControl |
Tab controls |
|
TextBox |
Edit controls |
|
ToolBar |
Toolbars |
|
ToolTip |
Tooltips |
|
TrackBar |
Track bars (slider controls) |
|
TreeView |
Tree views (display hierarchical lists of items) |
|
VScrollBar |
Vertical scroll bars |
Creating a control and making it appear in a form is a three-step process:
-
Instantiate the corresponding control class.
-
Initialize the control by setting its property values.
-
Add the control to the form by calling Add on the form’s Controls collection.
The following code creates a push button control and adds it to a form. The button measures 96 pixels by 24 pixels, and its upper left corner is positioned 16 pixels to the right of and 16 pixels below the form’s upper left corner. The text on the face of the button reads “Click Me”:
Button?MyButton;?//?Field
.
.
.
MyButton?=?new?Button?();
MyButton.Location?=?new?Point?(16,?16);
MyButton.Size?=?new?Size?(96,?24);
MyButton.Text?= "Click?Me";
Controls.Add?(MyButton);
Most controls fire events that apprise their owner of actions taken by the user. For example, button controls fire Click events when clicked. A form that wants to respond to clicks of MyButton can register an event handler this way:
MyButton.Click?+=?new?EventHandler?(OnButtonClicked);
??.
??.
??.
void?OnButtonClicked?(Object?sender,?EventArgs?e)
{
????//?TODO:?Respond?to?the?button?click
}
EventHandler is a delegate defined in the System namespace. Recall that a delegate is a type-safe wrapper around a callback function and that delegates are especially useful for wiring events to event handlers. The event handler’s first parameter identifies the control that fired the event. The second parameter provides additional information about the event. As with events involving menu items, EventArgs contains no useful information. However, some controls pass other argument types to their event handlers. For example, tree view controls fire AfterExpand events after a branch of the tree expands. AfterExpand uses TreeViewEventHandler as its delegate. The second parameter passed to a TreeViewEventHandler is a TreeViewEventArgs that identifies the branch of the tree that was expanded.
How do you know what events a given control fires? You read the documentation. Look up ListBox, for example, and you’ll see that it defines an event named DoubleClick that’s fired whenever the user double-clicks an item in the list box. DoubleClick is prototyped this way:
public?event?EventHandler?DoubleClick;
From this statement, you know that handlers for DoubleClick events must be wrapped in EventHandler delegates. And because EventHandler is prototyped this way:
public?delegate?void?EventHandler?(Object?sender,?EventArgs?e);
you know the signature for DoubleClick event handlers, too.
The application depicted in Figure 4-17 demonstrates the basics of Windows Forms control usage. Its one and only form contains four controls: a Label control, a TextBox control, a ListBox control, and a Button control. To put ControlDemo through its paces, start it up, type a path name (for example, C:\Winnt) into the TextBox control, and click the Show File Names button. A list of all the files in that directory will appear in the ListBox. Next double-click one of the file names to pop up a message box revealing when the file was created and when it was last modified.
ControlDemo’s source code appears in Figure 4-18. The application’s main form is an instance of MyForm. MyForm’s constructor instantiates the controls and stores references to them in private fields. Then it adds the controls to the form’s Controls collection so that they will physically appear in the form. Event handlers named OnShowFileNames and OnShowFileInfo respond to the push button’s Click events and the list box’s DoubleClick events. These handlers use static methods belonging to the System.IO namespace’s Directory and File classes to enumerate files and retrieve file information.
Note the statements that assign numeric values to the TextBox, ListBox, and Button controls’ TabIndex properties. TabIndex specifies the order in which the input focus cycles between the controls when the user presses the Tab key. The logic for moving the focus is provided by the framework; your only responsibility is to provide the order. The Label control isn’t assigned a tab index because it never receives the input focus.
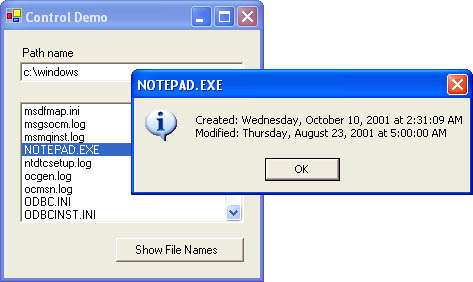 Figure 4-17
using?System;
using?System.Windows.Forms;
using?System.Drawing;
using?System.IO;

class?MyForm?:?Form
{
????Label?PathNameLabel;
????TextBox?PathNameBox;
????ListBox?FileNameBox;
????Button?ShowFileNamesButton;

????string?CurrentPath;

????MyForm?()
????{
????????//?Set?the?form's?title
????????Text?=?"Control?Demo";

????????//?Set?the?form's?size
????????ClientSize?=?new?Size?(256,?248);
????????//?Create?the?form's?controls
????????PathNameLabel?=?new?Label?();
????????PathNameLabel.Location?=?new?Point?(16,?16);
????????PathNameLabel.Size?=?new?Size?(224,?16);
????????PathNameLabel.Text?=?"Path?name";

????????PathNameBox?=?new?TextBox?();
????????PathNameBox.Location?=?new?Point?(16,?32);
????????PathNameBox.Size?=?new?Size?(224,?24);
????????PathNameBox.TabIndex?=?1;

????????FileNameBox?=?new?ListBox?();
????????FileNameBox.Location?=?new?Point?(16,?72);
????????FileNameBox.Size?=?new?Size?(224,?128);
????????FileNameBox.TabIndex?=?2;
????????FileNameBox.DoubleClick?+=?new?EventHandler?(OnShowFileInfo);

????????ShowFileNamesButton?=?new?Button?();
????????ShowFileNamesButton.Location?=?new?Point?(112,?208);
????????ShowFileNamesButton.Size?=?new?Size?(128,?24);
????????ShowFileNamesButton.Text?=?"Show?File?Names";
????????ShowFileNamesButton.TabIndex?=?3;
????????ShowFileNamesButton.Click?+=
????????????new?EventHandler?(OnShowFileNames);

????????//?Add?the?controls?to?the?form
????????Controls.Add?(PathNameLabel);
????????Controls.Add?(PathNameBox);
????????Controls.Add?(ShowFileNamesButton);
????????Controls.Add?(FileNameBox);
????}

????//?Handler?for?the?Show?File?Names?button
????void?OnShowFileNames?(object?sender,?EventArgs?e)
????{
????????//?Extract?the?path?name?from?the?TextBox?control
????????string?path?=?PathNameBox.Text;

????????if?(path.Length?>?0)?{
????????????//?Make?sure?the?path?name?is?valid
????????????if?(Directory.Exists?(path))?{
????????????????//?Empty?the?list?box
????????????????FileNameBox.Items.Clear?();

????????????????//?Get?a?list?of?all?the?files?in?the?directory
????????????????string[]?files?=?Directory.GetFiles?(path);

????????????????//?Put?the?file?names?(minus?path?names)?in?the
????????????????//?list?box
????????????????foreach?(string?file?in?files)?{
????????????????????FileAttributes?attr?=?File.GetAttributes?(file);
????????????????????if?((attr?&?FileAttributes.Hidden)?==?0)
????????????????????????FileNameBox.Items.Add?(Path.GetFileName?(file));
????????????????}

????????????????//?Save?the?path?name?in?case?the?user?double-
????????????????//?clicks?a?file?name
????????????????CurrentPath?=?Path.GetFullPath?(PathNameBox.Text);
????????????}
????????????//?If?the?path?isn't?valid,?notify?the?user
????????????else
????????????????MessageBox.Show?(path?+?"?is?not?a?valid?path",
????????????????????"Error",?MessageBoxButtons.OK,?MessageBoxIcon.Error);
????????}
????}

????//?Handler?for?DoubleClick?events?from?the?ListBox
????void?OnShowFileInfo?(object?sender,?EventArgs?e)
????{
????????//?Create?a?fully?qualified?file?name?from?the?file?name
????????//?that?the?user?double-clicked
????????string?file?=?CurrentPath;
????????if?(!file.EndsWith?(":")?&&?!file.EndsWith?("\\"))
????????????file?+=?"\\";
????????file?+=?FileNameBox.SelectedItem.ToString?();

????????//?Display?the?dates?and?times?that?the?file?was?created
????????//?and?last?modified
????????DateTime?created?=?File.GetCreationTime?(file);
????????DateTime?modified?=?File.GetLastWriteTime?(file);

????????string?msg?=?"Created:?"?+?created.ToLongDateString?()?+
????????????"?at?"?+?created.ToLongTimeString?()?+?"\n"?+
????????????"Modified:?"?+?modified.ToLongDateString?()?+
????????????"?at?"?+?modified.ToLongTimeString?();

????????MessageBox.Show?(msg,?FileNameBox.SelectedItem.ToString?(),
????????????MessageBoxButtons.OK,?MessageBoxIcon.Information);
????}

????static?void?Main?()?
????{
????????Application.Run?(new?MyForm?());
????}
}
When the Windows Forms team in Redmond drew up the blueprints for their part of the .NET Framework, they decided to include a few bells and whistles, too. One of those bells and whistles is a feature called anchoring. Anchoring enables forms designers to create forms whose controls move and resize as the form is resized. Figure 4-19 shows how ControlDemo looks if its form is expanded. Even though the form is larger, the controls retain their original size. Figure 4-20 shows the same form with anchoring enabled. The controls now “flow” with the size of the form.
Anchoring is applied on a control-by-control basis. It’s enabled for a given control by initializing the Anchor property that the control inherits from Control. Anchor can be set to any combination of the following values to tell the control what to do when its container is resized:
|
Anchor Style |
Meaning |
|
AnchorStyles.Left |
Maintain a constant distance between the left edge of the control and the left edge of the form |
|
AnchorStyles.Right |
Maintain a constant distance between the right edge of the control and the right edge of the form |
|
AnchorStyles.Top |
Maintain a constant distance between the top edge of the control and the top edge of the form |
|
AnchorStyles.Bottom |
Maintain a constant distance between the bottom edge of the control and the bottom edge of the form |
|
AnchorStyles.None |
Don’t maintain a constant distance between the control and any edge of the form |
If you want a control to move to the right when the container is widened, anchor the right edge of the control to the right edge of the form, like this:
MyControl.Anchor?=?AnchorStyles.Right;
If you want the control to widen rather than move when the form is widened, anchor both the left and right edges, like this:
MyControl.Anchor?=?AnchorStyles.Left?│?AnchorStyles.Right;
By applying various combinations of anchor styles, you can configure a control to flow how you want it to when its container is resized.
To see anchoring in action first-hand, add the following statements to MyForm’s constructor in ControlDemo.cs:
PathNameBox.Anchor?=?AnchorStyles.Left?│?AnchorStyles.Right?│
????AnchorStyles.Top;
FileNameBox.Anchor?=?AnchorStyles.Left?│?AnchorStyles.Right?│
????AnchorStyles.Bottom?│?AnchorStyles.Top;
ShowFileNamesButton.Anchor?=?AnchorStyles.Right?│?AnchorStyles.Bottom;
These statements produce the result that you see in Figure 4-20. Specifically, they configure the TextBox control to expand horizontally as the form expands but to remain fixed with respect to the top of the form; they configure the ListBox control to stretch horizontally and vertically as the form expands; and they configure the Button control to remain fixed in size but move with the lower right corner of the form.
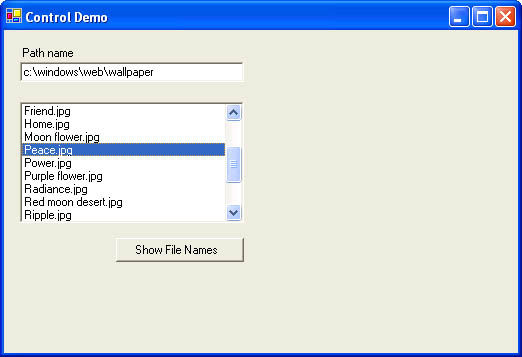 Figure 4-19
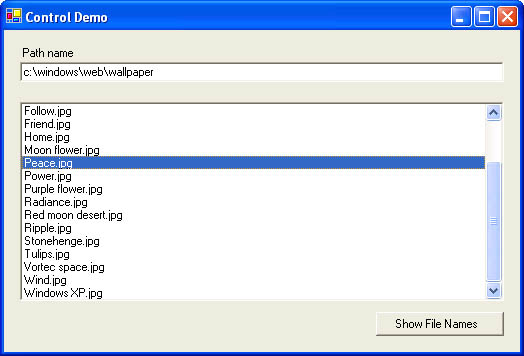 Figure 4-20