Building COM+ ComponentsThis next section will take you through the C# code that you can use to build the features described in the previous section. There are two key factors to building COM+ components in the .NET Framework: the ServicedComponent class from which all .NET COM+ components inherit, and various custom code attributes that give the COM+ environment detailed instructions on how to regulate the behavior of components and COM+ applications. TransactionsAs mentioned earlier, transactions indicate a single, cohesive unit of work. If something goes wrong during a transaction, the assumption must be that all work performed during that transaction will be rolled back or cancelled. If everything during the transaction goes properly, the assumption must be that all work performed during the transaction will be made permanent. The easiest way to control transactions is through the use of code attributes. The following code attributes affect transaction processing behavior for COM+ components and methods:
The only time you should consider using COM+ transactions is if a single method encapsulates transactional calls to multiple, disparate sources; for example, if you need to encapsulate a call to an MSMQ, a SQL database, and an OLEDB data source in a single unit of work. For this, you would use a COM+ transaction. However, if everything you need to do takes place within a single data source such as SQL Server, you're better off using native T-SQL transactions. Distributed transactions have very high overhead. The following code shows how you can manually control the commitment or rollback of a distributed COM+ transaction through the ContextUtil
using System;
using System.Data;
using System.Data.SqlClient;
using System.EnterpriseServices;
namespace ServicedApplication
{
public class SampleClass : ServicedComponent
{
public SampleClass()
{
}
public void ManualTransaction( string trxData )
{
// perform some work using trxData, using manual transactions
SqlConnection conn = null;
try
{
conn = new SqlConnection(" ... your connection string here ... ");
conn.Open();
SqlCommand cmd = conn.CreateCommand();
cmd.CommandText = " .. some update .. ";
cmd.CommandType = CommandType.Text;
cmd.ExecuteNonQuery();
conn.Close();
As you can see, working with transactions from within a COM+ component isn't very difficult at all. If you inherit from ServicedComponent, reference System.EnterpriseServices, and know how to use the ContextUtil class, the AutoComplete attribute, and the TRansaction attribute, you are ready to start creating COM+ components that participate in distributed transactions. Construction StringsThe construction string is used to initialize a component during the construction phase. This is accomplished by the COM+ system calling the Construct method on the COM+ component. To implement this method, simply define it and provide an implementation for it on your class:
protected override void Construct(string s)
{
  connectionString = s;
}
This code is pretty simple; all it does is override a method called Construct. This method can be invoked by COM+ if the application is configured properly. The preceding sample, assumes that a database connection string will be provided by the construction method. Another feature of .NET serviced components is that, upon initial execution, if the assembly contains the appropriate custom code attributes, the COM+ system can automatically register the assembly as a COM+ application. For example, the following code sets two attributes on a sample class library, ServicedApplication:
// Enterprise Services attributes
[assembly: ApplicationName("Chapter 43 Sample")]
[assembly: Description("Chapter 43 Serviced Component COM+ Sample")]
These attributes allow .NET and COM+ to create this application the first time a serviced component is invoked within this assembly. Figure 40.1 shows what the COM+ (Component Services) administration console looks like after instantiating a serviced component in the sample class library. Figure 40.1. The Component Services administration console showing a recently auto-registered COM+ application.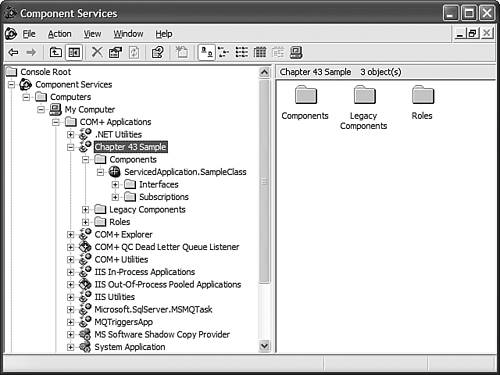 Now right-click the registered application and choose the Properties option. When you click the Activation tab, you will see the place where you can define the construction string (in this case, a database connection string passed in by administrators). Figure 40.2 shows this tab. Figure 40.2. The Activation tab of the Properties dialog on the newly registered COM+ application.
JIT Activation SampleAs you saw in the overview at the beginning of the chapter, JIT refers to just-in-time activation. JIT is possible only when object pooling is enabled, so the next section will show a sample of both JIT and object pooling. Object PoolingObject pooling is a scenario in which a pool of pre-instantiated objects is maintained in memory in a server application managed by COM+. Object pooling is enabled and configured on a per-object basis. This means that you can have some components in your COM+ application be pooled and some others not be pooled. When pooling is enabled and the COM+ application is configured as a Library mode application, pooled objects are pooled within the AppDomain of the client. In Server-activation applications, the pool resides on the server in the AppDomain in which the application resides. To configure object pooling, you can use the ObjectPooling attribute on a class. The following code shows you a sample of how to use this attribute:
[ObjectPooling(Enabled=true, MinPoolSize=1, MaxPoolSize=20, CreationTimeout=10000)]
public class MyPooledObject : ServicedComponent
{
    public override void Activate() { } // removed from pool
    public override void Deactivate() { } // returned to pool
    public override bool CanBePooled() { return true; }
}
The preceding component will be created in a pool. The first time that a request is made for the component, a pool with only one object will be created. At peak volume, when the most requests for the component are being made, 20 objects will belong to the pool. If a request for the component lasts more than 10 seconds without a response, the request will fail and the client will be unable to create an instance of the object. Shared PropertiesShared properties and shared property groups are services provided by COM+ that allow objects to share state within a given server process. One of the requirements of many types of applications written for COM+ is that they not maintain state because doing so would diminish the returns provided by object pooling, activation, and JIT. However, sometimes information needs to be shared between objects. To do this, you can actually share resources, called shared properties, within a single COM+ application. All of this work begins with the SharedPropertyGroupManager class. The Shared Property Manager (SPM) is designed to take the headache out of sharing data between objects in a server process in a multithreaded environment. It deals with access locks, name collision issues, multithreading synchronization issues, semaphores, and much more. All you have to do is create and access the propertiesit's definitely a good trade-off. The next sample uses two classes: SPMGetter Listing 40.1. Class That Reads the Current Value of a Shared Property
using System;
using System.EnterpriseServices;
namespace ServicedApplication
{
/// <summary>
/// Summary description for SPMGetter.
/// </summary>
public class SPMGetter : ServicedComponent
{
public string GetProperty() Listing 40.2. Class That Sets the Value of a COM+ Shared Property
using System;
using System.EnterpriseServices;
namespace ServicedApplication
{
/// <summary>
/// Summary description for SPMSetter.
/// </summary>
public class SPMSetter : ServicedComponent
{
public void SetProperty(string strValue) In the code so far, all that's been done is to create two classes: one that has a method that sets a value and one that has a method that reads a value. Finally, you can write some code that will test this theory and determine whether the code reads and writes the same value. That code is listed here:
Console.WriteLine("Setting shared property to the value 'Hello World'");
ServicedApplication.SPMSetter setter = new ServicedApplication.SPMSetter();
setter.SetProperty("Hello World");
ServicedApplication.SPMGetter getter = new ServicedApplication.SPMGetter();
Console.WriteLine("Value obtained from SPMGetter: " + getter.GetProperty());
As expected, this application produces the conventional hello world output. There is one caveat: This application won't work unless the COM+ components making use of the SPM are given an MTS object context. You'll learn more about contexts later in this chapter and in other COM+ reference manuals. The important thing to note here is that shared properties won't work without an MTS context. To provide a context for your components, the components must enforce sufficient security. On the Security tab of the application Properties dialog, make sure that the Perform Access Checks at the Component and Process Level radio button is checked. |
