| [ Team LiB ] |
|
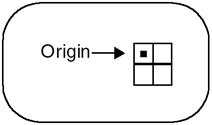
8.3 Extending the FrameworkIn this section, we provide some simple techniques for extending the image framework that is presented throughout this book and contained fully on the CD-ROM. By showing a few examples, we hope to make it easier for you to add your own image processing functions and to enhance your digital photographs. 8.3.1 Adding Image Processing FunctionsWe have gone into a great deal of detail in this book describing how to design an image processing framework. We have added a small set of image processing functions to demonstrate how the framework holds together. In the image processing world, most software packages offer a rich set of functionality. In this section we will provide some insight into how you can incorporate more features into our framework. Neighborhood OperationsA neighborhood operation is one that uses a relatively small set of pixels in the source image to generate a pixel in the destination image. The Laplacian and Gaussian filters we presented in Chapter 6 are examples of neighborhood operators. We presented a flexible filter framework that other neighborhood routines can use with little or no modification. The framework dealt with all the special boundary conditions and took care of the intersection operations to determine exactly which pixels needed to be processed. Our image processing filters, such as Laplacian and Gaussian, use kernels that are always square with an odd width and height. The kernel is always centered over the corresponding pixels in the image, removing any ambiguity over which pixels are used. There are other neighborhood routines, however, where this restriction does not work. To handle these cases, we have to generalize our definition in two ways. First, we need to add an origin point to the kernel to specify how the neighborhood operation is computed. Figure 8.1 shows a 2x2 kernel and its origin. Figure 8.1. 2x2 Kernel
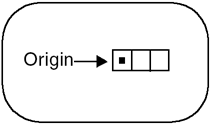
Second, we have to relax the restriction of the kernel being square, so that any rectangular kernel can be used. Figure 8.2 shows a 1x3 rectangular kernel and its origin. Figure 8.2. 1x3 Kernel
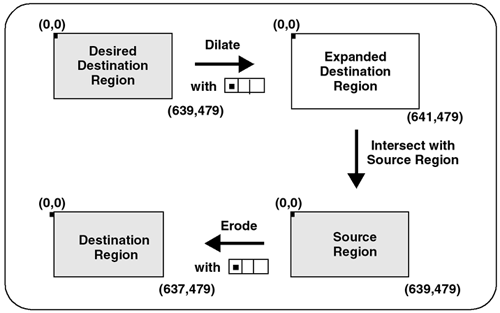
Because of these generalizations, we have to change how we determine which pixels to process. Figure 8.3 shows how we determine which source and destination pixels to use for a 640x480 image using a 1x3 kernel. Figure 8.3. Determining Pixels to Process Using 1x3 Kernel
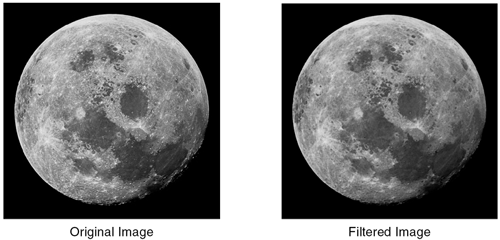
In addition to image convolution, there are a number of other image processing operations that use neighborhood operators, such as morphology. Note that dilation and erosion, which are indicated in Figure 8.3, are subsequently discussed within the context of morphology. MorphologyMorphology operations manipulate image data by performing operations on a region around each pixel. These regions are called structuring elements because they do not contain information other than a description of the pixel neighborhood. If you apply the morphological filter we provide to your images, you will find that the image becomes darker and that small defects in the image are removed, as shown in Figure 8.4. Figure 8.4. Morphology Filter
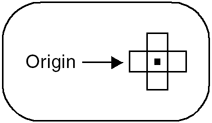
Morphology operations were initially defined for binary images (i.e., each pixel is either on or off), and performed simple OR and AND operations between pixels in the source image to decide the state of each destination pixel. Grayscale morphology extends the original definition to work with non-binary pixel data. These operators typically use a min or max operator to compare pixels in the source image. The structuring elements used in morphology do not have to be rectangular. A common structuring element is a cross with its origin in the center that uses the immediate neighbors around every pixel, as shown in Figure 8.5. Figure 8.5. Cross Structuring Element
The erosion operator (or min operator) tends to shrink the objects in an image by removing pixels along the boundary between the object and its background. The complimentary operator is the dilation operator (or max operator), which tends to expand the size of an object. Let's write a simple morphology operator with the following assumption: we will use a cross structuring element so that we can extend our existing convolution operation to perform morphology. Even though the structuring element is a cross, the intersection operations are identical to those used in our 3x3 kernel. Since we are using an existing operation, there are many parameters that we can ignore. The structuring element is hard-coded into our filter function, as shown here.
template<class R, class T1, class T2, class S1, class S2>
void ap_erode_cross (const R&, const apImage<T1,S1>& src1,
                     const char* /*kernel*/, unsigned int /*size*/,
                     int /*divisor*/, apImage<T2,S2>& dst1)
{
  typename apImage<T1,S1>::row_iterator i1 = src1.row_begin();
  typename apImage<T2,S2>::row_iterator i2 = dst1.row_begin();

  unsigned int h = src1.height() - 2;
  unsigned int w = src1.width()  - 2;

  const T1* p1;
  T2* p2;
  unsigned int x, y;

  // Elements to skip between rows
  unsigned int pitch = (i1->bytes / sizeof (T1));

  for (y=0; y<h; y++, i1++, i2++) {
    p1 = i1->p + (pitch + 1); // Center the pixel
    p2 = i2->p;
    for (x=0; x<w; x++) {
      *p2++ = apMin( apMin( apMin( apMin(*p1, *(p1-1)), *(p1+1)),
                                         *(p1-pitch)), *(p1+pitch));
      *p1++;
    }
  }
}
The biggest difference between this morphology operation and the convolution operation is how the output pixels are computed:
*p2++ = apMin( apMin( apMin( apin(*p1, *(p1-1)), *(p1+1)),
                                    *(p1-pitch)), *(p1+pitch));
We call our own apMin() function rather than min(), because min() is not defined uniformly by compilers. If you want this function to work correctly with apRGB images, you will need to define a specialization, as we did with convolution, or you will need to write a min() function that works with apRGB. To perform an erosion using a cross structuring element, you can simply call the erodeCross() function. Its definition is shown here.
template<class T1, class S1>
void erodeCross (const apImage<T1,S1>& src1,
                 apImage<T1,S1>& dst1)
{
  apFunction_s1d1Convolve<T1,T1,T1,S1,S1> processor
                                          (ap_erode_cross);

  char* kernel = 0;
  unsigned int size = 3;
  int divisor = 1;
  processor.run (src1, kernel, size, divisor, dst1);
}
Like with many image processing operations, you should experiment to determine what settings work best in your application. SobelAnother popular convolution filter is the Sobel operator. This is similar to Laplacian, but it finds the edges in the image by applying two kernels to each pixel. If you only take the magnitude of these two results, you have an image similar to that produced by the Laplacian filter. However, you can also use this information to determine the angle of any edge in the image. This angle information is then mapped to a binary value and written like any image pixel. Even though this angle is very rough, it works surprisingly well when the image has little noise in it. Figure 8.6 demonstrates the effects of using the Sobel operator that we provide. Figure 8.6. Sobel Filter (Magnitude)
The Sobel filter differs from the Laplacian filter, in that it tends to produce two peaks at every edge in the image. This is the result of using the following two convolution kernels during processing: 
Although you can compute a separate image with each kernel and then compute the output image, it is much more efficient to do this in a single step. Given the values x and y, you can compute the output pixel values using the following equations: 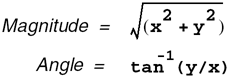
We can use our convolution framework to design this filter, as long as we return only a single image from each call. Since the Sobel angle image is of limited use, we implement it as a separate function. Here is the generic Sobel magnitude function:
template<class R, class T1, class T2, class S1, class S2>
void ap_convolve_3x3sobelmag (const R&,
                              const apImage<T1,S1>& src1,
                              const char* /*kernel*/,
                              unsigned int /*size*/, int /*divisor*/,
                              apImage<T2,S2>& dst1)
{
  typename apImage<T1,S1>::row_iterator i1 = src1.row_begin();
  typename apImage<T2,S2>::row_iterator i2 = dst1.row_begin();

  unsigned int h = src1.height() - 2;
  unsigned int w = src1.width()  - 2;

  const T1* p1;
  const T1* pk;
  T2* p2;
  R sumx, sumy;
  R pel;
  unsigned int x, y;

  // Elements to skip from end of one row to start of next
  unsigned int pitch = (i1->bytes / sizeof (T1)) - 3;

  for (y=0; y<h; y++, i1++, i2++) {
    p1 = i1->p;
    p2 = i2->p;
    for (x=0; x<w; x++) {
      sumx = sumy = 0;
      pk = p1 + x;

      pel = *pk++;
      sumx -= pel;
      sumy += pel;
      sumy += 2 * (*pk++);
      pel = *pk++;
      sumx += pel;
      sumy += pel;
      pk += pitch;

      sumx -= 2 * (*pk++);
      pk++; // Skip this pixel
      sumx += 2 * (*pk++);
      pk += pitch;

      pel = *pk++;
      sumx -= pel;
      sumy -= pel;
      sumy -= 2 * (*pk++);
      pel = *pk++;
      sumx += pel;
      sumy -= pel;

      sumx = static_cast<R>(sqrt(static_cast<double>(sumx*sumx +
                                       sumy*sumy)));
      *p2++ = apLimit<T2> (sumx);  // Prevent wrapping
    }
  }
}
When you write a function like this, you will often find that there are optimizations you can make. We took advantage of zero kernel elements to eliminate the unnecessary arithmetic: six of the 18 total kernel elements are zero, so ignoring them saves about one-third of the processing time. Our magnitude calculation at the end of the loop is as follows:
sumx = static_cast<R>(sqrt(static_cast<double>(sumx*sumx +
                                                sumy*sumy)));
We use a double to compute the magnitude, which is then cast to the appropriate type. However, this does not work properly for RGB data types because the compiler will implicitly convert the RGB quantity to a grayscale value. As with the morphology filter, we have written an RGB specialization to correctly handle this case. It is included on the CD-ROM. We can also write more specializations to further optimize our Sobel filter. For example, the magnitude calculation can hurt performance on embedded platforms in particular because of the floating point operations that are used. For a pixel type of Pel8, for example, you could add a lookup table to convert the X and Y values to a magnitude with a single lookup. This table does consume memory (64 kilobytes if an exhaustive table is stored), but can be well worth it to make this calculation run faster. You can also use approximations, depending on the purpose of the filtered images. For example, the magnitude calculation can be approximated using absolute value, as shown: Magnitude = |x| + |y| Fortunately, all these details are hidden. To use the Sobel magnitude filter, you can simply call the sobel3x3mag() function and explicitly specify R. Its definition is shown here.
template<class R, class T1, class T2, class S1, class S2>
void sobel3x3mag (const apImage<T1,S1>& src1,
                  apImage<T2,S2>& dst1)
{
  apFunction_s1d1Convolve<R,T1,T2,S1,S2> processor
(ap_convolve_3x3sobelmag);
  char* kernel = 0;
  unsigned int size = 3;
  int divisor = 1;
  processor.run (src1, kernel, size, divisor, dst1);
}
Image Space TransformsAnother image processing category are those operations that transform images from one type to another. In Chapter 6, we showed how copy() can be used to change an image from one type into another. We used this function to convert between monochrome (apImage<Pel8>) and color images (apImage<apRGB>). When we talk about image space transforms, we are referring to the meaning of a pixel, rather than the data type of a pixel. Let's look at two examples of useful transforms:
Mapping PixelsLookup tables are a very common technique for mapping pixels from one value to another. For pixel types with a small number of values, such as Pel8, an array is used to contain the mapping between source and destination. For larger images, such as apRGB, this is not practical because there are 224 possible values. A generic lookup table function is very easy to write, partly because only a single image is involved. The image is modified in-place and does not require any temporary image storage as shown.
template<class T, class S>
void convertLUT (apImage<T,S>& image, T* lut)
{
  typename apImage<T,S>::row_iterator i;

  for (i=image.row_begin(); i!=image.row_end(); i++) {
    T* p = i->p;
    for (unsigned int x=0; x<image.width(); x++)
      *p++ = lut[*p];
  }
}
There are problems when using this function for image types such as apRGB, because you must pass a lookup table of type apRGB*, which is difficult to compute. Even if you could pass these arguments, the function would not work properly, because the line: *p++ = lut[*p]; will try and use *p (an apRGB value) as an index to the lookup table. And yes, this does compile, because there is a conversion operator defined in apRGBTmpl<T> to convert a color pixel into a monochrome pixel (i.e., an integer value), as shown:
  operator T () const
  { return (red + green + blue) / 3;}
Most unit tests will not catch this mistake unless it tests template functions for a variety of pixel types. We recommend that whenever you write template functions, do any of the following:
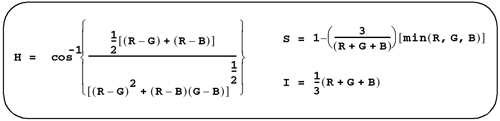
Converting Between Color SpacesMany applications that handle color images require image space conversion, which is the conversion of an RGB image to another color space image and vice versa. In our framework, we have used apRGBTmpl<> to represent an RGB pixel. There are many color spaces that use a triplet (i.e., three values) to represent the value of a color pixel. The term tristimulus value is another way of describing this triplet. When we defined apRGBTmpl<>, we considered making this name more generic. We decided against it because in most cases we are dealing with an RGB pixel. To define our new color space data type, we can reuse apRGBTmpl<> by defining a new typedef, as shown: typedef apRGBTmpl<Pel8> apHSI; We will use this apHSI definition to refer to a color pixel with hue, saturation, and intensity components. Keep in mind that this won't prevent the mixing of apHSI with apRGB, because they both are the same data types. You can either use the red, green, and blue components, or the generic sounding ts1(), ts2(), and ts3() to access the tristimulus values. The code that computes the conversion from RGB to HSI for one pixel is more complicated than the function that iterates over the output image. Figure 8.7 shows the equations used to convert RGB to HSI. Figure 8.7. Color Space Conversion Formulas
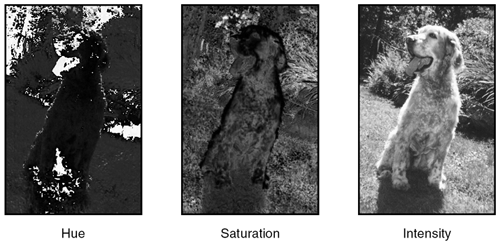
Figure 8.8 shows the conversion of an RGB image to its corresponding hue, saturation, and intensity images. Figure 8.8. Image Conversion from RGB to HSI
We have split the problem into two pieces: first, we write a function, RGB2HSI(), to convert an RGB pixel into an HSI pixel; next, we write another function, also called RGB2HSI(), to convert an entire RGB image to an HSI image. Both are shown here. template<class T> apRGBTmpl<T> RGB2HSI (const apRGBTmpl<T>& pel) { static double twoPi = asin(1.) * 4.; apRGBTmpl<T> hsi; double t; T r = pel.red; T g = pel.green; T b = pel.blue; if (r==g && r==b && g==b) // Degenerate case. Grayscale return apRGBTmpl<T> (0, 0, r); // Hue t = acos(.5 * ((r-g)+(r-b)) / sqrt((r-g)*(r-g) + (r-b)*(g-b))); double sum = r+g+b; if (b > g) t = twoPi - t; // 2*pi - t; Gives us 4 quadrant answer hsi.red = static_cast<T>(t * Our HSI pixel conversion function is far from optimized. We have chosen not to perform any optimizations because of the trade-off that occurs between accuracy and speed. As a generic implementation, this is fine. However, if you write a specialized version for apRGB, you should improve this function. The cos-1() function is a candidate for a lookup table, in order to improve performance. The floating point arithmetic can also be converted to fixed point. Image GeometryOperations that deal with the geometry of an image, such as resizing or rotation, are used extensively in the image processing world. Like most algorithms, there are good ways and bad ways to solve these problems. Earlier, we used a thumbnail() function as a running example through the book because it is both easy to understand and implement. While thumbnail() is a resizing function and it has some usefulness, it does not go far enough to address the general problem. In this section, we present a more robust image resizing operation. Most of our discussion is also applicable to image rotation, another important operation for image processing. Image ResizingWe define image resizing as taking a source image of dimensions Sw x Sh and converting it to an output (or destination) image of dimensions Dw x Dh. There are two important things to note here. First, the destination image can either be larger or smaller than the source image. Second, the resizing operation does not have to respect the aspect ratio of the source image. Aspect ratio is the relationship between the height and width of an image, and is usually expressed as:
Aspect Ratio = height / width
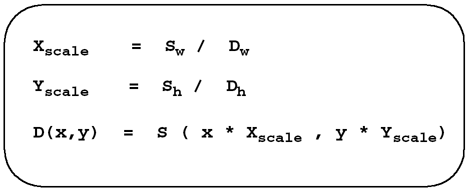
For many applications, resizing the image is done such that the aspect ratio is preserved. By specifying either the width or height of the destination image, you compute the other dimension to keep the aspect ratio constant. The right way to solve this problem is to think in terms of the destination image. For every pixel in the destination image, you want to find the appropriate pixels from the source image that contribute to it. When we write resize(), we will work with the geometry of the destination and compute a value for every pixel. The wrong way to solve this problem is to think in terms of the source image. Depending on how the resizing is performed, a single source pixel can be used to compute multiple destination pixels. If you try and step through each source pixel, you must find all the destination pixels that are affected by it. The result will be a jagged looking image that may contain output pixels with no value. Our implementation for resize() is slightly different than our other image processing operations, in that resize() allocates the destination image given the desired size. This decision is based upon how we expect resize() to be used in applications. We can ignore the origin point of the source image until we are finished, since this value is left unchanged. For any pixel in the destination image, D(x,y), we can find the corresponding pixel in the source image, S(x',y'), using the equations shown in Figure 8.9. Figure 8.9. Equations for Computing Corresponding Source Pixels
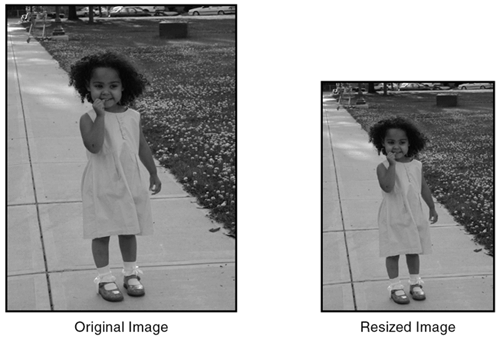
Notice that the desired source pixel usually has fractional pixel coordinates. The pixel at these coordinates does not exist in our discrete representation of the image, but we can perform an interpolation to find out its value. If performance is a concern, you can do a nearest neighbor interpolation, whereby you choose the pixel in the source image that is closest to the desired point. Figure 8.10 shows an image reduced by 75 percent using nearest neighbor interpolation. Figure 8.10. Nearest Neighbor Image Resizing
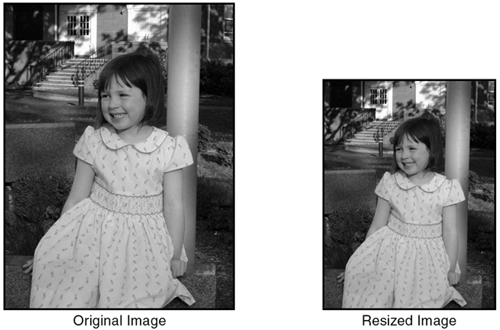
We recommend bilinear interpolation to determine the pixel value because the results are better. Bilinear interpolation refers to the fact that we use four pixels (two pixels in the x direction and two in the y direction) to determine the value of any arbitrary pixel. In contrast, nearest neighbor interpolation only chooses the nearest point, rather than computing the weighted average of the four pixels. Bilinear interpolation is fairly fast and produces good results, as shown in Figure 8.11. Figure 8.11. Bilinear Interpolation Image Resizing
Using bilinear interpolation, we compute a pixel at some fractional coordinate S(x+dx,y+dy), where dx and dy are the fractional coordinates and x and y are the integer coordinates computed as shown in Figure 8.12. Figure 8.12. Bilinear Interpolation
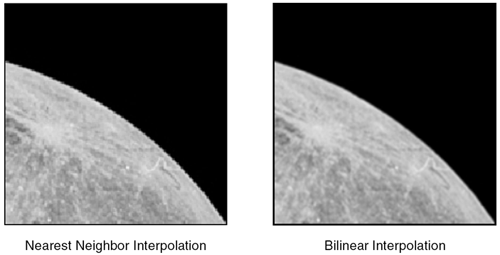
Figure 8.13 shows a side-by-side comparison of the nearest neighbor technique and the bilinear interpolation technique. Notice how the edges are much smoother with the bilinear interpolation technique applied to the same image. Figure 8.13. Nearest Neighbor Versus Bilinear Interpolation
With this information we can now write our resize() function to work with most datatypes. (Note that it does not support our apRGB datatype; you could support this datatype by writing a specialized version of this function.) We start by defining a function, fetchPixel_BLI(), to fetch a pixel from an image using floating point coordinates. The BLI suffix stands for bilinear interpolation. This is a useful stand-alone function that can also be reused in other applications. The fetchPixel_BLI() function is as follows:
template<class T, class S>
T fetchPixel_BLI (const apImage<T,S>& image, double x, double y)
{
  // getPixel() throws an error if the coordinates are out of range

  unsigned int x0 = static_cast<unsigned int>(x);
  unsigned int y0 = static_cast<unsigned int>(y);
  double dx = x-x0;
  double dy = y-y0;

  T p1 = image.getPixel (x0, y0);

  if (x >= image.width()-1 || y >= image.height()-1)
    return p1; // Overflow

  T p2 = image.getPixel (x0+1, y0);
  T p3 = image.getPixel (x0, y0+1);
  T p4 = image.getPixel (x0+1, y0+1);

  double pel = (1.-dy)*(1.-dx)*p1 + (1-dy)*dx*p2 + dy*(1-dx)*p3 +
               dx*dy*p4;
  return static_cast<T>(pel);
}
In this function, we use four calls to getPixel() to compute the output pixel. We could write a faster version that computes the address of one point and then finds the remaining three values using simple pointer arithmetic. fetchPixel_BLI() does not have any explicit range checking because getPixel() throws an exception if the coordinates are out of range. To prevent any messy boundary condition issues, the function just returns the actual coordinate, even if it lies on the edge of the image. We can also write the nearest-neighbor equivalent function, fetchPixel_NN(), which fetches the nearest integer pixel in the image, as follows:
template<class T, class S>
T fetchPixel_NN (const apImage<T,S>& image, double x, double y)
{
  unsigned int x0 = static_cast<unsigned int>(x+.5);
  unsigned int y0 = static_cast<unsigned int>(y+.5);
  return image.getPixel (x0, y0);
}
With this fetch capability, the resize() function only has to compute the destination image and fill it with values, as shown:
template<class T, class S>
apImage<T,S> resize (const apImage<T,S>& src, unsigned long width,
                       unsigned long height=0)
{
  if (width == 0 && height == 0)
    return src.sNull;

  // Maintain aspect ratio if only one value is given
  if (width == 0)
    width = src.width() * height / src.height();
  if (height == 0)
    height = src.height() * width / src.width();

  // Compute the destination window
  apRect boundary (src.x0(), src.y0(), width, height);
  apImage<T,S> dst (boundary);

  // Compute our starting point in the source image and the
  // steps we use to traverse it
  double sx;
  double sy = src.y0();
  double xscale = static_cast<double>(src.width()) / width;
  double yscale = static_cast<double>(src.height()) / height;

  typename apImage<T,S>::row_iterator i;
  T* p;
  for (i=dst.row_begin(); i!=dst.row_end(); i++) {
    sx = src.x0();
    p = i->p;
    for (unsigned int x=0; x<width; x++) {
      *p++ = fetchPixel_BLI (src, sx, sy);
      sx += xscale;
    }
    sy += yscale;
  }
  return dst;
}
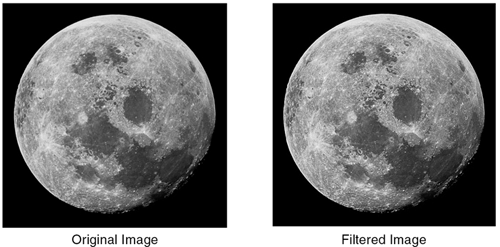
Image RotationImage rotation is similar to image resizing because it uses the same approach, in that pixels in the destination image are populated with pixels from the source image. The major difference is in how we compute which source pixels are needed. Image rotation is only one aspect of a more general purpose transformation called an affine transform. An affine transform handles image rotation, scaling, translation, and shear (non-uniform scaling). This may sound complicated, but the affine transform is really just a matter of applying one or more linear transformations to the pixel coordinates. For example, to rotate pixels in an image by an angle, q, around the origin of the image, you would apply the following computations: x' = x*cos(q) - y*sin(q) y' = x*sin(q) + y*cos(q) D(x,y) = S(x',y') Whether we apply just rotation, or perform an entire six degrees of freedom (x translation, y translation, x scale, y scale, rotation, and shear), we map a point in the destination image to one in the source image. Once we have these coordinates, we use bilinear interpolation to compute the actual value. We have not included the implementation for an affine transform. To write this function, you must pay close attention to the boundary conditions. For example, if you take a source image and rotate it 45 degrees, there will be large areas in the destination image that do not have valid pixels. If you devise your algorithm correctly, you can ignore most of these regions and only compute those pixels that contribute to the output image. 8.3.2 Enhancing Digital PhotographsMost of the image processing functions we have implemented are very mathematical in nature. A destination image is computed with pixels from one or more source images. In this section we discuss an image processing method, called unsharp masking, that you can use with your digital photographs to make them appear crisper and in focus. We refer to this method as unsharp masking because it works by subtracting a smoothed (or unsharp) version of the image from the original. If you have never used this method to sharpen images, you might be surprised by how well it works. You can take an image from a digital camera, for example, and once you see the processed photograph, the original may begin to look fuzzy to you. You can also use unsharp masking as a way to restore the sharpness of the edges in scanned photographs.Figure 8.14 shows the effects of unsharp masking. Figure 8.14. Unsharp Masking
You can construct an unsharp mask using one or more basic filtering components that we already have developed. Other filters, such as the convolution filters, may make an image more useful for further analysis by removing noise, but they can't create a more visually appealing image, as an unsharp masking filter can. There are a number of ways to filter an image using unsharp masking. One simple technique uses a Laplacian filter to find the high frequency edges, and then adds a portion of this value to the original image. Although this is a very simple implementation, it works erratically on many images. We provide the class unsharp masking implementation, which involves running a low pass filter on the image and subtracting a percentage of it from the original. The steps we use to implement unsharp masking are as follows:
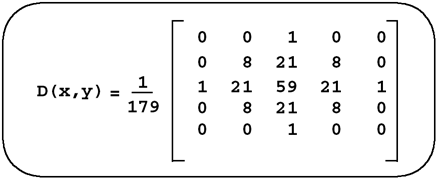
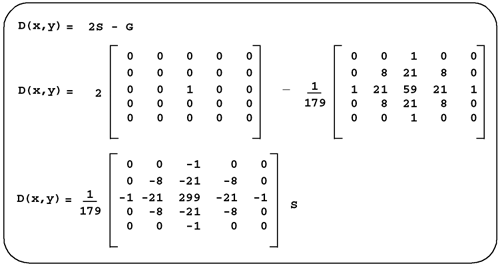
When k=2, we have a filter that usually produces reasonable results. We can rewrite our steps to produce this filter using a single convolution kernel, which is computed as shown in Figure 8.16. Figure 8.16. Equations for a Single Unsharp Masking Kernel
There is a one small problem with using this single kernel. The convolution routines we developed in Chapter 6 use a char to store the kernel values. The value, 299, does not fit. We could add a new version of convolve() to take larger kernels; however, an easier approach is to solve the problem in steps, thus avoiding the limitation. Our solution is shown below.
template<class R, class T1, class S1>
apImage<T1,S1> unsharpMask (const apImage<T1,S1>& src,
                            double strength=2.0)
{
  if (src.isNull())
    return src;

  // Compute our 5x5 gaussian (lopass) filter
  char kernel[] = { 0,  0,  1,  0, 0,
                    0,  8, 21,  8, 0,
                    1, 21, 59, 21, 1,
                    0,  8, 21,  8, 0,
                    0,  0,  1,  0, 0};
  apImage<T1,S1> gaussian;
  convolve<R> (src, kernel, 5, 179, gaussian);

  // Window our source image to be the same size
  apImage<T1,S1> srcWindow = src;
  srcWindow.window (gaussian.boundary());

  // Our destination is the same size as the gaussian
  apImage<T1,S1> dst (gaussian.boundary());

  // Compute our output using
  // strength * srcWindow + (1-strength) * gaussian
  typename apImage<T1,S1>::row_iterator s = srcWindow.row_begin ();
  typename apImage<T1,S1>::row_iterator d = dst.row_begin ();
  typename apImage<T1,S1>::row_iterator g = gaussian.row_begin ();

  unsigned int h = dst.height ();
  unsigned int w = dst.width ();

  unsigned int x, y;
  R sum;
  const T1* ps;
  const T1* pg;
  T1* pd;

  R pels, pelg;
  double gstrength = 1. - strength;

  for (y=0; y<h; y++, s++, d++, g++) {
    ps = s->p;
    pg = g->p;
    pd = d->p;

    for (x=0; x<w; x++) {
      pels = static_cast<R>(*ps++);
      pelg = static_cast<R>(*pg++);
      // The order is very important
      sum = (pels * strength) + (pelg * gstrength);
      *pd++ = apLimit<T1> (sum);  // Prevent wrapping
    }
  }

  return dst;
}
|
| [ Team LiB ] |
|