3.2. Configuring NetworkingThe majority of modern computer system are connected to a network. While server and desktop systems are often configured for one network at installation time and remain plugged into that same network for weeks, months, or years, laptop systems are frequently on the move and may connect to several different networks in one day. Fortunately, Fedora provides a good set of network configuration tools that enable you to easily swing from one network to another like a digital Tarzan. 3.2.1. How Do I Do That?There are three ways to configure networking on Fedora. Each approach has its advantages and disadvantages:
3.2.1.1. Configuring networking graphically
Select the menu option System Figure 3-6. Network Configuration window
To add a network connection, click on the New icon. The window in Figure 3-7 will appear, enabling you to select the connection type. Figure 3-7. New Device Type window
Use the default Ethernet connection option for any LAN connection, including cable modem connections as well as all DSL connections made through a router or gateway device. Click Forward to proceed to the device-selection window in Figure 3-8. Figure 3-8. Device-selection window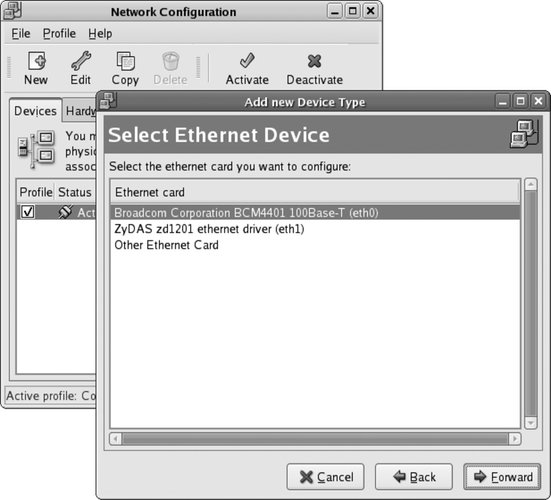
All of the Ethernet devices that have been automatically detected (or previously configured manually) will be listed, with the device name in parentheses (such as eth0). Select the device you wish to configure and click Forward. If the device is not in the list, select Other Ethernet Card from the bottom of the list and click Forward. The window shown in Figure 3-9 will appear; select the Adapter type (which selects the device driver to be used), the device name to be used (the default is usually OK), and any resources the card will use (this area should almost always be left blank). Click Forward. Figure 3-9. New device-setup window
You will now see the window shown in Figure 3-10. Select one of the two options to assign the IP address for this network connection:
Click Forward to proceed. Figure 3-10. IP address configuration
Figure 3-11 shows the final confirmation window that appears. Review the information for accuracy and then click Apply. Figure 3-11. Confirmation window
3.2.1.1.1. Changing a device configurationTo edit an existing network device, double-click on it in the main Network Configuration window (shown earlier in Figure 3-6), or select it and click the Edit icon. Figure 3-12 shows the editing window that appears.
Figure 3-12. Network Configuration device-editing window
There are three tabs in this window. The first tab, General, provides fields for basic device configuration:
Figure 3-13 shows the Route tab, which is used to configure network routes when there is more than one gateway (router) available to your system. For single-gateway networksincluding most home and office networksuse the Default Gateway field on the Devices tab and do not fill in any information on the Route tab. Figure 3-13. Routing configuration
To add a new route, click the Edit button, then enter the network to be routed as an IP network address and a netmask, and then enter the Gateway (router) to which packets destined for that network are to be sent. Figure 3-13 shows a new routing entry for an 8-bit subnet: the network number is 172.16.4.0, and the netmask is 255.255.255.0, which means that any packets addressed to an IP address that starts with 172.16.4 must be sent through the gateway associated with this route, which has been set to 172.16.97.200.
To edit or delete existing routes, select the route and click on the Edit or Delete buttons. Figure 3-14 shows the third tab, labeled Hardware Device, which contains three groups of fields: Figure 3-14. Hardware Device tab
3.2.1.1.2. Configuring DNS and the Hosts tableThe main network configuration window also contains tabs for Hardware, IPSec, DNS, and the Hosts table. I'm going to focus on the DNS and Hosts tabs in this lab. The DNS tab shown in Figure 3-15 is used to configure nameservers, computers that are configured to translate hostnames such as google.com into IP addresses. When using DHCP, this information is usually configured automatically. If your DHCP server does not supply this information or you're not using DHCP, enter up to three DNS servers using the Primary, Secondary, and Tertiary DNS fields. In the Hostname field, enter the name of the server you are configuring; this should be part of a valid domain, or localhost.localdomain if you don't have a domain. Figure 3-15. DNS tab
The "DNS search path" field is used to specify the domains to be searched when looking up a hostname that does not have a domain-name component. For example, if this field contained myorganization.ca fedorabook.com, then the hostname bluesky would be looked up as bluesky.myorganization.ca, and if no IP address could be found for that name, it would be looked up as bluesky.fedorabook.com. The Hosts tab shown in Figure 3-16 is used to configure static mappings, which define the relationship between hostnames and IP addresses without using DNS. This is useful if you have only a handful of hosts and wish to refer to them by hostname without going to the trouble of configuring a DNS nameserver. Figure 3-16. Hosts tab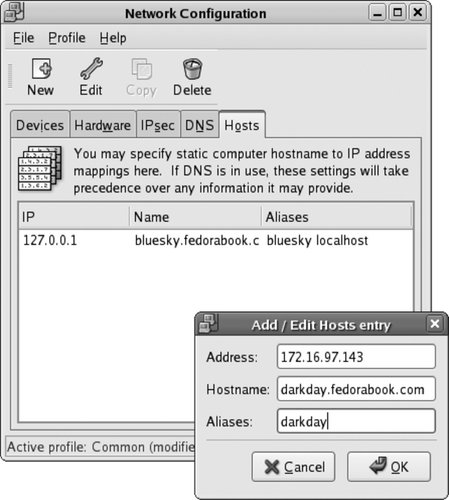
To add a static mapping, click the New button, and then enter the IP address, hostname, and (optionally) any aliases or alternate hostnames for that particular IP address. In Figure 3-16, the address 172.16.97.143 is being associated with the hostname darkday.fedorabook.com as well as the (shorter) alias of just darkday. Click OK to save the mapping. As you would expect, the Edit and Delete buttons may be used to change or remove a selected static mapping.
3.2.1.1.3. Saving and using the network configurationTo save the network configuration that you have configured using the GUI tool, select the menu option File To enable or disable network interfaces, go to the Devices tab (Figure 3-6), select the interface you wish to change, and click Activate or Deactivate. Alternately, you can exit from the network configuration tool and restart the Network service graphically (see Lab 4.6, "Managing and Configuring Services") or by entering this command: # service network restart Shutting down interface eth0: [ OK ] Shutting down loopback interface: [ OK ] Bringing up loopback interface: [ OK ] Bringing up interface eth0: [ OK ] Network interface devices which are set to activate at boot will automatically start up when the network interface is started. Other devices may be started and stopped using the network configuration tool. However, if the option labeled "Allow all users to enable and disable the device" has been set in the interface device configuration (Figure 3-12), any user can activate or deactivate the device using the GNOME menu option Application This option may not appear on your GNOME menu; to make it available, right-click on the GNOME application menu and select Edit Menus. Figure 3-17 shows the menu editor that appears. Figure 3-17. The GNOME menu editor
Select Applications When you start the Network Device Control program, either through the menu or by typing system-control-network in a shell, the window shown in Figure 3-18 will appear. Figure 3-18. Network Device Control window
To activate or deactivate network interface devices using this program, select the interface and click on the Activate or Deactivate buttons. Click Close when you are done with the window. You can also activate and deactivate network interfaces from the command line using the ifup and ifdown commands: # ifconfig eth1
eth1 Link encap:Ethernet HWaddr 00:0C:2D:00:2B:DB
BROADCAST MULTICAST MTU:1500 Metric:1
RX packets:794 errors:0 dropped:0 overruns:0 frame:0
TX packets:195 errors:0 dropped:0 overruns:0 carrier:0
collisions:0 txqueuelen:1000
RX bytes:115671 (112.9 KiB) TX bytes:19491 (19.0 KiB)
# ifup eth1
Determining IP information for eth1... done.
# ifconfig eth1
eth1 Link encap:Ethernet HWaddr 00:0C:2D:00:2B:DB
inet addr:172.16.97.101 Bcast:172.16.97.255 Mask:255.255.255.0
inet6 addr: fe80::20c:2dff:fe00:2bdb/64 Scope:Link
UP BROADCAST RUNNING MULTICAST MTU:1500 Metric:1
RX packets:802 errors:0 dropped:0 overruns:0 frame:0
TX packets:213 errors:0 dropped:0 overruns:0 carrier:0
collisions:0 txqueuelen:1000
RX bytes:117520 (114.7 KiB) TX bytes:22579 (22.0 KiB)
# ifdown eth1
# ifconfig eth1
eth1 Link encap:Ethernet HWaddr 00:0C:2D:00:2B:DB
BROADCAST MULTICAST MTU:1500 Metric:1
RX packets:802 errors:0 dropped:0 overruns:0 frame:0
TX packets:213 errors:0 dropped:0 overruns:0 carrier:0
collisions:0 txqueuelen:1000
RX bytes:117520 (114.7 KiB) TX bytes:22579 (22.0 KiB)3.2.1.1.4. Using network profilesThe graphical network configuration tool supports the concept of profiles to permit easy roaming between different networks. You can configure a separate profile for each network that you use (such as home, office, and coffeeshop). A standard profile named Common is created when your system is installed. The Common profile is automatically selected at boot time, and it's the only profile that can define interfaces that will be started when the system boots. To create additional profiles, use the Profile Figure 3-19. Creating a new Network Configuration profile
Once you have created at least one profile in addition to the standard Common profile, the Network Device Control window will gain a new pull-down menu that enables you to select the active profile, as shown in Figure 3-20 (compare with Figure 3-18). Figure 3-20. The Active Profile control has been added
To change profiles, select the desired profile from the pull-down menu, and then click on the Activate button. The list of configured network interface devices will change to reflect the interfaces configured as part of the selected profile. Interfaces that are part of the profile but that cannot be activated or deactivated by ordinary users will appear in the interface list, but will be grayed out and unselectable. 3.2.1.1.5. Configuring other network connection typesThe procedure for configuring an ISDN or analog telephone dial-up connection, a token-ring connection, or an xDSL (DSL, ADSL, SDSL, or IDSL) connection is identical to the procedure for configuring an Ethernet connection, except that additional (or slightly different) details are required in order to configure the connection:
3.2.1.2. Using GNOME NetworkManagerThe GNOME NetworkManager facility provides an alternative to the use of profiles. NetworkManager is a service that automatically detects network configuration changes and determines available options. A small GUI application permits you to quickly select the network option you wish to use. It's ideal for laptop users because it permits rapid switching between multiple wired and wireless networks.
The NetworkManager service is enabled in the same way as every other service (see Lab 4.6, "Managing and Configuring Services"). You can configure it to start at the next boot by choosing the menu option System From the command line, you can start the service immediately using the service command, and you can configure it to start at boot time using chkconfig: # service NetworkManager start
Setting network parameters...
Starting NetworkManager daemon: [ OK ]
# chkconfig NetworkManager on
As soon as the NetworkManager starts, an icon should appear in your panel's notification area, which is shown in Figure 3-21. This icon will indicate the type of IP connection currently in use. To switch to a different connection, click on the icon; a list of available connections will appear (including all broadcast local network names if you have a wireless card, plus a little signal-strength bar graph for each wireless network). Click on the network you wish to connect to, and NetworkManager will attempt to make the connection. You will be prompted to enter WEP or WPA encryption keys if necessary. Figure 3-21. NetworkManager icon (left), showing that a wired Ethernet connection is active
NetworkManager will establish connections with wired networks automatically, but it will not automatically connect to wireless networks to which you have not previously connected because they may belong to your neighbor, or to companies that you are passing if you are in a vehicle. It will also detect the loss of network connectivity when a wireless signal is no longer usable or a network cable is unplugged. You can also view the NetworkManager status from the command line by using nm-tool: # nm-tool
NetworkManager Tool
State: connected
- Device: eth0 ----------------------------------------------------------------
NM Path: /org/freedesktop/NetworkManager/Devices/eth0
Type: Wired
Driver: b44
Active: yes
HW Address: 00:0D:56:33:D7:18
Capabilities:
Supported: yes
Carrier Detect: yes
Speed: 100 Mb/s
Wired Settings
Hardware Link: yes
IP Settings:
IP Address: 172.16.97.100
Subnet Mask: 255.255.255.0
Broadcast: 172.16.97.255
Gateway: 172.16.97.254
Primary DNS: 24.153.23.66
Secondary DNS: 24.153.22.673.2.1.3. Configuring networking from the command lineThe GUI network configuration tool and NetworkManager both work well for desktop users, but when you're logged in to a server that is a few time zones away or need to make a fast change, it's useful to be able to configure networking from the command line. The main interface configuration command is ifconfig (for interface configuration). Executed by itself, it displays the basic configuration of active interfaces: $ /sbin/ifconfig
eth0 Link encap:Ethernet HWaddr 00:0D:56:33:D7:18
inet addr:172.16.97.100 Bcast:172.16.97.255 Mask:255.255.255.0
inet6 addr: fe80::20d:56ff:fe33:d718/64 Scope:Link
UP BROADCAST RUNNING MULTICAST MTU:1500 Metric:1
RX packets:289 errors:0 dropped:0 overruns:0 frame:0
TX packets:228 errors:0 dropped:0 overruns:0 carrier:0
collisions:0 txqueuelen:1000
RX bytes:45844 (44.7 KiB) TX bytes:27193 (26.5 KiB)
Interrupt:177
lo Link encap:Local Loopback
inet addr:127.0.0.1 Mask:255.0.0.0
inet6 addr: ::1/128 Scope:Host
UP LOOPBACK RUNNING MTU:16436 Metric:1
RX packets:2258 errors:0 dropped:0 overruns:0 frame:0
TX packets:2258 errors:0 dropped:0 overruns:0 carrier:0
collisions:0 txqueuelen:0
RX bytes:2884024 (2.7 MiB) TX bytes:2884024 (2.7 MiB)The two interfaces displayed here are eth0, the first Ethernet interface, and lo, the loopback interface used when a client and a server that are both on the local machine need to communicate. For each interface, the information displayed includes the IP version 4 address (inet addr), IP version 6 address (inet6 addr), netmask (Mask), status flags (such as UP and RUNNING), and transmit, receive, and error statistics. You can narrow down the report to a single interface by specifying that interface name as an argument: $ /sbin/ifconfig eth0
eth0 Link encap:Ethernet HWaddr 00:0D:56:33:D7:18
inet addr:172.16.97.100 Bcast:172.16.97.255 Mask:255.255.255.0
inet6 addr: fe80::20d:56ff:fe33:d718/64 Scope:Link
UP BROADCAST RUNNING MULTICAST MTU:1500 Metric:1
RX packets:331 errors:0 dropped:0 overruns:0 frame:0
TX packets:261 errors:0 dropped:0 overruns:0 carrier:0
collisions:0 txqueuelen:1000
RX bytes:49667 (48.5 KiB) TX bytes:32047 (31.2 KiB)
Interrupt:177To see both active and inactive interfaces, use the -a option: $ /sbin/ifconfig -a
eth0 Link encap:Ethernet HWaddr 00:0D:56:33:D7:18
...(Lines snipped)...
lo Link encap:Local Loopback
...(Lines snipped)...
sit0 Link encap:IPv6-in-IPv4
NOARP MTU:1480 Metric:1
RX packets:0 errors:0 dropped:0 overruns:0 frame:0
TX packets:0 errors:0 dropped:0 overruns:0 carrier:0
collisions:0 txqueuelen:0
RX bytes:0 (0.0 b) TX bytes:0 (0.0 b)
wlan0 Link encap:Ethernet HWaddr 00:0C:2D:00:2B:DB
BROADCAST MULTICAST MTU:1500 Metric:1
RX packets:0 errors:0 dropped:0 overruns:0 frame:0
TX packets:0 errors:0 dropped:0 overruns:0 carrier:0
collisions:0 txqueuelen:1000
RX bytes:0 (0.0 b) TX bytes:0 (0.0 b)In this case, there are two interfaces here that didn't show up when ifconfig was run without the -a argument: sit0, used for IPv6 tunneling, and wlan0, a Wi-Fi (802.11a/b/g) interface. ifconfig is also used to configure interfaces. The wlan0 interface can be given an IP address, broadcast address, netmask, and state (up or down): # ifconfig wlan0 up 192.168.9.37 netmask 255.255.255.0 broadcast 192.168.9.255
# ifconfig wlan0
wlan0 Link encap:Ethernet HWaddr 00:0C:2D:00:2B:DB
inet addr:192.168.9.37 Bcast:192.168.9.255 Mask:255.255.255.0
inet6 addr: fe80::20c:2dff:fe00:2bdb/64 Scope:Link
UP BROADCAST RUNNING MULTICAST MTU:1500 Metric:1
RX packets:1 errors:0 dropped:0 overruns:0 frame:0
TX packets:18 errors:0 dropped:0 overruns:0 carrier:0
collisions:0 txqueuelen:1000
RX bytes:268 (268.0 b) TX bytes:2922 (2.8 KiB)In almost all cases, the broadcast address can be left out because it can be determined from the IP address and netmask. The netmask can also be omitted if it is the default value for the network class indicated by the IP address. Table 3-1 lists the standard netmasks.
The up argument is also unnecessary if an IP address is being specified. The previous command can therefore be written much more simply: # ifconfig wlan0 192.168.9.37
# ifconfig wlan0
wlan0 Link encap:Ethernet HWaddr 00:0C:2D:00:2B:DB
inet addr:192.168.9.37 Bcast:192.168.9.255 Mask:255.255.255.0
inet6 addr: fe80::20c:2dff:fe00:2bdb/64 Scope:Link
UP BROADCAST RUNNING MULTICAST MTU:1500 Metric:1
RX packets:1 errors:0 dropped:0 overruns:0 frame:0
TX packets:18 errors:0 dropped:0 overruns:0 carrier:0
collisions:0 txqueuelen:1000
RX bytes:268 (268.0 b) TX bytes:2922 (2.8 KiB)3.2.1.3.1. Configuring wireless networks from the command lineFor wireless interfaces, there are two additional commands that are useful for configuration: iwconfig, which sets wireless parameterssuch as the channel, encryption, and ESSIDand iwlist, which can be used to scan for available networks. iwconfig will display current settings if no parameters are given: # iwconfig
lo no wireless extensions.
eth0 no wireless extensions.
sit0 no wireless extensions.
wlan0 IEEE 802.11b ESSID:"" Nickname:"zd1201"
Mode:Managed Channel:6 Access Point: 00:90:4C:7E:00:29
Bit Rate:11 Mb/s
Retry:off RTS thr:off Fragment thr:off
Encryption key:off
Power Management:off
Link Quality:0/128 Signal level=60/128 Noise level:0/128
Rx invalid nwid:0 Rx invalid crypt:0 Rx invalid frag:0
Tx excessive retries:0 Invalid misc:0 Missed beacon:0Here you can see that this interface has associated with an access point with a MAC address of 00:90:4C:7E:00:29, and which is apparently an 802.11b network (11 Mb/s). To scan for available networks, use iwlist with the scan argument: # iwlist scan
lo Interface doesn't support scanning.
eth0 Interface doesn't support scanning.
sit0 Interface doesn't support scanning.
wlan0 Scan completed :
Cell 01 - Address: 00:90:4C:7E:00:29
ESSID:"fedorabook"
Mode:Master
Channel:11
Bit Rates:1 Mb/s
Bit Rates:2 Mb/s
Bit Rates:5.5 Mb/s
Bit Rates:11 Mb/s
Encryption key:off
Quality=60/128 Signal level=-76 dBm Noise level=-100 dBm
Cell 02 - Address: 00:87:29:13:c0:71
ESSID:"tylers"
Mode:Master
Channel:2
Bit Rates:1 Mb/s
Bit Rates:2 Mb/s
Bit Rates:5.5 Mb/s
Bit Rates:11 Mb/s
Bit Rates:18 Mb/s
Bit Rates:24 Mb/s
Bit Rates:36 Mb/s
Bit Rates:54 Mb/s
Encryption key:on
Quality=59/128 Signal level=-76 dBm Noise level=-99 dBmTo select which network wlan0 associates with, set the extended service set identifier (ESSID) of the interface: # iwconfig wlan0 essid fedorabook
# iwconfig wlan0
wlan0 IEEE 802.11b ESSID:"fedorabook" Nickname:"zd1201"
Mode:Managed Channel:6 Access Point: 00:90:4C:7E:00:29
Bit Rate:11 Mb/s
Retry:off RTS thr:off Fragment thr:off
Encryption key:off
Power Management:off
Link Quality:0/128 Signal level=76/128 Noise level:0/128
Rx invalid nwid:0 Rx invalid crypt:0 Rx invalid frag:0
Tx excessive retries:0 Invalid misc:0 Missed beacon:0To disable an interface, turn it down using ifconfig: # ifconfig wlan0 down
# ifconfig wlan0
wlan0 Link encap:Ethernet HWaddr 00:0C:2D:00:2B:DB
inet addr:192.168.9.37 Bcast:192.168.9.37 Mask:255.255.255.0
BROADCAST MULTICAST MTU:1500 Metric:1
RX packets:476 errors:0 dropped:0 overruns:0 frame:0
TX packets:18 errors:0 dropped:0 overruns:0 carrier:0
collisions:0 txqueuelen:1000
RX bytes:84965 (82.9 KiB) TX bytes:2922 (2.8 KiB)Notice that the ifconfig display no longer shows the UP flag for the interface. 3.2.1.3.2. Netmasks and routingThe netmask is used to determine which computers are on the local network, and which ones are remote and must therefore be reached through a gateway or router. These rules create the default routing table, which can be displayed with route: # route Kernel IP routing table Destination Gateway Genmask Flags Metric Ref Use Iface 172.16.97.0 * 255.255.255.0 U 0 0 0 eth0 default 172.16.97.254 0.0.0.0 UG 0 0 0 eth0 Notice that two routes have been configured. The first one states that local machines (those with IP addresses starting with 172.16.97) can be reached directly on the local network (gateway * and no G in the Flags column), and the second entry states that packets destined to any other IP address are to be sent through the router 172.16.97.254 (which is on the local network and therefore directly reachable). The default route can be removed and added back in, pointing to a different gateway/router: # route delete default # route add default gw 172.16.97.253 # route Kernel IP routing table Destination Gateway Genmask Flags Metric Ref Use Iface 172.16.97.0 * 255.255.255.0 U 0 0 0 eth0 default 172.16.97.253 0.0.0.0 UG 0 0 0 eth0 When the wlan0 interface is configured, a new route is added for hosts directly accessible through that interface: # ifconfig wlan0 192.168.9.37 # route Kernel IP routing table Destination Gateway Genmask Flags Metric Ref Use Iface 172.16.97.0 * 255.255.255.0 U 0 0 0 eth0 192.168.9.0 * 255.255.255.0 U 0 0 0 wlan0 default 172.16.97.253 0.0.0.0 UG 0 0 0 eth0 If other networks are available through additional gateways, these can be configured by using route with the -net and netmask arguments. For example, if your corporate network 10.x.x.x in London were accessible through the gateway 192.168.9.1 on your wireless network, you could configure the route with this command: # route add -net 10.0.0.0 netmask 255.0.0.0 gw 192.168.9.1 # route Kernel IP routing table Destination Gateway Genmask Flags Metric Ref Use Iface 172.16.97.0 * 255.255.255.0 U 0 0 0 eth0 192.168.9.0 * 255.255.255.0 U 0 0 0 wlan0 10.0.0.0 192.168.9.1 255.0.0.0 UG 0 0 0 wlan0 default 172.16.97.253 0.0.0.0 UG 0 0 0 eth0 3.2.1.3.3. DNS and hostnamesDNS resolution is controlled by the file /etc/resolv.conf, which looks something like this: search fedorabook.com oreilly.com nameserver 127.0.0.1 nameserver 216.183.93.224 There are three common option keywords used in this file:
If the DNS settings are configured by DHCP, this file is overwritten automatically with the values provided by the DNS server. In that case, an additional comment line will appear at the top of the file: ; generated by /sbin/dhclient-script To change the DNS configuration, simply edit this file with a text editor, adding or removing domains in the search line or adding or removing nameserver lines as necessary. The /etc/hosts file contains a list of IP and hostname mappings. As initially set up by Anaconda (the Fedora installation system), the file will look like this: # Do not remove the following line, or various programs # that require network functionality will fail. ::1 bluesky.fedorabook.com localhost The one entry in this file associates the system's name and the localhost alias with the loopback device (which may be expressed as ::1 in IPv6 notation, or 127.0.0.1 in IPv4 notation). This entry must exist in the file, or many system services will fail to operate. You can add additional entries to /etc/hosts if you want to refer to local computers by name but don't want to go through the effort of setting up DNS (see Lab 7.3, "Configuring a Domain Name Server"). Simply place the IP address at the start of the line and then list the names and aliases for that host, separated by spaces or tabs: # Do not remove the following line, or various programs # that require network functionality will fail. ::1 bluesky.fedorabook.com localhost 172.16.97.60 darkday.fedorabook.com darkday frank 172.16.97.73 accounting.fedorabook.com accounting susan 172.16.97.207 samba.fedorabook.com To change the system's hostname, edit the /etc/hosts file and change the entry for the loopback line (do not remove the localhost alias): # Do not remove the following line, or various programs # that require network functionality will fail. ::1 beige.fedorabook.com localhost Then edit the HOSTNAME entry in /etc/sysconfig/network: NETWORKING=yes NETWORKING_IPV6=yes HOSTNAME=beige.fedorabook.com The change will take effect next time you boot. To make the change take effect immediately, use the hostname command: # hostname beige.fedorabook.com # hostname beige.fedorabook.com 3.2.1.3.4. Configuring networking from the command line using DHCPFedora Core provides the dhclient program to configure network interfaces based on information received from Dynamic Host Configuration Protocol (DHCP) servers. Simply run this program as root, specifying the interface(s) that you wish to configure: # dhclient wlan0
# ifconfig wlan0
wlan0 Link encap:Ethernet HWaddr 00:0C:2D:00:2B:DB
inet addr:10.144.12.160 Bcast:10.144.255.255 Mask:255.255.0.0
inet6 addr: fe80::20c:2dff:fe00:2bdb/64 Scope:Link
UP BROADCAST RUNNING MULTICAST MTU:1500 Metric:1
RX packets:3 errors:0 dropped:0 overruns:0 frame:0
TX packets:18 errors:0 dropped:0 overruns:0 carrier:0
collisions:0 txqueuelen:1000
RX bytes:1222 (1.1 KiB) TX bytes:3442 (3.3 KiB)Since information supplied by a DHCP server is considered a lease that expires after a preset time, dhclient continues to run in the background so that it can renew the lease when necessary. If you move the machine to a new network and attempt to run dhclient again, the existing background process will be detected, and the new copy of dhclient will exit immediately without obtaining a new network configuration. To work around this problem, kill the background copy of dhclient before running it for the second time: # killall dhclient # dhclient wlan0
3.2.1.4. Using wireless adapters that require firmwareFedora's distribution policies do not permit the inclusion of binary software without source code, and that includes firmware. Unfortunately, some very popular wireless network cards require firmware for which the vendor will not release source code.
If you find that your wireless network card is not working, it is possible that a driver is present, but the firmware file is not. Use grep to search the system logfile for messages related to firmware: # grep firmware /var/log/messages Jun 29 04:11:57 beige kernel: usb 2-1: Failed to load zd1201.fw firmware file! Jun 29 04:11:57 beige kernel: usb 2-1: Make sure the hotplug firmware loader is installed. Jun 29 04:11:57 beige kernel: usb 2-1: zd1201 firmware upload failed: -2 Jun 29 04:11:57 beige firmware_helper[14394]: Loading of /lib/firmware/zd1201.fw for usb driver failed: No such file or directory These messages clearly show that the system attempted to load firmware for a USB wireless adapter but failed because the firmware file was not found (No such file or directory). To find more information, view the /var/log/messages file using a text editor or the less program, and search for the date and time identified by the previous grep command: # less /var/log/messages
...(Lines skipped)...
Jun 29 04:11:57 beige kernel: usb 2-1: new full speed USB device using
uhci_hcd and address 5
Jun 29 04:11:57 beige kernel: usb 2-1: configuration #1 chosen from 1 choice
Jun 29 04:11:57 beige kernel: usb 2-1: Failed to load zd1201.fw firmware file!
Jun 29 04:11:57 beige kernel: usb 2-1: Make sure the hotplug firmware
loader is installed.
Jun 29 04:11:57 beige kernel: usb 2-1: Goto http://linux-lc100020.sourceforge.net
for more info
Jun 29 04:11:57 beige kernel: usb 2-1: zd1201 firmware upload failed: -2Notice the message directing you to the driver web site. Visit that web site and download the firmware file provided (in this case, the file was named zd1201-0.14-fw.tar.gz, which was downloaded to the /tmp directory through a web browser). The next step is to unpack this file and then install the firmware by copying the *.fw files to /lib/firmware: # cd /tmp
# tar xvzf zd1201-0.14-fw.tar.gz
zd1201-0.14-fw/
zd1201-0.14-fw/zd1201.fw
zd1201-0.14-fw/README
zd1201-0.14-fw/makefile
zd1201-0.14-fw/zd1201-ap.fw
# cd zd1201-0.14-fw
# cp *.fw /lib/firmware
You can now use the wireless device after resetting the device driver, which you can do by physically disconnecting and reconnecting the adapter (if it is a removable device, such as a USB or CardBus adapter), rebooting the system, or using modprobe to remove and then reload the device driver. In this case, the driver name is zd1201, so the driver can be reloaded with these commands: # modprobe -r zd1201 # modprobe zd1201 After pausing for a moment to permit the interface to be configured, you can view /var/log/messages and the output of ifconfig to see whether the driver loaded successfully and brought up the interface: # tail -50 /var/log/messages
...(Lines snipped)...
Jun 29 04:25:58 beige kernel: usbcore: deregistering driver zd1201
Jun 29 04:26:04 beige kernel: usb 2-1: wlan0: ZD1201 USB Wireless interface
Jun 29 04:26:04 beige kernel: usbcore: registered new driver zd1201
Jun 29 04:26:05 beige dhclient: DHCPREQUEST on eth1 to 255.255.255.255 port 67
Jun 29 04:26:10 beige dhclient: DHCPREQUEST on eth1 to 255.255.255.255 port 67
Jun 29 04:26:11 beige dhclient: DHCPACK from 172.16.97.254
Jun 29 04:26:11 beige NET[15776]: /sbin/dhclient-script : updated /etc/resolv.conf
Jun 29 04:26:11 beige dhclient: bound to 172.16.97.101 -- renewal in 39113 seconds.
# ifconfig
eth0 Link encap:Ethernet HWaddr 00:0D:56:33:D7:18
inet addr:172.16.97.100 Bcast:172.16.97.255 Mask:255.255.255.0
inet6 addr: fe80::20d:56ff:fe33:d718/64 Scope:Link
UP BROADCAST RUNNING MULTICAST MTU:1500 Metric:1
RX packets:18181 errors:0 dropped:0 overruns:0 frame:0
TX packets:3263 errors:0 dropped:0 overruns:0 carrier:0
collisions:0 txqueuelen:1000
RX bytes:2561730 (2.4 MiB) TX bytes:375878 (367.0 KiB)
Interrupt:177
lo Link encap:Local Loopback
inet addr:127.0.0.1 Mask:255.0.0.0
inet6 addr: ::1/128 Scope:Host
UP LOOPBACK RUNNING MTU:16436 Metric:1
RX packets:4936 errors:0 dropped:0 overruns:0 frame:0
TX packets:4936 errors:0 dropped:0 overruns:0 carrier:0
collisions:0 txqueuelen:0
RX bytes:2973825 (2.8 MiB) TX bytes:2973825 (2.8 MiB)
wlan0 Link encap:Ethernet HWaddr 00:0C:2D:00:2B:DB
inet addr:172.16.97.101 Bcast:172.16.97.255 Mask:255.255.255.0
inet6 addr: fe80::20c:2dff:fe00:2bdb/64 Scope:Link
UP BROADCAST RUNNING MULTICAST MTU:1500 Metric:1
RX packets:10 errors:0 dropped:0 overruns:0 frame:0
TX packets:13 errors:0 dropped:0 overruns:0 carrier:0
collisions:0 txqueuelen:1000
RX bytes:1026 (1.0 KiB) TX bytes:2384 (2.3 KiB)3.2.1.5. Using private networksAny IP address that is publicly accessible must be assigned by a central authority in order to prevent address collisions. For private networks, addresses can be freely assigned from pools reserved for this purpose, as listed in Table 3-2; these addresses are guaranteed not to conflict with any public IP addresses. Many home and small business gateway products default to assigning addresses in the 192.168.1.x range. If your computer is assigned one of these addresses, it will not normally be accessible from machines that are on different networks (unless you are using the port forwarding feature of your router or wireless access point). 3.2.2. How Does It Work?The Linux kernel keeps track of network devices in the form of interfaces. Each interface is assigned a unique name, such as eth0, etH1, eth2, tr0, tr1, tr2, and so forth. The interface name is initially assigned by the device driver and kernel but may be overridden using ifrename. Each interface has a number of flags, statistics, and configuration settings; these values are exposed through /proc/net and /sys/class/net, and are displayed and manipulated by ifconfig. Interface aliases such as eth0:1 and eth0:2 permit multiple interfaces to be assigned to one physical network device. Packet routing is also performed by the kernel; the kernel routing table is exposed through /proc/net/route and /proc/net/ipv6_route, and is displayed and manipulated by the route command (netstat -r displays the same information). The DNS information stored in /etc/resolv.conf is used by the resolver libraries loaded by applications. Since most resolvers load the contents of /etc/resolv.conf only when an application is started, it is usually necessary to restart your applications after changing the resolver configuration.
The system-config-network tool is a Python script that manipulates the file /etc/sysconfig/network and the contents of the directory /etc/sysconfig/network-scripts (in addition to the /etc/hosts and /etc/resolv.conf files). These files are then read by the system init script to configure the boot-time network environment, and they are also used by other utilities such as ifup, ifdown, and system-control-network. The NetworkManager service consists of a single binary, /usr/sbin/NetworkManager, which attempts to keep a network running at all times. The NetworkManagerDispatcher service can be used to launch scripts in /etc/NetworkManager/dispatcher.d as interfaces are brought up and down, but this capability is not used by Fedora Core, so you can leave this service disabled. The GUI component of NetworkManager is provided by nm-applet (/usr/bin/nm-applet); the two components communicate through the desktop bus (dbus) mechanism. Wireless interface drivers provide an extended set of control and monitoring functions called the wireless extensions. There are many versions of the wireless extensions in use, and not all of the extensions are supported by each driver. The current version of the wireless extensions is version 20, and it is expected that this version will remain stable for some time. When a wireless card can be configured by the GUI or command line but not by NetworkManger, it's usually due to incomplete or out-of-date wireless extension support in the interface device. 3.2.3. What About...3.2.3.1. ...using a Fedora system as a router?A router passes packets from one interface to another, and Fedora is capable of doing this. /proc/sys/net/ipv4/ip_forward controls packet forwarding; writing a 1 to this path enables forwarding: # echo 1 >/proc/sys/net/ipv4/ip_forward
Likewise, writing a 0 disables forwarding: # echo 0 >/proc/sys/net/ipv4/ip_forward
3.2.3.2. ...renaming a network interface, or configuring a "wlan" interface using the GUI configuration tool?The ifrename utility can be used to rename a network interface. The -i option specifies the old interface name, and -n sets the new name. To rename wlan0 to eth1, for example: # ifrename -i wlan0 -n eth1
eth1
# ifconfig wlan0
wlan0: error fetching interface information: Device not found
# ifconfig eth1
eth1 Link encap:Ethernet HWaddr 00:0C:2D:00:2B:DB
BROADCAST MULTICAST MTU:1500 Metric:1
RX packets:0 errors:0 dropped:0 overruns:0 frame:0
TX packets:0 errors:0 dropped:0 overruns:0 carrier:0
collisions:0 txqueuelen:1000
RX bytes:0 (0.0 b) TX bytes:0 (0.0 b)The GUI network configuration program ( system-config-network) will sometimes refuse to configure interfaces that start with wlan; after renaming the interface, you can use the GUI configuration tool to permanently set up the interface. 3.2.4. Where Can I Learn More?
|
 Administration