17.3 Creating Snippets
Dreamweaver comes with a lot of snippets, many of which you may have no use for.
No problem梚t's simple to create snippets of your own. Here's how:
Create and select the code you wish to turn into a snippet.
You could, for instance, select a table in Design view, or select the opening and
closing <table> tags (as well all code between them) in Code view. If you make a snippet out of code that isn't visible in Design view, such as a JavaScript
program or content that appears in the <head> of the page, you'll need to
switch into Code view first and then select the code. Click the New Snippet button on the Snippets tab (Figure 17-1).
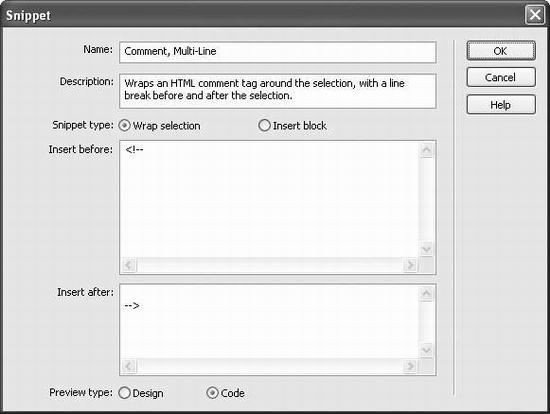
The Snippet window appears (Figure 17-2), displaying the code you selected in
the Insert field.  |
If you skip step 1, and just click the New Snippet button, you can either type the code or paste a previously
copied selection into the Insert box (see step 6).
|
|
Title the snippet.
The name you type in the Name field appears in the Snippet tab. Make sure to give
it an easily understood name. In the Description field, type identifying details.
This step is optional, but useful. Use this field to provide a description of when and
how to use the snippet and whether or not the snippet wraps a selection. Select a Snippet type.
Wrap Selection makes the code wrap code around a selection when you use the snippet
in your Web pages. The Insert Block option is for a snippet that is a single block
of code inserted into the document梖or example, a simple copyright notice. If necessary, add the code for the snippet.
If you initially selected code in the document window, it already appears in the
"Insert before" or "Insert code" field. If you're creating a wrapping snippet, then
some code will go in the "before" field and some in the "after" field. For example, say you wanted to create a snippet that would let you set off a paragraph
of text by adding a horizontal rule at the beginning of the paragraph and
one at the end. In both the "Insert before" and "Insert after" fields, you'd type
<hr>梩he HTML code for a horizontal rule (if you're creating XHTML pages as
described in Section 1.3.3, you'd type <hr /> in both fields.) Select a Preview Type.
The preview type determines how the snippet will appear in the Preview pane of
the Snippets tab (see Figure 17-1). Design means the snippet will look as it would
in Design view梐 snippet of a table will appear as a table. Code means the code
itself will appear in the Preview pane (in that case, a snippet for a horizontal rule
would preview like this: <hr>). Use Code preview for snippets that aren't visible
in Design view, such as JavaScript code. Click OK.
The snippet is added to the Snippets tab, and you can then drop it in your Web
pages using any of the techniques described in Section 17.2.
If you need to go back and edit a snippet梒hange the code, type, description or
name梥elect the snippet in the Snippets tab and click Edit Snippet (Figure 17-1).
You can also right-click (Control-click) the snippet name and select Edit from the
contextual menu. Whichever method you chose, the Snippet window (Figure 17-2)
appears. Make your changes and click OK.
17.3.1 Organizing Snippets
To keep snippets organized, you can create new folders to store them by category. To
add a folder to the Snippets tab, click the New Folder button (see Figure 17-1). An
untitled folder appears; type a name for it. If you select a folder before clicking New
Folder, Dreamweaver creates the new folder inside that folder. You can move folders
around by dragging them into other folders.
|
To drag a folder to the top level of the Snippets list, you have to drag it all the way to the bottom of
the tab, below any other folders. If you try to drag it to the top, Dreamweaver puts the folder inside the top
folder in the list.
|
|
To move a snippet into or out of its folder, simply drag it. If you drag a snippet over
a closed folder without releasing the mouse, that folder expands to reveal the folders
inside, if any.
To delete a snippet, select it from the Snippets tab and click the Delete Snippet (trash
can) button (see Figure 17-1). Quicker yet, press the Delete key.
|
 Configuration