1.3 The Dreamweaver Test Drive
Although reading a book is a good way to learn the ins and outs of a program, nothing
beats sitting in front of the computer and taking a program through its paces. Many
of this book's chapters, therefore, conclude with hands-on training: step-by-step tutorials
that take you through the creation of a real, working, professionally designed
Web site for the fictional online magazine the National Exasperater.
The rest of this chapter, for example, introduces Dreamweaver by taking you step-by-step through the process of building a Web page. It shouldn't take more than an hour. When it's over, you'll have learned the basic steps of building any Web page: creating and saving a new document, adding and formatting text, inserting graphics,
and adding links.
|
Occasionally, one of the floating windows梩he Property
inspector, for example梥imply disappears. Yet when you
visit the Window menu, you still see a checkmark next to
the window's name. In other words, that window is actually
still open梥omewhere.
This problem can result from accidentally dragging a window
off the screen or from choosing a smaller screen resolution.
Either way, simply choosing the window's name from the
Window menu won't help you; you're just hiding or showing
a window that's beyond the boundaries of your monitor.
Even quitting and restarting Dreamweaver is no use.
To get out of this predicament, choose Window Arrange
Panels to make the windows snap back to their default梐nd
visible條ocations on the screen. Arrange
Panels to make the windows snap back to their default梐nd
visible條ocations on the screen.
|
If you're already using Dreamweaver and want to jump right into the details of the
program, feel free to skip this tutorial. On the other hand, this tutorial identifies some
major changes in Dreamweaver MX 2004, so you may want to take a spin, even if
you're comfortable with Dreamweaver MX. (And if you're the type who likes to read
first and try second, read Chapters 2 through 5, and then return to this chapter to
practice what you've just learned.)
NOTE
The tutorial in this chapter requires the example files from this book's Web site,
www.sawmac.com/dwmx2004/
. Click the Tutorials link to go to the tutorials page. Download the files by clicking either the Chapter 1 Windows or Macintosh link, depending on the kind of machine you're using (Mac or Windows).
After you've downloaded and decompressed the files, you should have a DWTutorial1 folder on your computer, containing the Web pages and graphics needed for this tutorial. If you're having difficulties, the Web
site contains detailed instructions for downloading the files.
|
During the tutorial in these pages梐nd, indeed, everywhere
in Dreamweaver梱ou'll encounter a few terms frequently
heard at Web-designer luncheons:
Root folder. The first basic rule of Web design is that every
piece of the site you're working on梂eb page (HTML)
documents, graphic images, sound files, and so on梞ust
sit in a single folder on your hard drive. That master folder
is the root folder for your Web site梚n fact, it's the local root
folder. ("Local" means on your computer, as opposed to the
copies of these Web pages that will ultimately hang on the
Internet. "Root" means "the master, outer, main folder, in
which there may be plenty of subfolders.")
Local site. The usual routine for creating Web pages goes
like this: You first create the page on your own computer,
using a program like Dreamweaver; then you upload it to a
computer on the Internet called a Web server, where your
handiwork becomes available to the masses. In other words,
almost every Web site in the universe exists in two places
at once. One copy is on the Internet, where everyone can
get at it. The other, original copy is on some Web designer's
hard drive.
The copy on your own computer is called the local site
or the development site. Think of the local site as a sort
of staging ground, where you build your site, test it, and
modify it. Because the local site isn't on a Web server and
can't be accessed by the public, you can freely edit and add
to a local site without affecting the pages your visitors are
viewing, meanwhile, on the remote site.
Remote site. When you've added or updated a file, you
move it from the local site to the remote site. The remote, or
live, site is a mirror image of the local site. Because you create
it by uploading your local site, it has the same organizational
folder structure as the local site and contains the same files.
Only polished, fully-functional pages go online to the remote
site; save the half-finished, typo-ridden drafts for your local
site. Chapter 16 explains how to use Dreamweaver's FTP
features to define and work with a remote site.
(If you're using Dreamweaver's database features, by the
way, you'll encounter yet another term: a testing server.
You'll find the low-down on this kind of site, which is used
to test database features, in Section 21.3.)
|
1.3.1 Phase 1: Creating a Web Site
Whenever you build a new Web site or edit an existing one, you must begin by introducing
Dreamweaver to it梐 process called defining a site. This simple process
is the most important first step when you start using Dreamweaver, whether you
plan to work on a five-page Web site, build a thousand-page online store, or edit an
existing Web site.
Whenever you want to use Dreamweaver to create or edit a Web site, your first step
is always to show the program where the root folder is梩he master folder for all your
Web-site files. You do it like this:
Choose SiteManage Sites.
The Manage Sites window appears. Click New and then select Site from the pop-up menu.
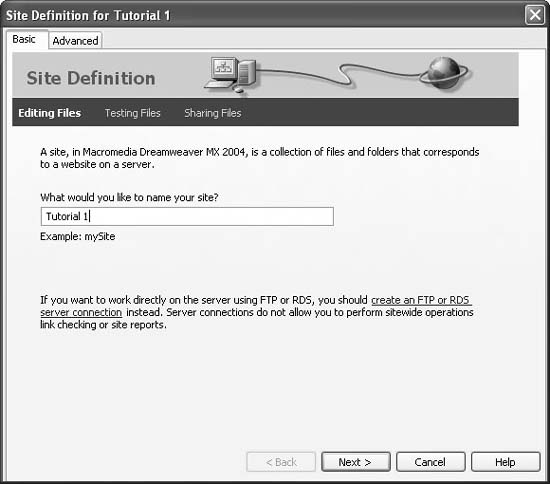
The Site Definition window appears.
Make sure the Basic tab is selected (see Figure 1-6). Type Tutorial 1 in the Site Name field. Click Next.
The name you type here is solely for your own reference, to help you identify the
site in Dreamweaver's Site menu. It won't appear on the Web. In the next step, you'll tell Dreamweaver whether you plan on building (a) regular
Web pages or (b) pages that require a special server for creating the dynamic, database-driven Web sites discussed in Part VI of this book.
Click "No, I do not want to use a server technology." Click Next.
In this tutorial, you'll be building a basic Web page. In the next steps, you'll tell Dreamweaver how you want to work on the files in
your site and where you store those files. In this example, you'll use the folder you
downloaded from this book's Web site (at other times, you'll choose or create a
folder of your own). Click "Edit local copies on my machine."
Understanding why you made this choice takes a bit of explanation. The most common method of working on the files of a Web site involves having
two sets of files: the local site on your hard drive and the remote site on the Web
(see the box in Section 1.3). But there are other ways to work on Web sites. For example, if you work at a company
with an in-house Web server, you may want to work directly on the online
Web files over the corporate network. In fact, there's a third method: you can even
edit your Web pages directly on the Internet. But the first method is by far the best one. Working directly on the live version of
the site梩he one anyone with a Web browser can see梕xposes your half-finished
pages, with their typos and missing pictures, to your audience. It's a much better
idea to perfect a page on your own computer, and then, when it's finished, move
it to the Web server. Click the folder icon next to the label, "Where on your computer do you want to store your files?"
The Choose Local Root Folder window opens, so that you can choose a folder on
your hard drive that will serve as your local root site folder. This is the folder on
your computer where you'll store the HTML documents and graphics, CSS, and
other Web files that make up your Web site. Browse to and select the DWTutorial1 folder.
The Mac and Windows versions of Dreamweaver handle this ritual a bit differently;
see Figure 1-7. If you were starting a Web site from scratch, you could also create a new empty
folder at this point. You would then save your Web pages and graphics into this
folder as you built your site. For more on root folders and organizing Web sites, see Part IV of this book. For now,
the fact to burn into your brain is that all the files that will constitute your Web site
must live in the one, single local root folder while you're working on them. Click Next. Now Dreamweaver asks how you want to connect to your remote server梩he
computer that will dish up the finished Web files to your adoring public. From the "How do you connect to your remote server?" menu, choose None;
click Next.
Dreamweaver can move your files to a Web server automatically, as you'll learn
in Chapter 16. After clicking Next, you see a summary of your settings. If you made a mistake,
click Back to return to the appropriate step in the process to make changes.

Click Done.
After defining the site, Dreamweaver creates a site cache for your Web site. That's a
small database (cache) that tracks pages, links, images, and other components of
your site. The cache helps Dreamweaver's site-management tools avoid breaking links, warn you when you're about to delete important files, and help you reorganize your site quickly. Since there are hardly any files in the DWTutorial1 folder,
you may not even notice this happening梚t'll go by in a blink of the eye. Dreamweaver returns you to the Manage Sites window. Click Done to close the window.
Defining a site doesn't actually do anything to your computer; it doesn't create a
home page or add a folder, for example. It merely prepares Dreamweaver for working
on a site.  |
Dreamweaver lets you define multiple Web sites, a handy feature if you're a Web designer with several clients, or if your company builds and manages more than one site. To define an additional site, choose SiteManage Sites and follow the steps in Section 1.3.1. You can then switch from one site to another using
the Site List in the Files panel (see Figure 14-6).
|
|
1.3.2 Phase 2: Setting Preferences
As noted at the beginning of this chapter, Dreamweaver has many different windows
that help you build Web pages. For this tutorial, though, you'll need only three: the
Insert bar, document window, and Property inspector (see Figure 1-2). (If you don't see the Insert bar, choose WindowInsert; if the Properties inspector isn't visible
choose WindowProperties.)
Before beginning the Web site construction in earnest, though, you'll help yourself
greatly by adjusting a few Dreamweaver preferences like this:
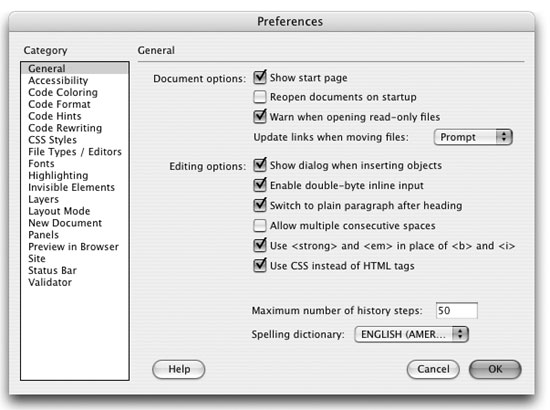
Choose EditPreferences (DreamweaverPreferences on a Mac).
The Preferences dialog box opens (see Figure 1-8). In the Category list on the left side of the Preferences dialog box, click General. Make sure the last checkbox?Use CSS instead of HTML tags"梚s turned on.
This is one of the big changes in Dreamweaver MX 2004. The program offers
wider support for Cascading Style Sheets and can use CSS instead of outdated
HTML tags to add sophisticated formatting to text, links, and basic properties of
a Web page. NOTE
The use of CSS for formatting text and page properties represents a big change in MX 2004. Out of the box, Dreamweaver uses CSS instead of the outmoded <font> tag to format text and old-school HTML
attributes to format the <body> tag.
If you still want to use those options梞aybe because you already have a site that uses the <font> tag religiously
梩urn off "Use CSS Instead of HTML tags" as pictured in Figure 1-8. But be careful; that approach is
deprecated (considered obsolete) by the W3C, the main Web standards organization. Future browsers may
not understand those tags and attributes.
Click OK.
The dialog box closes. You're ready to start building a Web site.
1.3.3 Phase 3: Creating and Saving a Web Page
"Enough already! I want to build a Web page," you're probably saying. You'll do so in
this phase of the tutorial.
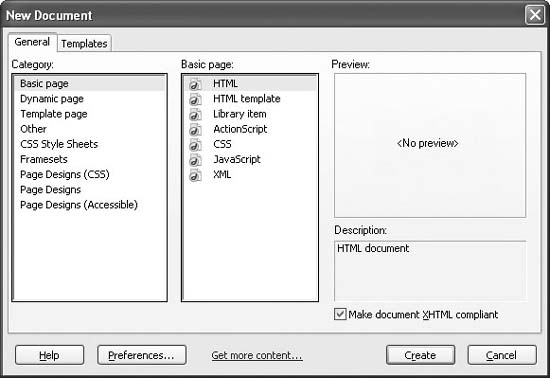
Choose FileNew.
Although you may already have a blank document open, you should get to know
the New Document dialog box (see Figure 1-9).
|
If you don't want to deal with this window every time you create a new page, click Preferences. In the Preferences dialog box, click the New Document category, and turn off the "Show New Document Dialog
on Control-N" checkbox.
While you're at it, you can also specify what kind of file you want Dreamweaver to make whenever you
press Ctrl+N ( -N). For example, if you most commonly create plain HTML files, choose HTML. But if you
most often create dynamic pages (like the ASP.NET pages described in Section 21.2.1.2), choose a different type
of file桝SP.NET VB, for example. -N). For example, if you most commonly create plain HTML files, choose HTML. But if you
most often create dynamic pages (like the ASP.NET pages described in Section 21.2.1.2), choose a different type
of file桝SP.NET VB, for example.
With these settings, pressing Ctrl+N (-N) will instantly create a new blank document. (Choosing File
New, however, will still open the New Document window.)
|
|
On the General panel, highlight the Basic Page category; in the Basic page list,
highlight HTML.
The window should look like Figure 1-9. You'll do one last thing before finally creating your new Web page: To be truly up-to-the-minute with Web building
techniques, you'll also use XHTML to build this page. XHTML, further described
in Section 0.2.2, is the latest incarnation of HTML. The main Web-standards organization, the World Wide Web Consortium (W3C), recommends it because of its
compatibility with future standards and its cleaner, more logical structure. (In other
words: Plain old HTML sites will theoretically become technologically obsolete
before XHTML sites.) Turn on the "Make document XHTML compliant" checkbox, and then click Create.
Dreamweaver opens a new, blank, XHTML page. Even though the underlying
code for an XHTML page is different in many ways than a plain HTML page, you
have nothing to worry about. Dreamweaver manages all that code, so you don't
have to. Choose FileSave.
The Save As dialog box opens. Always save your pages right away. This habit prevents serious headaches if the
power goes out as you finish that beautiful梑ut unsaved梒reation. Save the page as advertise.html in the DWTutorial1 folder.
Make sure you save this page into the correct folder. In Phase 1, you defined the DWTutorial1 folder as the root of the site梩he folder that holds all the pages and
files for the site. If you save the page outside of this folder, Dreamweaver will get
confused, and its site management features won't work correctly. |
Most operating systems let you save files with long names, spaces, and characters like #, $, and &. But some browsers and servers have trouble interpreting anything other than letters and numbers; for example,
Netscape 4.x can't "see" any files with spaces in their names. Play it safe: use only letters, numbers, and梚f
you want a good substitute for a space梩he underline or underscore character, like_this (Shift-hyphen).
Furthermore, Web servers rely on file extensions like .htm, .html, .gif, and .jpg to know whether a file is a Web page, graphic, or some other type of file. Dreamweaver for Windows automatically adds the extension
to your saved document names. But on the Mac, where you can save files without extensions, make sure
the file ends in the suffix .html or .htm when you save a Dreamweaver document.
|
|
If the document window toolbar isn't already open (see Figure 1-2), choose View
ToolbarsDocument to display it. The toolbar at the top of the document window provides easy access to a variety
of tasks you'll perform frequently, such as titling a page, previewing it in a Web
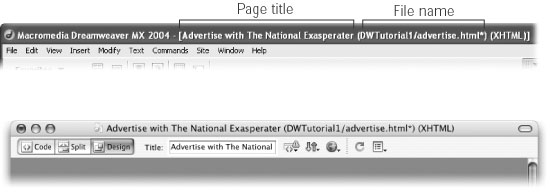
browser, and looking at the HTML source code. In the Title field in the toolbar, select the text "Untitled Document"; type Advertise
with the National Exasperater.
The Title field lets you set a page's title梩he information that appears in the title
bar of a Web browser. The page title is also what shows up as the name of your
Web page when someone searches the Web using a search engine like Yahoo or
Google. |
Try this simple experiment: Go to
www.altavista.com
and search for Untitled Document. You'll find
that the Web is strewn with thousands upon thousands of Web pages without titles, many of which were
created with Dreamweaver.
That's because when you create a new Web page, Dreamweaver assigns it the not-so-glamorous title "Untitled
Document" and all too many people forget to change that dummy text to something more meaningful. Not
only does "Untitled Document" look very unprofessional on a Web page, but an untitled page looks terrible
in the results list of a search engine.
|
|
Click the Page Properties button on the Property inspector or choose ModifyPage Properties.
The Page Properties dialog box opens (see Figure 1-10), allowing you to define the basic attributes of each Web page you create. There are five categories of settings that
let you control properties like background color, link colors, and page margins. From the Page font menu, select "Verdana, Arial, Helvetica, sans-serif."
This sets a basic font (and three backup fonts, in case your visitor's machine lacks
Verdana) that Dreamweaver will automatically use for all text on the page. As
you'll see later in this tutorial, though, you can always specify a different font for
selected text. Next, you'll set a basic text color for the page. Click the small black box next to the "Text color" label. From the pop-up color palette, choose "white."
Unless you intervene, all Web page text starts out black in Dreamweaver. But in
the next step, you'll set the background of this page to a darker color, so the text
needs to be a light color梬hite, in this case梩o be readable. (Here again, you can
override this color on a case-by-case basis, as you'll see later in this tutorial.) NOTE
Alternatively, you could have typed #FFFFFF into the box beside the palette square. That's hexadecimal
notation, which is familiar to HTML coding gurus. Both the palette and the hexadecimal color-specifying field
appear fairly often in Dreamweaver.

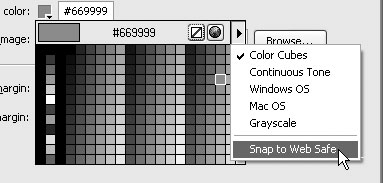
Click the small gray box next to the words "Background color." Using the eyedropper cursor, select the blue-gray square pictured in Figure 1-10.
The numbers #669999 should appear at the top of the box. You've just changed
the page background from white to bluish-gray. |
You can even fill the background of your page with a graphic梩o add a subtle pattern for texture, or to put the company logo in the background as a "watermark." Be careful with background images, however.
If there's a lot of contrast and detail in your background image, it can easily obscure the rest of the content
on the page.
To choose a background image, click the Browse button shown in Figure 1-10. A window opens, where you
can search for the graphic you want to use.
You can also control the placement of this background image梬hether it repeats across the entire page, or
just along the top or side, and more梪sing CSS. See Section 6.7.2 for more detail.
|
|
If you want to eliminate margins from the edge of the browser window, type 0 into each of the margin boxes.
Most browsers put a little bit of space between the contents of your Web page
and the top, left, right, and bottom sides of the browser window. The size of this
margin varies from browser to browser. If you like, you can change this setting to make the browser add more space to
the top and left side of the page, or eliminate it altogether. In fact, you can even
add a little extra empty space on the right side or bottom of a page. (The right
margin control is especially useful for languages that read from right to left, like
Hebrew.) The ability to set all four margins of a page from the Page Properties window
is new in MX 2004, made possible by Dreamweaver's use of CSS to control the
properties of a page. For this tutorial, you don't need to set any margins, but keep this discussion in
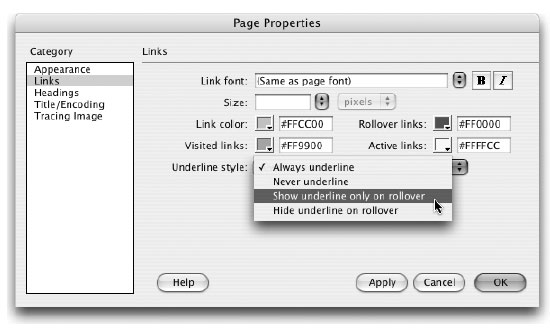
mind when you start building your own pages. Click the Links category and add the following properties: in the Links color field, type #FFCC00; in the Visited Links field, type #FF9900; in the Rollover links field, type #FF0000; and in the Active Links color field, type #FFFFCC (see
Figure 1-11).
These are hexadecimal codes that specify specific Web page colors; more on this
notation in Section 1.3.3. Links come in four varieties: regular, visited, active, and rollover. An active link
is one you're clicking at this moment; a visited link is one you've already been to,
as noted in a browser's History list. A regular link is a plain old link, unvisited,
untouched. And, finally, a rollover link indicates how the link looks when someone
moves their mouse over it. You can choose different colors for each of these
link states.
NOTE
Although Dreamweaver uses the term rollover link, in the world of Cascading Style Sheets, this kind
of link is called a hover link.
|
The innocent-looking gray box on the Property inspector,
the Modify Page Properties window, and in various boxes
throughout Dreamweaver is called the color box. You can
use it to choose a color for the selected Web page element
in any of three ways.
First, you can click one of the colors on the pop-up rainbow
palette that appears when you click the box.
Second, you can use the eyedropper cursor that appears
when you click the color box. This cursor is "loaded";
you can click any spot on
your screen梕ven outside
the dialog box梩o select a
color, a trick that comes in
handy when you want to
use a color from a graphic in
your document. Mac users
can even sample a color from another application (from any visible window, Dreamweaver
or not): just move the eyedropper over the color and click.
(This click may take you out of Dreamweaver. Just return
to Dreamweaver and you'll see that the color you sampled
has been applied.)
Finally, you can click the Color Picker icon, identified here, to
launch the Mac or Windows color-picker dialog box, which
lets you choose from among millions of possible colors.
If you decide you don't want to add color, or you want to
remove a color you've already applied, click the Default Color
button on the pop-up color palette. Without a specific color
setting, Web browsers will use default colors for the element
in question. For instance, text on a Web page is usually black
unless you specify otherwise.
Next to the color box in any Dreamweaver dialog box is a
blank text field. If you know your Web colors, you can type
their hex codes into this box, which is sometimes faster and
more precise than clicking on the rainbow palette.
In a hex code, a Web color is represented by a six-digit
code like this: #FF0000. (Hexadecimal notation is a system
computers use for counting. In this system, you count like
this: 0, 1, 2, 3, 4, 5, 6, 7, 8, 9, A, B, C, D, E, F. The # tells the
computer that the following sequence is a series of hexadecimal
numbers, in this case three pairs of them.) The best way
to learn a color's hex value is to choose the color you want
by clicking on it in the palette, and then looking at the code
that Dreamweaver writes into the text box next to it.
You can choose a different set
of rainbow colors (the ones
that appear in the palette),
too, using the Palette Options
menu. You can choose from
among five different palettes:
Color Cubes, Continuous
Tone, Windows OS, Mac OS,
and Grayscale. The first two
contain the Web-safe color palette (colors that most browsers on most machines will
reliably display in the same shades you pick) in different arrangements.
The Windows OS and Mac OS palettes display
the colors available on those respective operating systems
when in 256 color mode. Finally, the grayscale palette offers
256 somber shades of gray; you'll find them useful primarily
when building Ingmar Bergman tribute sites.
Finally, when you use the eyedropper to sample a color,
Dreamweaver uses the nearest Web-safe color梠ne of only
216 colors. When people surfed the Web with old monitors
and old video cards, sticking to Web-safe colors was a good
idea. Today, however, most computer screens can show
thousands or millions of different colors梞any more than
are available from the Web-safe palette. In short, consider
turning off the Snap to Web Safe option in the Palette Options
menu. You'll have a much wider range of colors to choose
from梐nd all of them, these days, are safe.
|
While it may seem a bit like overkill to have four different colors for links, the
regular and visited link colors can provide very useful feedback to Web visitors by
indicating which links they've already followed and which remain to be checked
out. For its part, the rollover link gives instant feedback, changing color as soon
as a visitor moves the mouse over it. Click OK to close the window and apply these changes to the page.
You return to your document window. If you see an asterisk next to the file name
at the top of the document window, Dreamweaver is trying to tell you that you've
made changes to the page since you last saved it (see Figure 1-12).
Choose FileSave (or press Ctrl+S [-S]).
Save your work frequently. (This isn't a Web technique as much as a computeralways-
crashes-when-you-least-expect-it technique.)
1.3.4 Phase 4: Adding Images and Text
Now you'll add the real meat of your Web page: words and pictures.
On the Common tab of the Insert bar, select Image from the Images menu (see
Figure 1-13).
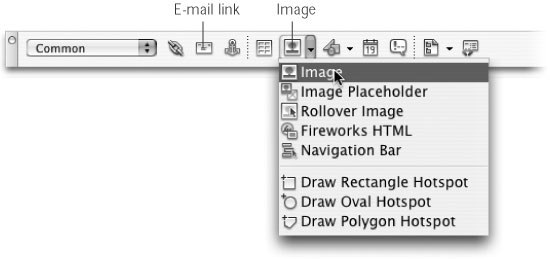
Alternatively, choose InsertImage. Either way, the Select Image Source dialog
box opens. Browse to the images folder in the DWTutorial1 folder; double-click the graphics
file called banner.gif.
The banner picture appears at the top of the page, as shown in Figure 1-14. A
thin border appears around the image, indicating that it's selected. The Property
inspector changes to reflect the properties of the image.
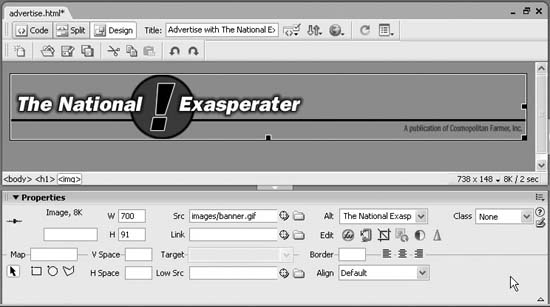
In the Alt field in the Property inspector, type The National Exasperater.
An image's Alt property is a text description of the graphic. It's important to add
a text label for each graphic on your Web page; two populations will thank you.
First, there are the people who deliberately turn off pictures in their Web browsers,
in exchange for a dramatic speed-up in the appearance of Web pages. Second,
visually impaired people often use software that reads the text of Web pages out
loud. In both cases, the Alt label you give each picture is all these visitors will have
to go on. Deselect the image by clicking just to its right, or press the right arrow key.
Unfortunately, clicking anywhere in the empty space underneath the image doesn't
always deselect the image (as it did in previous Dreamweaver versions). Keep the
arrow keys in mind梩hey're a great way to deselect a selected page element and
move your cursor into place for adding text or more images. Press Enter to create a new paragraph. Type Ad Sizes and Rates.
Notice that the text is white and uses the Verdana font; these are the exact properties
you set up earlier in the Page Properties window. The Property inspector now
displays text-formatting options. NOTE
The key called Enter on a Windows keyboard is named Return on most Macintosh keyboards. On the Mac, you can press either Return or Enter.
From the Format menu in the Property inspector, choose Heading 1 (see Figure 1-15).
The text you just typed becomes big and bold梩he default style for Heading 1.
This Format pop-up menu offers a number of different paragraph types. Because
the text isn't visually bold enough, you'll change its color next.

Select the text you just typed.
You can do so either by dragging carefully across the entire line or by triple-clicking anywhere inside the line. (Unlike the Format menu, which affects an entire
paragraph at a time, most options in the Property inspector, like the one you'll use
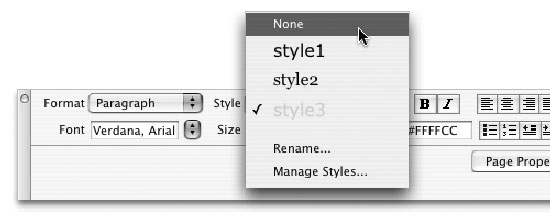
next, apply only to selected text.) Click the color box in the Property inspector and select a black color swatch. Two things happen. First, the color of the text changes to black (it'll actually appear
white until you deselect it). Second, a new style name appears in the Style menu on
the Property inspector, named Style1 (or Style2, or Style3, depending on whether
your independent spirit has led you off into earlier formatting expeditions). Meanwhile, Dreamweaver has actually created a new CSS style and applied it to this
heading. The Style menu lets you apply any styles you (or Dreamweaver) create.
You'll learn plenty about CSS styles in Chapter 6. Click to the right of the heading text to deselect it. Press Enter to create another new paragraph. Type this: The National Exasperater offers three sizes and rates
for advertisements.
This text is smaller than the headline above it. When you press Enter or Return at
the end of a headline-formatted paragraph, Dreamweaver automatically formats
the next line as a paragraph. (Want proof? Look at the Property inspector's Format
menu. It says "paragraph.") Not only is this new text is a bit dull, it also retains the black color of the headline.
If you look at the Style menu in the Property inspector, you'll notice that this text
is also in Style1, so your next move is to remove this formatting. From the Property inspector's Style menu, choose None.
You've just removed the style. Now you'll spice up the text, like this: Highlight the entire sentence you've most recently typed. From the Font menu in the Property inspector, choose "Georgia, Times New Roman, Times, serif."
The sentence is now displayed in another font. (Why is more than one font listed
for each choice in the Font menu? Turn to Section 3.3.2 to find out.) In addition,
Dreamweaver has created another CSS style (called Style2, or whatever) and listed
it in the Style menu on the Property inspector. Next, you'll want to italicize the name of your publication: Select the words "National Exasperater," and then click the button labeled I in the top row of the Property inspector.
The I button, of course, means italics. Dreamweaver italicizes your selection. For added attractiveness, you can now add a horizontal line梐 rule, as designers
call it梪nderneath the text you've typed so far: NOTE
Dreamweaver actually uses the <em> tag (meaning emphasis) whenever you apply italics to text.
See Section 3.3.2 for full details.
Click at the end of the last sentence to place the cursor there, and press Enter to
create a new paragraph. From the Insert bar menu, choose HTML.
A new set of Object buttons appears on the Insert bar. You'll insert the first object,
the Horizontal Rule. Click the Horizontal Rule button (the first button on the Insert bar). You can also choose InsertHTMLHorizontal Rule. Either way, Dreamweaver
inserts a line across the page. It's highlighted, meaning that the Property inspector
is showing its characteristics. With the horizontal rule still selected, type 700 in the W field of the Property
inspector. Press Enter.
The width of a freshly minted horizontal line is 100%梞eaning that it spans the
entire width of a browser window, no matter how wide the window is. You've just
changed your selected line's width to 700 pixels wide. From the Align menu in the Property inspector, choose Left.
Normally, a horizontal rule is centered in the middle of a page. Now the line is
aligned to the left, to match the alignment of the text and graphics on the page. Next, you'll add a subhead to the page, a graphic, and set of bulleted information
points. Click below the horizontal rule and type Square Button. From the Style menu in
the Property inspector, choose None; from the Format menu, choose Heading
2.
You've removed the style that was applied to the previous paragraph, and the
text for Square Button (one of the online ad sizes your Web site will be offering)
changes. It's now bigger and bolder, though smaller than the Heading 1 paragraph
at the top of the page. Now add some additional formatting to this text: Select the text you just typed; click the Color box in the Property inspector. From the pop-up palette, choose a light yellow color.
The text changes to the color you selected. Dreamweaver adds yet another style
(Style3) to the Style menu. A quick way to select this paragraph is to click the <h2> that appears in the lower
left-hand corner of the document window. (This is the tag selector, which lets you
quickly and accurately select HTML tags梚n this case, the Heading 2 tag). Click at the end of the line of text; press Enter.
Although the new line is formatted as a "paragraph" and not Heading 2, its still
retains the style of the previous paragraph. You don't want that style for this
paragraph, so you need to get rid of it. From the Style menu in the Property inspector, choose None (see Figure 1-16.)
Doing so removes the style from the text, restoring your original page settings
white Verdana text. Now you'll add another image梐 sample advertisement梩o the page. On the Common tab of the Insert bar, click the Image button.
Alternatively, choose InsertImage.
Browse to the images folder in the DWTutorial1 folder; double-click the file called square_ad.gif.
A square ad for the National Exasperater appears. Add Alt text for the image next, before you forget. With the graphic still selected, type Square Ad Sample in the Alt box in the Property inspector and press Enter.
Get in the habit of pressing Enter after typing anything in the Property inspector.
That way, you ensure that Dreamweaver won't "forget" to apply the property
value, as it sometimes does if you type it and then click somewhere without
pressing Enter. Next, you'll add a bulleted list of specifications for this type of ad. Click to the right of the image to deselect it. Press the Enter key to create a new paragraph.
A new paragraph appears just below the graphic. Next, you'll transform it into
a bulleted list. Click the Bulleted List button in the Property inspector (see Figure 1-17).
Next, you'll be adding a series of bulleted items that explain the size and cost of
a "Square Button" ad in the National Exasperater.
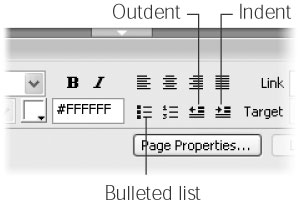
Type $100 for one month; hit Enter. Type Dimensions: 125 pixels x 125 pixels and hit Enter. Click the Bulleted List button again to end the list.
You can also click the Outdent button to do the same thing. You've just added a list with two bulleted items and reset the formatting to a
regular paragraph梟o indent and no fancy formatting. Next, you'll add another
horizontal rule. Choose InsertHTMLHorizontal Rule.
Alternatively, on the HTML tab of the Insert bar, click the Horizontal Rule button.
(For even faster horizontal ruling next time, add this button to the Favorites tab,
as described in Section 4.3.) Dreamweaver inserts a line across the page. This line is highlighted, meaning
that it's selected. Click in the W field of the Property inspector; type 700. From the Align menu in the Property inspector, choose Left.
As you did once before, you just created a horizontal rule of a specified width and
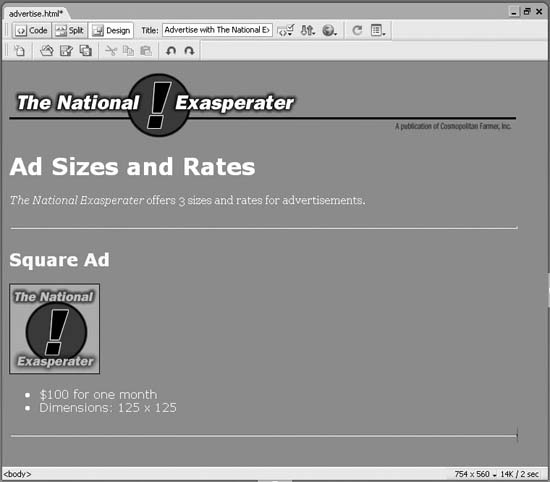
aligned against the left edge of the window. Your Web page in progress should now look like the one shown in Figure 1-18.
Choose FileSave.
1.3.5 Phase 5: Preview Your Work
Dreamweaver is as close as a Web-design program can be to a WYSIWYG application,
meaning that for the most part, What You See (in the document window) Is What
You'll Get (on the Web).
At least that's how it's supposed to work. But Dreamweaver may display more information
than you'll see on the Web (including "invisible" objects, table borders, and other
elements that you won't see in a Web browser), and may display less (it sometimes
has trouble rendering complex designs).
Furthermore, much to the eternal woe of Web designers, different Web browsers
display pages differently. Pages viewed in Netscape don't always look the same in Internet
Explorer. In some cases, the differences may be subtle (for example, text may be
slightly larger or smaller). Or it might be dramatic梥ome of the advanced page layout
techniques described in Chapter 8 look awful in older Web browsers. Throughout
this book, you'll find tips and techniques to deal with this problem.
If you're designing Web pages for use on a company intranet and only have to worry
about the one Web browser your IT department has put on everyone's computer,
you're lucky. But most of us have to deal with the fact that our sites must withstand
scrutiny by a wide range of browsers, so it's a good idea to preview your Web pages
using whatever browsers you expect visitors to your Web sites to use. Fortunately,
Dreamweaver lets you preview a Web page using any browser you have installed on
your computer.
Before you can preview a page, you need to set up your list of browsers in the program's
preference window, like this:
Choose FilePreview in BrowserEdit Browser List.
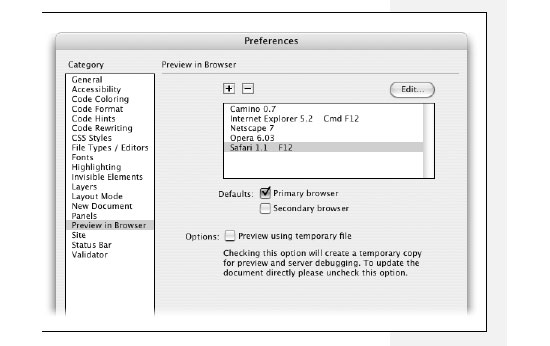
The Preview in Browser preferences window opens (see Figure 1-19).
Click the + button.
The Add Browser or Select Browser window opens. Click the Browse button. Search your hard drive to find the browser application you most frequently use and select it.
Dreamweaver inserts the browser's default name in the Name field of the Add
Browser window. If you wish to change its name for display purposes within
Dreamweaver, select it and type a new name. (But don't do this before selecting
the browser, since Dreamweaver will erase anything you've typed as soon as you
do finally select a browser.) Turn on the Primary Browser box. Click OK.
You've just designated the browser as your primary browser while working in
Dreamweaver. You can now preview your pages in this browser with a simple
keyboard shortcut: F12. If you like, you can also choose a secondary browser, which you'll be able to launch
by pressing the Ctrl+F12 (-F12) key combination. Now you're ready to preview your document in a real, bona fide Web browser.
Fortunately, Dreamweaver makes it easy: Press the F12 key (or choose EditPreview in Browser and select a browser from
the menu).
The F12 key is the most important keyboard shortcut you'll learn. It opens your
Web page in your primary browser, letting you preview your work. If you're using a Macintosh laptop, you may have to press both F12 and the function
(fn) key in the lower-left corner of the keyboard. |
The Document toolbar also has a preview button梩he globe icon. Click it to open a menu listing all the browsers you've set up in the "Preview in Browser" dialog box (Figure 1-19).
|
|
When you're done previewing the page, go back to Dreamweaver.
Do so using your favorite way to switch programs on your computer梑y using
the Windows taskbar, or the Dock in Mac OS X. NOTE
If the images don't appear when you preview the page, see the note in Section 4.2.2 for help.
1.3.6 Phase 6: Finishing the Page
You've covered most of the steps you'll need to finish this Web page. All you need to
do now is add the rest of the ad sizes and rates, add some contact information, and
add a copyright notice:
Click below the last horizontal rule in the document window; type Full Banner.
Notice that there's no formatting. Since the text is a heading of the same importance
as the "Square Button" paragraph heading above it, it would be nice to make
it look the same. Select Heading 2 from the Format menu on the Property inspector; and select Style3 from the Style menu.
This formats the text as a Heading 2, and also applies the style Dreamweaver created
in step 18 in Section 1.3.4. Now it's time to add another graphic梐 sample full banner ad梐nd a set of
bulleted information points, just as you did for the "Square Button" section of
the page. Click at the end of the paragraph and press Enter to create a new paragraph and choose None from the Property inspector's Style menu.
Doing so removes the style you applied a moment ago, creating a clean slate for
adding and formatting new text or images. On the Insert bar, click the Image button (or choose InsertImage).
The Insert Image dialog box appears. In the DWTutorial1images folder, double-click the file full_banner_ad.gif.
A full banner ad for the National Exasperater appears. Add the Alt text next. With the image still selected, in the Alt box in the Property inspector, type Full Banner Ad Sample.
Now you need only to add details for this ad. Click to the right of this image, and hit Enter to create a new paragraph; click the Bulleted List button in the Property inspector.
You've just added a bullet at the beginning of the paragraph. Type $560 for one month, and then press Enter; type Dimensions: 468 pixels x 60 pixels, and then press Enter.
You've just created two bulleted items. Click the Bulleted List button again to end the list.
To wrap up, you'll insert another horizontal line beneath your ad rates: Choose InsertHTMLHorizontal Rule.
Dreamweaver inserts the line; you'll need to make it look like the other lines on
the page. With the horizontal rule still selected, click in the W field of the Property inspector and type 700. From the Align menu in the Property inspector, choose Left.
The line moves to the left edge of the window, just like the other lines you inserted. Choose FileSave.
You're now ready to add the last elements to this page and finish this tutorial. Click below the last horizontal rule in the document window; type Half Banner.
Repeat steps 2 through 12 to add and format the final ad size and rates.
You'll use the graphic called half_banner_ad.gif located in the Images folder. Use the
text "Half Banner Ad Sample" for the Alt property. The two bulleted items of text
should read: "$230 for one month" and "Dimensions: 234 pixels x 60 pixels." Click below the last horizontal rule on the page; type Contact Information. Choose Heading 1 from the Format menu in the Property inspector, and select Style1 from the Style menu.
You've just created a big, bold heading just like the one at the top of the Web
page. Click to the right of the Heading 1 to deselect it and press the Enter key; choose "None" from the Style menu in the Property inspector.
Type The sales staff at the National Exasperater would be happy to take your money. Contact us and we'll make it so. Call us at 555-768-9090 or email our (don't type a final period).
Web pages can contain email links梐 link that opens your visitor's email program,
and automatically adds an email address to a new message. Dreamweaver has a
built-in function for adding this type of link. Click the Insert Email Link button in the Insert bar (see Figure 1-13), or choose InsertEmail Link.
The Insert Email Link dialog box opens. Type Advertising Department in the Text field.
This is the text that will appear on the Web page. Type adsales@nationalexasperater.com in the E-Mail field, and then click OK.
Notice that "Advertising Department" appears on the page underlined and in
yellow. This is the formatting for links on this page. The email address adsales@
nationalexasperater.com, however, is embedded into the link of the page. It may
be invisible to your audience, but a Web browser knows it's there. Click at the end of the line and type a period. Press Enter to create a new paragraph.
A blank line appears. You'll add some text and a link to another Web site. Type For more information on online advertising, visit the Interactive Advertising Bureau.
Select the words "Interactive Advertising Bureau."
You'll turn these words into a link that, when clicked, will send your visitor to
another Web site. In the Link field in the Property inspector, type
www.iab.net/
and press the Enter key.
You've just added an external link. When you preview this page and click that link,
you'll be taken to the home page for the Interactive Advertising Bureau. Click at the end of the line; press Enter and add another 700-pixel horizontal rule to the page.
In other words, repeat steps 10 and 11 above. This line, like the other ones you've
added, helps break up the page into distinct sections. Click below that last line and type Copyright 2004, the National Exasperater.
No page is complete without stamping your legal rights onto it. But that doesn't
mean you have to rub it in anyone's face, so you'll make the text a little less noticeable,
like this: Select your copyright-notice text; from the Size menu in the Property inspector, choose 12.
You've just set the text to 12 pixels tall. (See Section 3.3.3 for an explanation of different ways to specify the size of text.) It also creates one last style桽tyle4. Lastly, you'll
add some text and link it to a page already in your site. Click at the end of the copyright notice and type View our online privacy policy.
Now for the link. Select the text you just typed. In the Property inspector, click the folder icon that appears to the right of the link field.
The Select File dialog box appears. Navigate to the DWTutorial1 folder and select the file called privacy.html.
To apply the link, select the file and click OK, or simply double-click the file name.
Either way, the Select File box closes, and you return to your finished Web page. Choose FileSave. Press the F12 key to preview your work in your browser.
Test out the links to make sure they work.
Congratulations! You've just built your first Web page in Dreamweaver, complete with
graphics, formatted text, and links. If you'd like to compare your work with an actual,
Internet-posted version of the same page, visit the tutorial page for this book,
www.sawmac.com/dwmx2004/tutorials
. (The finished page, called finished.html, is also in
your DWTutorial1 folder.)
Much of the work of building Web sites will involve using the procedures covered in
this tutorial梔efining a site, adding links, formatting text, and inserting graphics. The
next few chapters cover these basics in greater depth and introduce other important
tools, tips, and techniques for using Dreamweaver to build great Web pages.
|