21.6 Connecting Dreamweaver to a Database
Dreamweaver MX 2004 works with a variety of different databases, from simple
Microsoft Access files to corporate mainstays like Oracle 9i. Depending on the server
model you've chosen, Dreamweaver connects to those databases in a variety of ways.
For the PHP server model, for instance, Dreamweaver works only using the MySQL
database and must connect directly to the MySQL server. For this tutorial, you'll use
the Access database you downloaded earlier.
Databases, like server models, come in many shapes and sizes. Access is different than
SQL Server, which is different from Oracle, FoxPro, or MySQL. Fortunately, there's a
common language that lets operating systems and programs communicate with all of
these databases and more梐 protocol called ODBC (Open Database Connectivity).
Each database company creates its own ODBC driver software.
The ODBC drivers for most popular databases are preinstalled on most Windows
machines. To further simplify the process, Windows computers let you assign a data
source name, a "nickname" that points to a particular database through a specific
ODBC driver. A data source name (DSN) is one of the most common methods of
connecting to a database on Windows. Instead of having to remember a long complex
series of codes to access your data, you simply use a short name梩he DSN.
NOTE
Many Web hosting companies that provide Windows-based Web hosting services let you set up DSNs
on their computers. You can use the same DSN name to refer to the database on your testing machine
and the database on the live Web server, even if those databases are located in different places on each
machine. In this way, you can move your database-driven pages from your testing server to the Web server
quickly and easily.
To set up a DSN, you need to open the ODBC Data Source Administrator window on
your Windows testing server. You could do this using one of Windows' administrative
control panels, but it's a lot easier to access this window within Dreamweaver as you
add a database connection to your site. You'll only have to do this once.
 |
Dreamweaver won't let you set up a connection to a database unless a dynamic page is already
open. You need to either open an existing page (index.asp, for example) or create a new dynamic page, as described in Section 21.5.
|
|
NOTE
To Mac users桭ollow these steps on a networked Windows machine. Copy the database file?span class="docEmphasis">nationalEx.mdb梠nto the Windows server and follow the instructions below for creating a DSN. You can then
connect to it from your Mac.
Open the Databases panel by choosing Window Databases. Databases.
The Application panel group opens. Click the + button at the top right of the panel. From the pop-up menu, choose
the appropriate database connection.
The options you see depend on which server model you've selected. For example,
if you're using ColdFusion, you get a list of all data sources (databases) defined in
the ColdFusion server. If you're using JSP, you see a long list of different database
options. In PHP, you see only one listing: MySQL Connection. For the purposes of this tutorial using ASP, your options are Custom Connection
String and Data Source Name (DSN). You'll create a DSN, so choose Data Source
Name. The window shown in Figure 21-8 opens. NOTE
ASP.NET note桟hoose OLE DB Connection to open the OLE DB Connection dialog box.
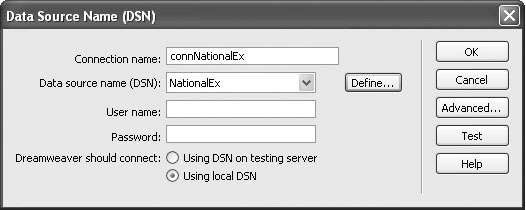
In the Connection Name box, type connNationalEx.
You can use any name you want as long as it doesn't start with a number and doesn't
contain any characters other than letters, numbers, and the underscore. In this case,
conn is a helpful indicator that this is a database connection and makes identifying
it easier if you ever need to look into the underlying code of the page. Next, you'll set up a DSN for your Windows system. NOTE
ASP.NET note桰n the Connection String box, type:
Provider=Microsoft.Jet.OLEDB.4.0;
Data Source=[path to database];
Replace the bracketed information梚ncluding the brackets梬ith a path to the .mdb (Access database) file.
For example, if you downloaded the files to your C: drive, then the connection string would be:
Provider=Microsoft.Jet.OLEDB.4.0;
Data Source=C:\DWDynamic\nationalEx.mdb;
Skip to step 15.
Click Define.
The Windows ODBC Data Source Administrator window opens (Figure 21-9).
Although Dreamweaver lets you access this administrative tool for the Windows
operating system, this window isn't actually part of Dreamweaver.
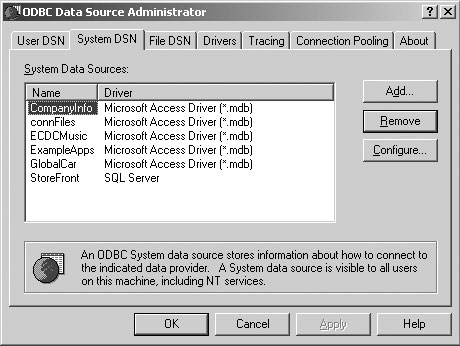
In the ODBC Data Source Administrator window, click the System DSN tab to
view all the DSNs currently set up.
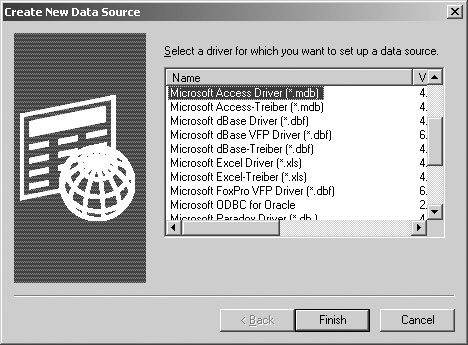
Make sure you choose the System DSN tab and not User DSN. User DSNs don't let your Web pages communicate with the database. In the ODBC Date Source Administrator window, click Add to create a new DSN.
Then, from the Create New Data Source window, choose Microsoft Access Driver
(Figure 21-10).
Next, you'll tell Windows where the database is and assign it a data source name
(DSN). Click the oddly named Finish button (you aren't finishing anything梱ou're
actually just getting started)!
The Microsoft Access Setup dialog box opens (see Figure 21-11). Now you'll give
this database connection a data source name (DSN), so it can communicate with
the database quickly and easily. Type NationalEx in the Data Source Name field.
Next, you'll select the database file you downloaded earlier.
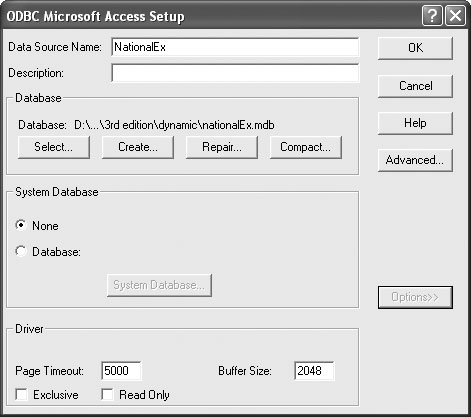
Click Select to open the Select Database window. Navigate to the DWDynamic
nationalEx.mdb file. Click OK.
You've just told Windows which Access database it should use. To minimize the
chances of an error that might prevent dynamic pages from appearing, you need
to adjust one other option as well. Click the Options button at the bottom of the window.
The window fully expands to display several optional settings, as shown in Figure 21-10. The one you're interested in is labeled Page Timeout. Type 5000 in the Page Timeout box.
The factory setting of 5 is too low, and can sometimes generate some frightening
looking errors條ike "Microsoft OLE DB Provider for ODBC Drivers error
`80004005' [Microsoft][ODBC Microsoft Access 97 Driver] Couldn't use `(unknown)';
file already in use." Click OK to exit the Access Setup window. Click OK once more to close the ODBC
Administrator.
You return to Dreamweaver and the Data Source Name window (Figure 21-8). From the DSN menu, choose NationalEx.
The NationalEx option may not appear immediately梠ccasionally Dreamweaver
doesn't register a new DSN. If this happens, click Define a second time. When the
ODBC Data Source administrator appears again, click Cancel. If your database requires a user name and password, enter them in the "User
name" and Password fields. (The National Exasperater database doesn't, so you
can leave these blank.) Make sure Using Local DSN is selected.
This option isn't available on the Mac, since DSN and ASP testing servers must
reside on a Windows machine. If you're using a database and testing server on another computer, select "Using
DSN on Testing Server" instead. Click the Test button.
If all goes well, a message reading "Connection made successfully" appears. Click OK to close the dialog box.
Behind the scenes, Dreamweaver creates a small file in the selected server model's
programming language, stores it in a folder called Connections in your site's root
folder, and adds it to every page on your site that communicates with the database.
(The file's name reflects the connection name you typed in step 3梙ere it's
connNationalEx.asp.)
NOTE
Don't delete the Connections folder. This folder holds scripts that let your pages connect to one or
more databases. If, while cleaning your site, you throw this folder away, you'll break the database connection
for all pages.
You're not limited to a single database connection. You can repeat the steps above to
connect to as many databases as you like. Once you've created a database connection,
Dreamweaver MX attaches it to all of the pages within your site梱ou don't have to
recreate the connection for each page.
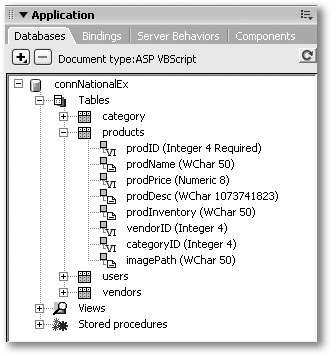
21.6.1 Exploring the Databases Panel
The Databases panel (Figure 21-12) lets you do more than just connect databases to
your site. It also lets you explore the structure and data of a database. By clicking the
+ buttons (flippy triangles on Macs) you can view any of three lists:
Tables. Lists all of the tables in the database (see Section 21.4). Expanding a table
displays all of the columns for that table (as shown way back in Figure 21-6). This
is the option you'll use most often. Views. Lists all views stored in the database. A view is a selection of data in the
database梐 slice of its data. Unless you've created views using the database systems
tools, this list is empty. Stored Procedures. Lists programs that access and manipulate information in the
database. Since they're stored right in the database, they run faster than similar code
in a Web page. (Some database systems桝ccess and MySQL, for example梔on't
recognize this feature.)
|
In the Databases panel, I see some weird information in
parentheses next to the column names桰nteger 4 Required,
for example. What's that about?
You're right梩here is a notation next to each column name.
For example, Figure 21-12 shows a column called prodID,
which is followed by (Integer 4 Required).
The information in parentheses denotes the type of data in
that column. In this instance, it's an integer (a whole number
like 1, 3, or 5), it's 4 bytes of data long (meaning it can be
a very, very large number) and it's required (meaning that
every new record must have a value stored in this field).
Within each of these categories, there can be subtypes like
time stamp, decimal number, and so on. Different databases
recognize different data types, so the list of possible data types for all the server models Dreamweaver supports is
quite long.
These notations may appear cryptic, but they can come in
handy. For example, if you're creating a form for updating
or inserting a record in a database (as described in the next chapter), the data type and length can help you determine
what kind of information you're looking for and how long
it should be.
For example, the prodName column pictured in Figure 21-12 contains text (that's what "Char" stands for, as in
"characters") and is only 50 characters long. So if you're
creating a form element, you'll probably want to create a
text field that accepts at most 50 characters (see Section 11.3 for details on form elements).
|
NOTE
To get a quick peek at the data in a database table, right-click (Control-click) the table's name in the
Databases panel. From the contextual menu, choose View Data. A window appears, displaying a table of
data extracted directly from the database!
In this chapter, you've laid the foundation for a dynamic Web site. In the next chapter,
you'll start adding data from a database to the page you created in the preceding
tutorial梐nd building a real, dynamic Web application.
|