23.5 Tutorial: Inserting and Updating Data
In this tutorial, you'll continue working on the National Exasperater's online store.
You'll work on two administrative pages that allow employees of the National Exasperater to add new products to the database, and to edit products already in the
database.
This tutorial assumes you've already completed the tutorials for Chapters 21 and
22. If not, turn to Section 21.3.1 and follow the instructions for preparing the application
server, database, and Dreamweaver for this project. Then turn to Section 22.8 and build
the product catalog pages.
23.5.1 Adding an Insert Product Page
Start by opening a page that's already been created.
Open the file named add_product.asp in the admin folder of the local site you
defined in Chapter 21.
Pages for adding and editing the online store's products shouldn't be accessible
to the public; you wouldn't want just anyone adding products?The Electric
Whoopee Cushion, by Mr. Hacker," for example梩o the store. Accordingly, these
pages are kept in a folder reserved for administrators of the Web site. (In the next
chapter, you'll learn how to password protect these pages.) NOTE
ASP.NET note桝SP.NET developers can follow along using the ASP.NET server model. Open the add_product.aspx file and follow the instructions below. Throughout this tutorial, Note boxes like this one will point
out differences in the procedures between .NET and ASP.
One piece of information required for each new product is an ID number for the
vendor who manufactures the product. The database for these products actually
contains several tables: Products, Vendors, and Category. Information about each
vendor (name and contact info) is in the Vendors table, while information on
each product (price, description, and so on) is in the Products table. A third table
contains a list of product categories, which you used in the last tutorial to create
the category navigation bar. To keep the Vendors and Products tables connected, so that you know which vendor
manufactures which product, the Products table includes a field containing the
vendor's ID number. Whenever you add an item to the Products table, then, you
also need to insert the vendor's ID number. To make the process of selecting a vendor easier, you should add a pop-up menu
that lists all of the vendors in the database. To make this kind of dynamic menu,
start by creating a recordset. Choose Insert Application ObjectsRecordset. Application ObjectsRecordset.
The Recordset window opens. Make sure that the simple recordset options show
up (see Figure 23-15). Next, you'll define the properties of this recordset. NOTE
In ASP.NET, a recordset is called a dataset, so choose InsertApplication ObjectsDataset for this
step.
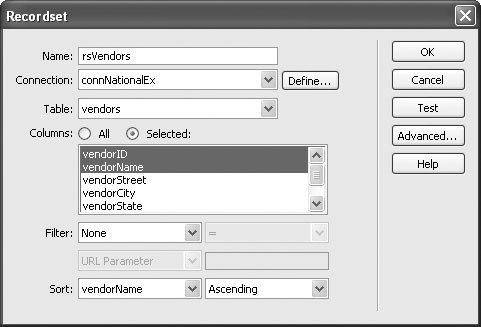
Type rsVendors in the Name box. Select connNationalEx from the Connection
menu. Select "vendors" from the Table menu.
These three steps set up the name, database, and table required for the recordset.
For a recap of creating recordsets, turn to Section 22.1.2. Click the Selected radio button; select vendorID and vendorName from the Columns list.
You can do this by holding down the Ctrl (Option) key while clicking the name of
each column. Finally, pick an order for sorting the list of vendors. Choose vendorName from the Sort menu. Make sure Ascending is selected in the
Order menu.
The Recordset window should now look like Figure 23-15.
Click OK to close the window and insert the recordset in the page.
Since the database also contains a list of product categories, next you'll create a
dynamic menu for them as well. Repeat steps 2-5: name the recordset rsCategories, select the "category" table,
choose the All columns radio button, and sort by CategoryName.
You've just added a second recordset to this page. Now you're ready to add a form
for inserting a new record. Click in the area directly below the headline "Add a Product." Choose Insert
Application ObjectsInsert RecordRecord Insertion Form Wizard.
The Record Insertion Form window opens. Next, you'll tell Dreamweaver which
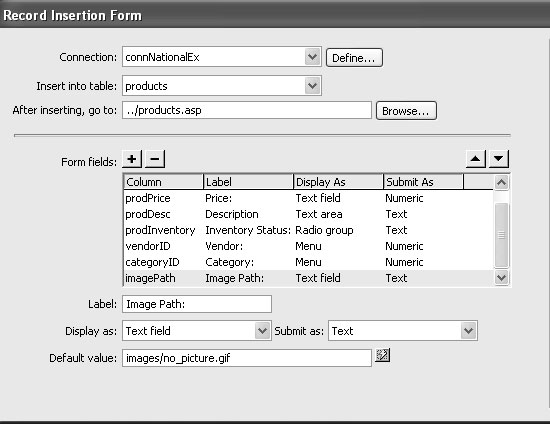
database to connect to and which table will receive data from the form. From the Connection menu, choose "connNationalEx." From the Insert Into
Table menu, choose "products."
You can insert data into only one table at a time. In this case, you've selected the
Products table because it holds all of the information for each item at the store.
After information is added to the database, the visitor will be redirected to another
page. You'll set this up next. Click the Browse button. Select the file products.asp.
After adding a new product to the database, your staff will be taken to the Products
page (the one you created in the previous chapter). Since the newly added
product is part of the database, browsing the products catalog will reveal the
newly added item. NOTE
To ASP.NET users桰n step 10, select the file products.aspx.
In the Form Fields list, select "prodID." Click the Remove (-) button to remove
this field.
In some cases, the database itself fills in certain fields. For instance, every product
in the database has its own unique ID梩he table's primary key, which is generated
by the database. When a new record is added, the database creates a new, unique
number and stores it in the prodID column. Since you don't want anyone entering the wrong information here, you should remove it from the form Dreamweaver
is about to create.
Select the prodName column. Change the label in the Label field to Product Name:.
The label you type here doesn't affect your database in any way. It's just the text
that visitors will see next to the form field. (You'll do the same thing with each
field, to make the labels reader-friendly.) Select the prodPrice column and change the label in the Label field to Price:.
The next field, ProdDesc contains a product description, so it might contain a
fair amount of text. The one-line Text Field form element, then, is just too small.
You'll change that to the more spacious Text Area next. Select the prodDesc column and change the label to Description:. From the
Display As menu, choose Text Area.
The database also tracks a product's inventory status: whether the product is in the
warehouse or on back order with the manufacturer. You could let a store administrator
type in the correct status, but that would take time, and, besides, he might
make a mistake. (It wouldn't do for shoppers to see that the "Big Foot T-Shirt" is
on "Gack Order.") So you'll simplify the process by adding radio buttons. Select the prodInventory column and change the label to Inventory Status:. From
the Display As menu, choose Radio Group, and click the Radio Group Properties
button.
The Radio Group Properties window appears (Figure 23-17). Here you're going
to add the radio buttons you want to appear on the form. Remember, the value
of each button must match the data stored in the database (Section 23.3.2).
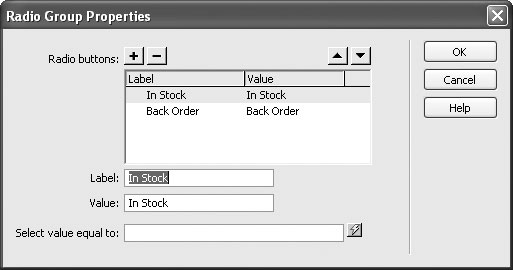
In the Label field, replace button1 with In Stock. Type In Stock in the Value field
as well.
The label is what appears on the page, while the value is the information that gets
stored in the database. You need to add one more button. Click the + button to add another radio button; repeat step 16 but type Back
Order for the label and value of the second button.
The window should look like Figure 23-17. You're almost done with the form. Click OK to close the Radio Group Properties window.
Again, in an effort to speed up data entry and make sure the form is filled out correctly,
the next two fields will be pull-down menus. First, you'll create a dynamic
menu to display the list of vendors, like this: Select the vendorID column, and then change its label to Vendor:.
This column only stores a number; the vendor's name and contact information is
stored in a different table. To make entering this information easier, you'll make
a dynamic menu that lists all of the vendors' names. When somebody chooses
a name from the menu, the appropriate vendorID number will be submitted to
the database. From the Display As menu, choose Menu. Then click the Menu Properties button.
The Menu Properties window opens (see Figure 23-18). Use this window to build
the menu.
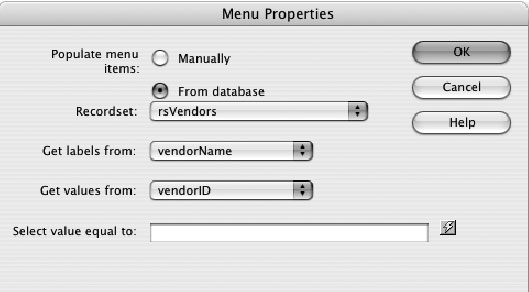
Click the From Database radio button. Make sure "rsVendors" is selected in the
Recordset menu.
You're telling Dreamweaver that the items to be listed in the menu are actually
coming from a database query. In fact, they come from the recordset you created
at the beginning of this tutorial梤sVendors. From the Get Labels From menu, choose vendorName. Then, from the Get Values
From menu, choose vendorID.
The labels梩he text that appears in the menu梬ill be the names of each vendor.
The value that's submitted with the form, meanwhile, will be the vendor's
ID number. You can skip the Select Value From field. It's useful if you want a particular value
to be preselected when the form loads. Click OK to close the window.
The product category is another instance where a pull-down menu makes sense.
You'll follow the same procedure to add a pop-up menu listing the names of all
the categories available at the store. Select the categoryID column, and then change its label to Category:.
The next few steps should feel familiar. Repeat steps 20-23; use the rsCategories recordset, retrieve the label from the
categoryName field, and set the value to categoryID.
For the final field, you'll change the label and manually enter a default value. Select the imagePath column, and change its label to Image Path:.
Because, not every product has an image, you'll change the default value to point
to a graphic that's already been created梠ne used to indicate that no graphic is
available. In the Default Value box, type images/no_picture.gif.
At this point, the Insert Record Form window should resemble Figure 23-16. NOTE
Note to ASP.NET users: The form items may not be in the same order as they appear in Figure 23-16. Use
the up and down arrows at the top right of the Form Field box to put them into an order that makes sense
(the first item should probably be the product name, for example).
Click OK again to insert the form.
Dreamweaver adds a table, a form, and all of the programming code necessary to
add a new product to the database. Choose FileSave.
You're nearly finished. All that's left is to finish up the design and take it for a
test drive.
23.5.2 Finishing the Insert Form
To make your form ready for primetime, you'll spruce up its appearance and prevent
users from submitting bad data.
Select the table containing the form.
The fastest method is to click anywhere inside the table, and then in the tag selector,
click the <table> tag (the one farthest to the right in the tag selector). For other
table selection techniques, see Section 7.4. In the Property inspector, from the Align pop-up menu, choose Default.
The Default option aligns the table to the left without adding bandwidth-hogging
HTML code. It would be nice if the text looked more like the rest of the site, too; in the next
step, you'll update the style of the text. In the Property inspector, from the Class menu choose productInfo.
The text inside the table should now be formatted to better match the site's style. Next, add form validation so that users can't submit the wrong kind of information. NOTE
To ASP.NET users桾he Validate Form behavior does not work with ASP.NET Web control. WWWeb
Concepts makes a free ASP.NET Form Validation Tool Kit v1.1.5 (
www.ebconcepts.com/asp/extension_details.
asp?MXP_ID=4
) that lets you perform server-side validation for ASP.NET pages.
Select the form by clicking the <form> tag in the tag selector.
You can also click the red, dashed line to select the form. Open the Behaviors panel by choosing WindowBehaviors.
Shift+F3 does the same thing. Click the + button and select Validate Form.
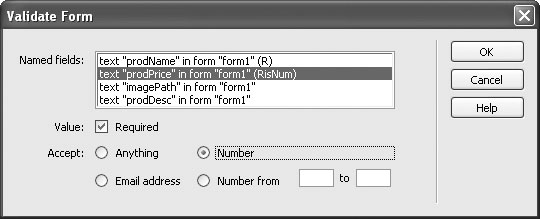
The Validate Form window appears. In this case, you want to make sure that when
this form is submitted, both a product name and a price have been entered. It
wouldn't make sense to have a product without a name or price. In addition, you
need to make sure that the user types a number (not alphabetic text) into the price
field. Since the database expects a number for the price, you'll receive a nasty error
if anything but a number is submitted. Select the first listing in the Named Fields box梩ext "prodName."
This is the field used for collecting the name of the item for sale. There should be
something in this box when the form is submitted. Turn on the Required box.
Notice that (R) appears next to the "prodName" item. It tells you that a value is
required for this field. Set up the price field next. In the Named Fields box, select the text "prodPrice" item. Turn on the Required
box and the Number radio button.
The window should now look like Figure 23-19.
Click OK to close the window and apply the behavior. Choose FileSave; press F12 to preview the page in your Web browser.
The finished page should resemble Figure 23-20.
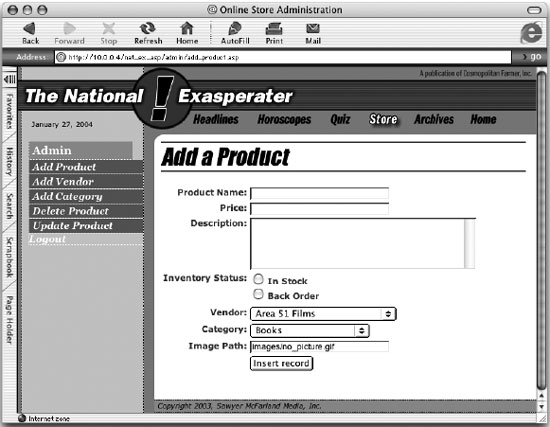
Type information into each of the fields and click the Insert Record button.
If you filled out all of the fields correctly, you should see the product page you built
in the last chapter. Click the category name of the new product you just added,
or navigate through the product pages until you find the newly added item. Try
filling out the form, except for the name and price, to see how the Validate Form
behavior prevents you from submitting the form.
NOTE
ASP.NET note桾wo things may trip you up when you try to use this page to add a product. Because the ASP.
NET page can't use Dreamweaver's Validate form behavior, you'll get an error if you don't include required
information, or if you type the wrong kind of information.
For example, if you type ABC, which isn't a number, into the price field, you'll run into all sorts of errors,
since the database is expecting a number. In addition, you may encounter the error, "Operation must use
an updateable query," which indicates that the Web server doesn't have permission to write data into the
Access database file (that's the nationalEx.mdb file included with the tutorial). The easiest way is to add
write permissions for all users to both the folder holding the database (DWDynamic) and the file itself
(nationalEx.mdb). For more info, check out
support.microsoft.com:80/support/kb/articles/Q175/1/68.ASP&NoWebContent=1.
There are many ways to enhance this page. For example, there's currently no way to
add a vendor to the database. When you add a product to the database using the form
you just created, you're stuck selecting one of the names listed in the pop-up menu.
To make this application more useful, you could add a button or link to the right of
the Vendor menu, call the link Add New Vendor, and link it to another insert record
page that would include form fields for inserting a new record into the Vendors table.
With the steps you've learned in this tutorial, you could even make that form return
you to the Add Product page, after you've added the vendor to the database.
23.5.3 Building a Page for Editing Database Records
If customers at the National Exasperater type the wrong information for a particular
product and have no way to correct it, they could be in a lot of trouble. After all,
they'd be losing money hand over fist, if the site was selling those $15.00 Loch Ness
Monster keychains for only $1.50. That said, here's how to add an update record
page to the site.
23.5.3.1 Linking to the Update Page
An update page is very much like an insert record page; the only difference is that the
form is already filled out with information about a particular record. The first step
is to tell the update page which product it's supposed to update. To do so, you must
add a link to the product details page you built in the last chapter.
Open the file named product_details.asp in the root folder of the local site.
This page lists details for a particular product. As you may recall from last chapter,
this page is itself accessed from the products.asp page, which displays a listing of
all products in the database. By clicking the name of a product on that page, the
product_details.asp page retrieves and displays information on a single ad. Now you need to create a link on this page that, when clicked, takes a visitor to an
update page for the particular ad. NOTE
To ASP.NET users桹pen the file product_details.aspx.
Click in the empty space under the table with the product information and type
Edit This Information. Select the text you just typed and click the Browse For
File button (the little folder icon) in the Property inspector.
The standard Open File dialog box appears. (The Go To Detail Page, described in
Section 22.7.1, is another way to create this link.) Navigate to and select the file in the admin folder called update_product.asp, but
don't close the window yet.
You need to add some additional information, which identifies the product that
needs updating, to the end of the URL. NOTE
To ASP.NET users桸avigate to and select the file update_classified.aspx instead.
Click the Parameters button to open the Parameters window. Click in the name
column and type prodID.
The Parameters button lets you add a URL parameter to the end of a link, allowing
you to pass information on to another page. In this case, you're passing on a
dynamic piece of data梩he product ID number for the item currently displayed
on the Product Details page. Press Tab twice to hop to the Value column. Click the dynamic data button (the
lightning bolt).
The Dynamic Data window opens. Here you can select data that you've already
added to the Bindings panel, such as columns from a recordset. From the rsDetails recordset, select the item "prodID" and click OK.
(You may need to click the + button to the left of the word Recordset to see this
option.) The link is nearly complete. NOTE
To ASP.NET users桽elect the item "prodID" from the rsDetails dataset instead.
Click OK to close the Parameters window. Click OK once again to close the Select
File window and apply the link.
When you're all done, the link box in the Property inspector should look like
this: admin/update_product.asp?prodID=<%=(rsDetails.Fields.Item("prodID").Value)%>NOTE
ASP.NET note桾he link box in the Property inspector should read: admin/update_product.aspx?prodID=<%#rsDetails.FieldValue("prodID", Container) %>.
Choose FileSave.
That was a lot of work, and you haven't started building the update page yet.
23.5.3.2 Creating the Update Page
Now that the initial legwork is out of the way, you're ready to build the actual record
update form. To start you'll add a filtered recordset to retrieve information for the
product to be updated.
Open the file update_product.asp in the admin folder.
NOTE
To ASP.NET users桹pen the update_product.aspx file.
Choose InsertApplication ObjectsRecordset.
The Recordset window opens. Make sure the simple options are displayed, as
shown in Figure 23-18. NOTE
ASP.NET note桲eep in mind that ASP.NET uses the term dataset in place of recordset, so wherever you
encounter recordset in these instructions, substitute dataset.
Type rsProduction the Name field, choose "connNationalEx" from the Connection
menu, and select "products" from the Tables menu. Leave the All button
selected.
Next, add a filter to the recordset. This will ensure that the recordset retrieves only
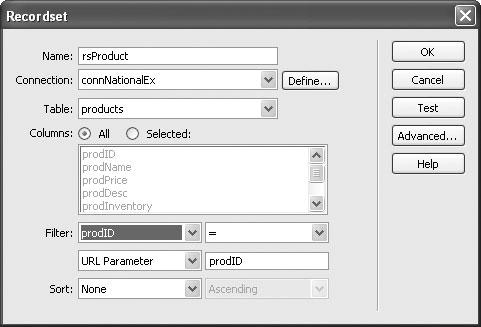
a single record梩he product you wish to update. From the Filter menu, select prodID. From the Comparison menu, select =. From
the Source menu, choose URL Parameter. Finally, in the last field in the Filter area
of the window, type prodID.
The Recordset window should now look like Figure 23-21. In essence, it instructs
the recordset to retrieve only the record whose prodID matches the number passed
in the URL parameter prodID. Click OK to close the window and add the recordset to the page.
Next, you'll create two more recordsets梐 listing all of the vendors and a listing
of product categories. You'll use them to create dynamic menus, just as you did
on the insert form. Follow steps 2-7 from the "Adding an Insert Product Page" part of this tutorial
(Section 23.5.1) to create new rsVendors and rsCategories recordsets.
(You can also copy those recordsets from the insert product page as described in
Section 22.1.7). The hard part's behind you. You can now use Dreamweaver's Update
Record Form tool to finish the page. Click in the empty area directly below the "Update Product Information" headline.
Choose InsertApplication ObjectsUpdate RecordRecord Update Form
Wizard.
The Record Update Form window opens (see Figure 23-21). Next, you'll specify
the recordset and fields the form should update.
From the Connection menu, select connNationalEx. Make these selections for
the next three menus: "products" in the Table to Update menu, rsProduct in the
Select Record From menu, and prodID in the Unique Key Column.
Next, you need to specify which page will appear after someone updates the record.
Since the update page lets you edit a single product, it makes sense that after
submitting any changes, you should see the newly updated information on that
product's detail page. Click the Browse button. In the Select File window, navigate to and select the file
product_details.asp. Click OK to choose the file.
Now you must specify which fields will appear in the form. You also need to change
which type of form element they should use, and edit their labels. This process is
very similar to the Insert Record form; it's summarized in the following steps. NOTE
ASP.NET note梇ou'll have to follow a few more steps here:
In step 9, click the Browse button next to the "On Success, Go To" box and select the product_details.aspx
page, but don't close the Select File window. Click the Parameters button. In the parameters window, click in the name column and type prodID. Press Tab twice to hop to the value column; press the dynamic data button (the lightning bolt). Select the item prodID from the rsProduct dataset. Click OK to close the Parameters window; click OK again to close the Select File window.

In the Form Fields list, select "prodID"; click the Remove (-) button to remove
this field from the list.
Since prodID is a primary key generated by the database, no one should be allowed
to change it. Next, you'll change the text label that will appear next to a couple of the fields. Select the "prodName" form field and change its label to Item for Sale:. Select the
"prodPrice" form field and change its label to Price:.
Next, you'll provide some more room for lengthy descriptions for each product. Select the prodDesc column. Change the label to Description:, and from the
Display As menu, choose Text Area.
As with the insert product page, inventory status information is better displayed
with a simple pair of radio buttons. You'll add those now. Select the prodInventory column. Change the label to Inventory Status:, and
from the Display As menu, choose Radio Group.
You need to give Dreamweaver a bit of information about the radio buttons you
wish to add to the page, so: Click the Radio Group Properties button.
The Radio Group Properties window appears (Figure 23-16). You need to add the
radio buttons you want to appear on the form. The value of each button must
match the data stored in the database. In the Label field, replace button1 with In Stock. Type In Stock into the Value
field, too.
The label will appear on the page, while the value will be stored in the database.
You need to add one more button. Click the + button to add another radio button; repeat Step 15 but type Back
Order for the label and value of the second button.
The window should look like Figure 23-16, except that the "Select value equal
to" box will be filled with the programming code necessary to select the correct
button. After all, since this is an update form, one of the buttons should already
be selected when the page loads. Click OK to close the Radio Group Properties window.
Again, in an effort to speed up data entry and make sure the form is filled out correctly,
the next two fields will be pull-down menus. First, you'll create a dynamic
menu to display the list of vendors, like this: Select the vendorID column, and then change the label to Vendor:. From the
Display As menu, choose Menu; click the Menu Properties button.
The Menu Properties window opens (see Figure 23-17). Click the From Database radio button, make sure rsVendors is selected in the
Recordset menu, and then choose vendorName from the Get Labels From menu.
Now, from the Get Values From menu, choose vendorID.
Leave the Select Value Equal To field as is. Dreamweaver automatically selects the
appropriate choice, based on which vendor manufactures the product. Click OK to close the Menu Properties window.
You need to repeat the process for the product categories menu. Select the categoryID column, and then change the label to Category. From the
Display As menu, choose Menu; click the Menu Properties button.
The Menu Properties window opens (see Figure 23-17). Click the From Database radio button, make sure rsCategories is selected in
the Recordset menu, and then choose categoryName from the Get Labels From
menu. Now, from the Get Values From menu, choose categoryID.
Leave the Select Value Equal To field as is. Dreamweaver automatically selects the
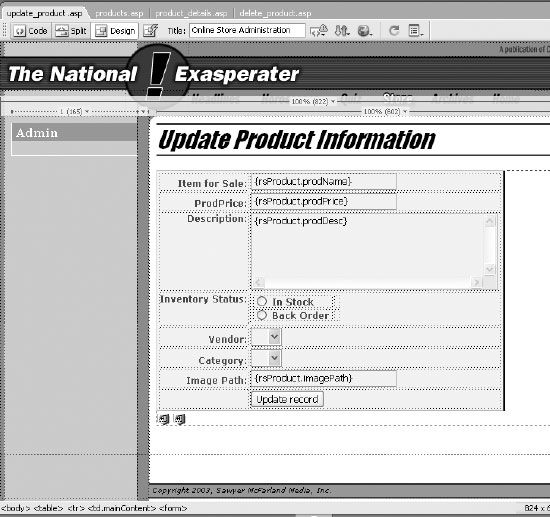
appropriate choice, based on which category a product belongs to. Select the imagePath form field and change its label to Image Path:.
At this point, the Record Update Form window should look like Figure 23-22. NOTE
To ASP.NET users桾he form items may not be in the same order as they appear in Figure 23-22.
Use the up and down arrows at the top right of the Form Field box to put them into an order that makes
sense (the first item should probably be the product name, for example).
Click OK to close the Record Update Form window.
Dreamweaver inserts a table, form, form fields, and programming code to the
update page. All that's left are some final cosmetic touches. Repeat steps 1-10 from the "Finishing the Insert Form" part of this tutorial (Section 23.5.2).
Doing so properly formats the form and adds the necessary form validation
behavior. Your finished page should resemble Figure 23-23. NOTE
ASP.NET note : See the note in Section 23.5.2 for information on validating ASP.NET forms.
Save this page and close it.
To get a feel for what you've done, it's time to test your application. Open the products.asp page. Press F12 to preview it in a browser.
The page lists the products in the database. Take a close look at one product in
particular. NOTE
ASP.NET note桹pen and preview the products.aspx page instead.
Click the name of any product in the list. A details page for that product appears. Click the Edit This Information link near the bottom.
The Update Product page appears, with the form already completed. Change some of the information on the form and then click the Update Record
button.
Voilà! You're taken back to the details page for this ad, which proudly displays the
freshly edited content.
23.5.4 Creating and Linking to the Delete Page
Obviously, if a vendor stops manufacturing a product, or the staff at National Exasperater
decide to discontinue an item, they need a way to remove a product listing
from the database. Adding a Link on the Details Page
To begin, you must provide a link to delete the product. A good place for this would
be on the details page of each product. Since you've already added an Edit This Information
link to this page, you must now add a Delete This Product link.
Open the file product_details.asp.
Add a link that leads to a Delete page. NOTE
ASP.NET note桹pen the file product_details.aspx instead.
Near the bottom of the page, click to the right of the text you added earlier: Edit
This Information. Press the Space bar, followed by the | character and another
space; type Delete This Product.
Now you'll link this type to the Delete page. Select the text "Delete This Product" and click the Browse for File button in
the Property inspector (the little folder icon). Navigate to and select the file delete_
product.asp in the admin folder, but don't close the window yet.
You need to tag on the information that will let the update form know which
product it should update. (ASP pages can also use the Go To Detail Page server
behavior to accomplish the same thing; see Section 22.7.1). NOTE
ASP.NET note: Navigate to and select the file delete_product.aspx instead.
Follow steps 4-7 in the "Linking to the Update Page" part of this tutorial (Section 23.5.3.1).
Doing so creates a link that not only goes to the Delete page, but also passes along
the ID number of the product to be deleted. There's one final step for this page: copying a recordset to use on the Delete
page. Open the Bindings panel. Select "Recordset (rsDetail)," right-click (Control-click)
on it, and choose Copy from the contextual menu.
You've just copied the recordset information so you can use it on another page.
(You can also copy a recordset from the Server Behaviors panel in this way.) Save and close this page.
23.5.4.1 Creating the Delete Page
You've just created a link to the Delete page; now you need to make the Delete page
do its stuff.
Open the file delete_product.asp.
This is where you'll paste the recordset that you copied a moment ago. NOTE
ASP.NET note桹pen the file delete_product.aspx.
Make sure the Bindings panel is open. Right-click (Control-click) in the empty
area of the panel; from the contextual menu, choose Paste.
Dreamweaver pastes all the programming code to create recordset from the Details
page. This is a fast way to reuse a recordset. In the Bindings panel, expand the recordset listing by clicking the small + button
to the left of the recordset.
Don't click the large + button, which lets you add additional recordsets. You just
want to see an expanded listing of recordset columns so you can add some dynamic
data to the page. Drag the prodName column from the Bindings panel and drop it onto the document
window, just to the right of the text "Item to Delete."
This inserts dynamic data into the page. When this page appears in a Web browser,
the name of an ad will appear in bold type. Click in the empty space just below the name of the product. Choose Insert
FormForm.
A red, dotted line梩he boundaries of the form梐ppears on the page. Now you
need to add a Delete button to the form. Choose InsertFormButton. In the Property inspector, change the label to
Delete.
This button, when clicked, removes one product from the database. NOTE
ASP.NET note桾here are a couple of extra steps you need to perform before continuing to step 7.
Select the form (click on the red dotted line or click <form> in the tag selector). In the Action box in the Property inspector, type delete_product.aspx. This will force the form to send its
information back to the page (the Delete record server behavior will then delete the record and send the
administrator off to the main products page.) Click just to the right of the Delete button and choose InsertFormHidden Field. Name the field prodID and then click the lightning bolt button to the right of the value box. This opens
the Dynamic Data window. Choose prodID from the list and click the OK button. This sets the value of the hidden field to the ID
number of the product to be deleted. Continue to Step 7.
Open the Server Behaviors Panel (WindowServer Behaviors). Click the + button
and select Delete Record.
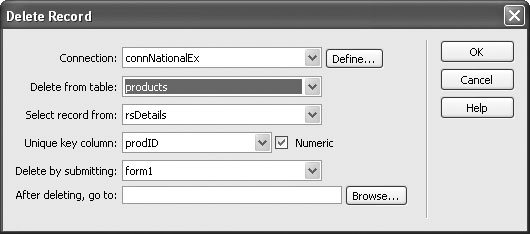
The Delete Record window appears (see Figure 23-24). From the Connection pop-up menu, choose connNationalEx.
Now tell Dreamweaver which table the record belongs to. From the Delete from Table menu, choose products.
The next three boxes should be filled out correctly, and the Delete Record window
should now look like Figure 23-24. Essentially, these four selections tell Dreamweaver
which table the record is in, which recordset retrieved the record, what
database column is the primary key, and which form has the Delete button. To finish filling out this window, you'll just tell Dreamweaver which page should appear
after someone deletes the record. NOTE
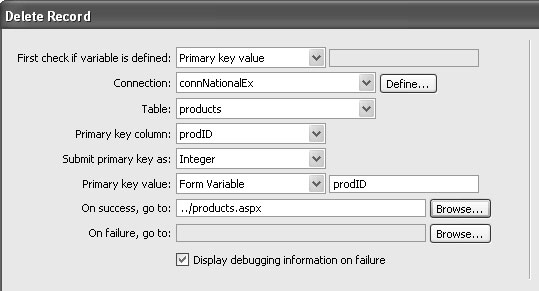
ASP.NET note桵ake sure Primary Key Value is selected in the first menu, and the other menus are similar
to Figure 23-25.
Click the Browse for File button in the Property inspector. Navigate to and select
the file products.asp.
NOTE
ASP.NET note桽elect products.aspx instead.
Click OK.
Dreamweaver adds the Delete Record server behavior to the page. You've done it!
Now you need to test it out. Save and close this page. Open the products.asp page. Press the F12 key to preview
it in a browser.
The page lists the products in the database. Take a closer look now at a specific
item. NOTE
ASP.NET note桹pen and preview the products.aspx page instead.
Click the name of any product in the list.
A details page for that product appears. Click the Delete This Product link near the bottom.
The Delete Product page appears (see Figure 23-26). Notice that both the product
name and a Delete button appear.
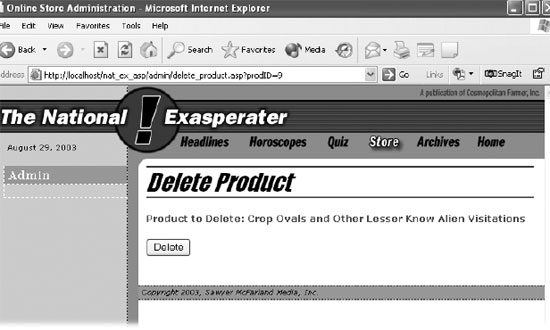
Click the Delete button to remove the item.
Don't worry: You can always insert more products later! In any case, you'll note that that the product is no longer listed in the Product
listings.
Of course, in the real world, you wouldn't want just anybody deleting, adding, or
editing products from an ecommerce Web site. So in the next chapter, you'll learn
how to keep prying eyes and mischievous fingers away from your coveted Insert,
Update, and Delete pages.
|