24.4 Tutorial: Authentication
In the tutorial at the end of Chapter 23, you created Web pages that could add, delete,
and update records in the National Exasperater database. You wouldn't want to
allow just anyone who visits the Web site to access these pages, let alone delete ads
from the site.
NOTE
ASP.NET note桿nfortunately, Dreamweaver doesn't include any tools for adding password protection to
ASP.NET pages. However, a commercial extension is available (Section 24.1).
The following steps assume that you've worked through the tutorial in Chapter 23,
and have all of the completed files ready to go. You'll build on them in the following
steps.
24.4.1 Building a Login Page
The first step is to create a login page梐 simple form with fields for a user name
and password. After a successful login from this page, an administrator will be able
to access the administration pages.
Open the file
login.asp
in the
admin
folder of the site.
This page will contain the form for typing in an administrator's user name and
password. You'll add the form next. Click in the empty space directly below the headline "Administrator Headline."
Choose Insert FormForm. FormForm.
Dreamweaver adds a red dashed line to the page, indicating the beginning and
ending <form> tags. In the Property Inspector, type login as the name of the form.
While this step isn't required, it's good to get into the habit of assigning your forms
helpful names. In the document window, click inside the red dashed lines and type
Username:.
This is the label for the form field you'll add next. Choose InsertFormText Field. In the Property inspector, name this field
username.
Next, because a login requires both a user name and password, you need to also
add a form field for capturing a password. Click to the right of the form field you just inserted and press the Enter (Return)
key to add a new paragraph. Type
Password:.
Choose InsertFormText Field. In the Property inspector, name this field
password and select the Password radio button.
By turning this form element into a password field, anything your visitors type
in the field will be displayed like this **** or this ••••, hiding the secret password
from nosy passersby watching over your shoulder. To complete the form, you'll add a Submit button. In the document window, click to the right of the password field and press the
Enter (Return) key. Choose InsertFormButton.
The form is complete. Now it's time to let Dreamweaver do its magic. Choose WindowServer Behaviors to open the Server Behaviors window.
Alternatively, you can use the keyboard shortcut: Ctrl+F9 ( -F9). -F9). Click the + button and choose User AuthenticationLog In User.
The Log In User window appears (see Figure 24-11). The first three items should
already be filled out: the name of the form, the name of the user name field, and
the name of the password field. If you had more than one form on the page, or
additional fields inside the one form, you'd have to tell Dreamweaver which form
and which fields to use for collecting the login information.
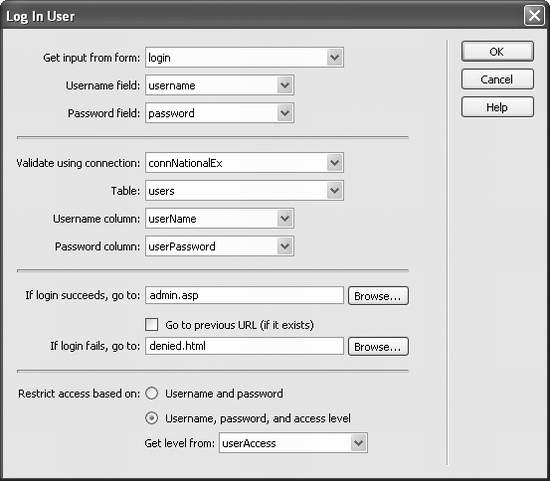
From the Validate Using Connection pop-up menu, select connNationalEx.
This indicates which database contains the login information. You also need to
specify which table and columns contain the user name and password. From the Table menu, select Users. From the Username Column pop-up menu,
choose "username." From the Password Column pop-up menu, choose userPassword.
You've just established the basic logic of the login behavior: Whatever a visitor
types into the two form fields is compared with data stored inside the Users table
in the National Exasperater database. Next, you need to specify what happens when there's a match梬hen your visitor
types a valid user name and password into the form梐nd what happens when
the visitor types in an invalid user name or password. Click the Browse button to the right of the "If Login Succeeds, Go To" field. In
the Select File window, navigate to and select the file
admin.asp
inside the
admin
folder. Click OK.
You've just chosen the page that will appear if the login is successful; your visitor's
browser will display an administration page. Click the Browse button to the right of the "If Login Fails, Go To" field. In the
Select File window, navigate to and select the file
denied.html
inside the
admin
folder. Click OK.
This, of course, is the "access denied" page that will appear when somebody types
in an invalid user name or password. Because this section of the site is for administrators only, you'll add an additional
layer of security by restricting administrative pages using an access level as well
as a password and user name. In this way, you'll also be able to have other password-
protected pages梥uch as a special "paid subscribers" section梖or registered
visitors, without letting them access administrative areas of the site. Select the "Username, password, and access level" button. From the "Get level
from" pop-up menu, choose userAccess.
The database table includes a special field for defining the access privileges of
each registered user. For example, each administrator record in the users table
also includes the value admin in the userAccess field. Click OK. Save this file. Press F12 to preview it in your Web browser.
You'll now try out your newly created login page. In your Web browser, type anything you want in the two fields; click Submit.
Unless you've just made an incredible guess, you just typed in a user name and
password that doesn't exist in the database. If the technology gods are smiling,
an "Access Denied" page appears. Now try it again: Click the "Try logging in again" link to return to the login page. Type
bigcheese
in the Username field and
sesame
in the Password field; submit the form.
This time, you're in: the browser takes you to the main administration page. Here
you can jump to the pages you created earlier for adding, updating, and deleting
classified ads. The login script works just fine梱ou end up at the right page when you type in a
valid user name and password. However, none of those other pages are protected
yet. You can go to any of them, even if you haven't logged in. In the next part of
this tutorial, you'll lock down each admin page, so only logged-in administrators
can access them.
24.4.2 Password-Protecting the Administration Pages
The password protection features offered by Dreamweaver require you to add a server
behavior to each page you wish to protect.
Open the file
admin.asp
in the
admin
folder.
This page is the main jumping-off point for adding, deleting, and updating
products. It should only be accessible to administrators, so you'll add password
protection to it. Make sure the Server Behaviors window is open (WindowServer Behaviors).
Click the + button and choose User AuthenticationRestrict Access To Page.
(Alternatively, you can use the User Authentication menu in the Insert bar, as
pictured in Figure 24-2.) The Restrict Access To Page window appears (see Figure 24-12). Since you want to
limit access to administrators only, make sure the page is restricted to those with
the proper access level.
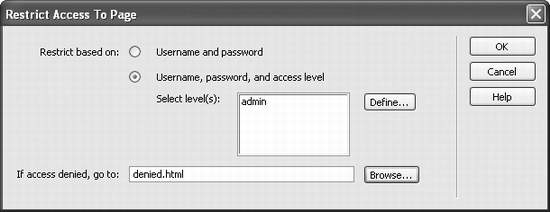
Select the "Username, password, and access level" radio button.
You want to specify which type of user has access to this page, but first you must
tell Dreamweaver what the different levels are. Click Define to open the Define Access Levels window. In the Name field, type
admin;
then click OK to close the window.
The word admin appears in the Select Levels box. If you had other areas of the site
with different access privileges, such as a subscriber area of the site only paying
subscribers could access, you could continue to add levels by repeating this step. Click Browse; select the
denied.html
file in the
admin
folder and click OK. Click
OK again to close the Restrict Access To Page window.
To finish this page, you'll add a "Log out" link. Select Logout (the last link in the left-hand navigation bar on the page).
You'll turn this text into a "Log out" link. On the Server Behaviors panel, click the + button and select User Authentication
Log Out User.
Again, this option is also available from the Insert bar as pictured in Figure
24-2. In any case, the Log Out User window appears (see Figure 24-13). The first
radio button should already be selected. The text Selection: "Logout" appears in
the menu. These are the proper settings; you're simply adding the logout script to the words
you selected on the page. Next, you'll tell Dreamweaver which page to go to after the visitor logs out.
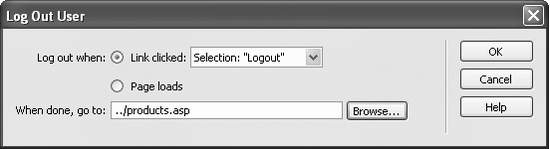
Click the Browse button; navigate to and select the file
products.asp
in the root
folder of the site.
When people log out, they'll simply end up at the main products page. Since
they're no longer logged in as administrators, they won't be able to access any of
the administrative pages without logging back in. The window should now look
like Figure 24-13. Click OK to close the window.
Now it's time to test the result. Choose FileSave; press F12 to preview the page in your browser.
One of two things will happen: Either you'll end up on the Access Denied page,
or you'll see this administration page. If you quit your Web browser after the previous section of this tutorial, or never
logged in to begin with, the Restrict Access To Page server behavior is working: It
doesn't recognize you as a registered administrator and denies you access to this
page. Click the "Try logging in again" link to go to the login page. Type bigcheese
in the Username field and sesame in the Password field, and submit the form.
You're now logged in and go to the admin page. However, if you logged in following the instructions from the previous section
in this tutorial, and you haven't quit your Web browser in the meantime, you're
still logged in. In this case, the Restrict Access To Page server behavior is again
doing its job. You're allowed onto this admin page, because you are a registered
administrator. Click Log Out.
The site logs you out and takes you to the main products page. To make sure you
really are logged out, you'll open the administration page again. Return to Dreamweaver and the
admin.asp
page. Press F12 to preview the page
again.
You're immediately redirected to the Access Denied page. You're not logged in, so
you can't see the administration page. Hooray! The page is successfully protected
from snoops. Of course, the most vulnerable pages (the update, delete, and add product pages)
are still accessible to everyone. You need to lock down those pages as well. Open the page
add_product.asp
page and repeat steps 2-5 in Section 24.4.2.
Repeat this step for all other dynamic pages (delete_product.asp and update_product.
asp) in the admin folder, with the exception of denied.asp and login.asp. (After
all, those pages should be visible to those who haven't yet logged in.) If you want, you can also add a Log Out link to each of these pages by repeating
steps 6-9.
Now all of the administrative pages in the site are password-protected. Only authorized
administrators who log into the site can add, edit, or delete records from the
database.
24.4.3 Displaying a Portion of a Page to Logged-In Users
Even though unauthorized users can't access any of the pages that can change the
database, they can still see the links you added to the Product Details page in the last
chapter?Edit this Information" and "Delete this Product." Nothing particularly
earth-shattering will happen梪nauthorized users will just end up at the Access Denied
page梑ut even that's not very elegant. Wouldn't it be tidier if those links didn't
even show up except to people logged in as administrators?
You'll set that up next.
Open the productDetails page.
You'll be doing a little painless programming in the Code view at this point. In the document window, click inside the text "Edit this Information"; in the tag
selector, click the <p>.
You've just selected the paragraph containing the two links. This paragraph should
appear only to administrators. Choose ViewCode.
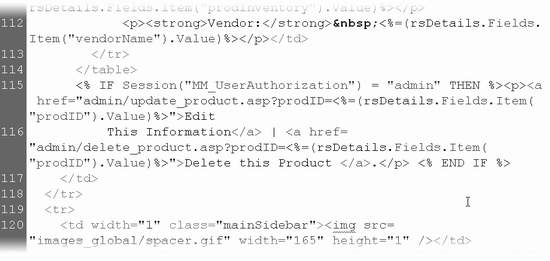
The document window switches into Code view (see Figure 24-14). Click at the beginning of the selection, just before the opening <p>.
The insertion point is now the start of the paragraph. You'll add some programming
code here.
Type <%
IF Session("MM_UserAuthorization")
=
"admin" THEN
%>.
The opening <% tells the application server that some ASP code is coming. In other
words, this isn't HTML, it's a program that the application server must process.
The IF and THEN parts of this code indicate what's called a conditional statement.
In this case, it means, "if this person is logged in with an access level of 'admin,'
then the paragraph will appear on the page." To determine if the visitor is logged in with the proper access level, the code sneaks
a peak at a session variable called MM_UserAuthorization. As mentioned in Section 24.1.4, when someone logs into the site, the server behavior creates a session variable
called MM_UserAuthorization. This bit of code follows the visitor around
the site and contains a word that indicates what level of access he has. In this case,
if the authorization is "admin," then he's logged on as an administrator, and the
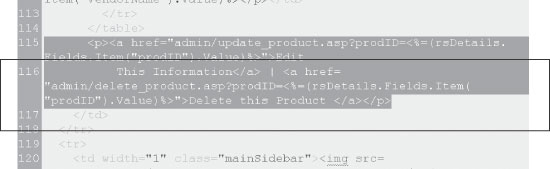
paragraph appears. Click to the right of the closing </p> tag (just after "Delete this product") and
type <%
END IF
%>.
This code concludes the conditional statement. In other words, all of the HTML
between the first line of code you added in the previous step and this final <%
END IF %> will appear only if the user is logged in as an administrator. The code should now look like Figure 24-15. Choose FileSave; press F12 to preview the page.
Because you logged out earlier, the links should now be invisible. To see them, you
must log in and return to the product details page. Go back to Dreamweaver, and open the
login.asp page.
Press F12 to preview the
page. Type
bigcheese
in the Username field and
sesame
in the Password field. Click
Submit.
You're now logged in and go to the main administration page. If you return to a
product details page, the links will miraculously return.
Click the Store button in the top navigation bar on the page to go to the product
listings page. Click the name of any product to see its details.
Voila! The links are back. You can freely edit or delete any product in the database.
If you return to the administration page and click the Log Out button, you won't
see these links until you log back in.
You could also use this trick to only show the "Log out" link if the visitor is logged in.
With very little programming experience, you can use Dreamweaver's Server Behaviors
in combination (and perhaps bring in server behaviors from extension developers)
to build sophisticated database-driven Web sites.
Now go forth and electrify your sites!
|