24.1 Password-Protecting Web Pages
Although Dreamweaver lets you create Web pages that can add, edit, and delete records
from a database, your ebusiness wouldn't last very long if just anyone could remove
orders from your online ordering system or view credit card information stored in
your customers' records. And certainly your company's executives wouldn't be happy
if someone accessed the staff directory database, and changed their titles from, for
example, CEO to Chief Bozo. For these and other reasons, Dreamweaver provides a
simple set of tools for locking your pages away from prying eyes.
The User Authentication server behaviors can password-protect any page on your
site. With this feature, you can limit areas of your site to registered users only, allow
customers to access and update their contact information, create maintenance pages
accessible only to administrators, or personalize Web pages with customized messages
("Welcome back, Dave").
NOTE
ASP.NET note桪reamweaver MX 2004 does not provide any User Authentication behaviors for ASP.NET. If
you want to add these to your ASP.NET pages, you'll have to program it yourself or try a commercial extension
like ASP.NET Authentication Suite from WebXcel (
www.webxel-dw.co.uk/
).
NOTE
PHP note桪reamweaver MX 2004 now includes server behaviors for protecting your PHP pages.
To password-protect pages on your site, you'll need to get several elements in order:
A database table containing user login information. A registration form for adding new users. (This is an optional step, but it's frequently
useful when you want to automate the process of adding user login information
to the database.) A login form. One or more pages that need to be password protected.
24.1.1 The Users Table
Your database must hold several pieces of information. For example, each visitor must
have a user name and password to type in when he attempts to log into your site. If
the name and password match a record in the database, then he's logged into the site
and can access password-protected pages.
You might also need to include a field in the record for assigning an access level to each
person. This way, your site can have multiple sections accessible by different groups of
people. Dreamweaver provides tools not only to require a proper name and password,
but also to allow access to only those with the proper clearance level.
For example, if your site has a members-only section that affords registered visitors
extra content or special features, you could assign everyone who registers the level of
"member" and give them access to these pages. However, you only want your site's administrators
and staff to be able to update a product database or retrieve sales records,
so you would give these users a level of "administrator" for access to these areas.
At a minimum, then, your database needs a users table with three fields (user name,
password, and access level). You can either use a standalone table or incorporate this
information into another table. For example, if you require people to provide their
name, address, email address, and so on when registering with your site, you could
include the three login fields in this table. For an ecommerce system, login information
could be stored in the table holding customer information.
 |
Most database systems let you assign a default (proposed) value to a column. That way, when someone
creates a new record and supplies no information for the column, the application enters the default value
instead.
For starters, it's a good idea to assign a default value for the access-level field. You can set your database to
assign the lowest access level?guest," say梬henever someone creates a new user record. In this way, if
you use a Web form for collecting and creating a new user, you can omit a form field for assigning an access
level. This method is a good security precaution, as adept (and malicious) Web users could submit a fake
form with a higher access level, potentially granting them access to sensitive areas of your site.
|
|
24.1.2 Creating a Registration Form
Once you've added a users table to your database, you'll need a way to add new users.
If you plan to use password protection for sensitive pages that only your site's staff
should access, you probably shouldn't create a Web form for adding new administrative
users. You'd run the risk of someone finding the form and adding herself to the
list of administrators. In such cases, you're better off adding the proper login records
in the database system itself梪sing Microsoft Access, for example.
|
If you do create a Web form for adding new users with a high access level, password-protect this form!
Otherwise, anyone stumbling upon it could add new administrative users梐nd from there, Pandora's Box
would be open.
|
|
On the other hand, if you want to let lots of people sign up as members of your site,
you might want to add a registration form that automatically adds them to the list of
the site's users. This setup would free you from the headache of assigning user names
and passwords for everyone who wants to become a member.
If the site already includes a form for collecting visitor information, you can simply
add the proper user fields to this form. Say your site includes a "Sign up for our email
newsletter" page that collects a visitor's name, email address, and other contact information.
You could add a field called user name and another called password.
|
It's commonplace to use an email address as a person's user name for password-protected pages. If
you're already collecting an email address, exclude the user name field from the form.
|
|
When the visitor submits the form, the Web application adds all of these fields to the
database. (To add records to a database using a Web form, see Section 23.1). While the
process of creating a new user for password-protected pages is basically the same as
adding a new record to a database, there's one additional step: You must make sure
that every visitor has a unique user name.
Dreamweaver's Check New User Name server behavior ensures that each user name
submitted in the form is unique. If the name already exists, the server won't add the
new record to the database and will redirect the visitor to another page. To apply this
server behavior, follow these steps:
Add an insert-record form to a dynamic page.
The form should include fields for a user name and password. You might also add
a field for an access level, if that's how you've structured your site. However, for a
form that's accessible to the public, it's best to use the database to set a default value
for this; see the Tip above. (You'll need to use Dreamweaver Insert
Record server behavior. Creating insert-record forms is described in Section 23.1.) Make sure the Server Behaviors panel is open (Window Server Behaviors). Click
the Add (+) button and, from the pop-up menu, choose User Authentication
Check New Username. Server Behaviors). Click
the Add (+) button and, from the pop-up menu, choose User Authentication
Check New Username.
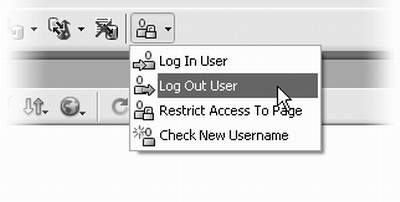
You can also use the new User Authentication menu on the Application tab of the
Insert Bar (see Figure 24-2). Either way, the Check New Username window appears (see Figure 24-1).
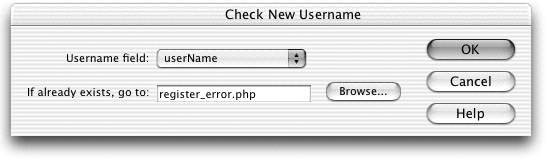
Select the name of the database field that stores each user name.
Note that this is the name of the column in the database, not the name of the form
field on the Web page. This field doesn't necessarily need to be named "userName."
It could be "login" or something else. You could even use an email address as a
user name. Click Browse and select a Web page.
Here, choose the page that will open if the user name is already assigned to someone
else. This page (which you've created before applying this behavior) should include
a note to your visitor, clearly spelling out the problem (the user name just supplied
is already in use and therefore unavailable). To make re-entering information easier
for your guest, you should include the insert form on this page as well, or provide
a link back to the registration-form page. Click OK to close the window and add the server behavior to the page.
Now when someone fills out the registration form, this behavior will kick in and
make sure that no one else has the same user name.
NOTE
Unfortunately, registering a new user doesn't automatically log him into the site. He'll still need to go
to a login page (described next).
After inserting the server behavior, Dreamweaver lists it in the Server Behaviors panel.
If you wish to change any of its properties, double-click its name in the panel to reopen
the Check New Username window (Figure 24-1). To delete the behavior, select it in
the Server Behaviors panel, and click the Remove (-) button.
24.1.3 Creating the Login Page
To access a password-protected page, your visitor must first log into the site using a
Web form. This simple Web form should contain just two fields梐 user name field
and password field梐nd a Submit button.
When someone attempts to log in, the values she types into the form are compared
with the user name and password columns in the database. If there's a match, then
she's transported to another page梠ften the main page of a password-protected area
of the site. If there is no matching record, then the visitor is carted away to a page of
your creation梐n "Access Denied!" page or maybe just the original login page.
To create a login page:
Add a Web form to a dynamic Web page.
If your site includes password-protected pages aimed at a general audience of Web
visitors, you could place this form on your home page. Or you could create a dedicated
login page (remembering to provide links to this page throughout your site).
However, if you're creating a login for administrators, you might want to put the
login form out of the way, so that it doesn't get in the way of the average visitor. Either way, the form should contain simply a user name field, a password field, and
a single Submit button. Naming the fields "username" and "password" (rather than
keeping Dreamweaver's factory-set field names) will help with step 3. Open the Server Behaviors panel (WindowServer Behaviors). Click the + button
and choose User AuthenticationLog In User.
The Log In User window appears (see Figure 24-3). From the first three menus, select the names of the login form, the form field for
collecting the user name, and the password field, respectively.
You're telling Dreamweaver which form (if the page has more than one) and which
fields to use for comparing to the users table in the database. From the Validate Using Connection menu, choose the name of the database
connection.
This should be the database that contains the table with user login information. From the Table menu, choose the name of the users table.
From the Username column, select the database column that stores names. From
the Password column, choose the database columns for passwords.
The user authentication server behavior will search these two database columns
for a record that matches the values your visitor types into the form. To the right of the If Login Succeeds field, click the Browse button; navigate to
and select a page from your site.
Most of the time, this will be the main page for a password-protected area of the
site. If the site contains a members-only section, then, after logging in, the visitor
would arrive at the Members page. If you're adding features for administering
the site梐dding, deleting, and editing database info, for example梒reate a main
Administrators page with links to all of the database administration pages.
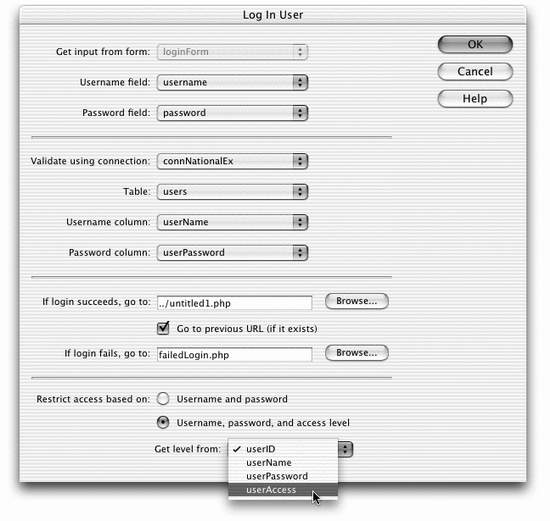
Turn on the Go To Previous URL checkbox.
This option is a little confusing, but very convenient. Imagine a visitor stumbling
across a password-protected page (you'll learn how to protect pages in the next
section). He simply comes across a link to a password-protected page and clicks
it. Of course, since he hasn't logged in, he's denied access to the page and sent to
another page. At this point, you're probably redirecting him to the login page, so
he can log in and continue clicking his way through your site. NOTE
PHP note桰f you have PHP 4.2 or greater installed on your Web server, the "Go To Previous URL" option
won't work. When someone successfully logs in, they'll always be sent to the page you specified in step 7.
That's where this feature comes in handy. By turning on this box, you permit the
login form to take the visitor back to the page he couldn't get past at the outset. In
other words, the visitor tries to access a password-protected page (any passwordprotected
page in the site); he's not logged in, so he's sent to the login page; after
successfully logging in, he's taken directly to the page he first tried to access (not
the page you specified in step 7). This is very convenient for visitors who bookmark
password-protected pages in your site, since it saves them the hassle of having to
log in and then navigate to the page they wanted in the first place! To the right of the If Login Fails field, click Browse; navigate to and select a page
from your site.
This page, which you've created in advance, should explain that the user name and
password were not correct. Since the visitor may have just made a typo, it's polite to
either include another login form on this page or a link back to the login page. If the database includes a column for storing an access level, select the "Username,
password, and access level" radio button.
This option not only lets folks log into the site, but also tracks their access levels.
In this way, you can limit areas of your site to people with the proper access
level梐dministrators, for example. From the Get Level From pop-up menu, select the name of the database column
that contains users' access levels.
Dreamweaver lists all of the columns in the table you selected in step 5. If the table
doesn't have a column for this information, go to your database application and
add it, or deselect the Access Level radio button. (Even if you don't currently have
plans for offering different levels of access, it's a good idea to keep this option in
mind. In the future, you may very well want to add special pages for administrators
or Super Premium Members. Without an access level, anyone who has a user
name and password will be able to visit those pages.) Click OK to close the window and apply the behavior to the page.
You can edit or delete this behavior by double-clicking its name in the Server Behaviors
panel.
NOTE
PHP note梂hen you edit this behavior, Dreamweaver sometimes forgets your original settings. In particular,
check to make sure "Password column" is still set to the correct field in your database table.
24.1.4 The Log Out User Behavior
Dreamweaver's Log Out User server behavior lets someone log out by clicking a link.
Thereafter, her Web browser won't be able to load any password-protected pages in
the site until she logs back in.
This setup is useful when a visitor shares her computer with others, maybe at the
library or school, because it provides a sense of security to visitors who see that
they have the ability to log out. (It's not technically necessary, though; her computer
destroys the session variable used to keep track of her login status anyway, as soon
as she quits her browser. Furthermore, if a certain amount of time passes without
any activity梪sually 20 minutes梩he Web server automatically destroys the session
variable, effectively logging out the user anyway. Again, though, a logout link can be
reassuring to your audience.)
To add a Log Out server behavior:
Open a dynamic page.
Note that since this adds programming code to the page, it works only on dynamic
pages. You can't add a logout link to a static HTML page. So if you want to provide
this option on all pages of your site, you'll have to save each page in your site as an
ASP, PHP, JSP, or other dynamic page that matches your server model. Click on the page where you'd like to add a logout link.
Open the Server Behaviors panel (WindowServer Behaviors). Click the + button
and, from the pop-up menu, choose User AuthenticationLog Out User.
The Log Out User window appears (see Figure 24-4). Select one of the two radio buttons.
|
The Log In User server behavior checks to see if the user
name and password submitted by a form matches a user
name and password in the database. If it does, the behavior
generates two session variables (Section 24.2.7): MM_Username
and MM_UserAuthorization (in the PHP/MySQL server
model, these are MM_Username and MM_UserGroup). The
first one stores the user name of the logged-in visitor; the
second stores the access level of that user. (The MM stands
for Macromedia, since programs written by Dreamweaver
engineers create these session variables.) The variables follow
visitors from page to page of the site, until they log out,
close the browser, or don't do anything on the Web site for
at least 20 minutes.
The password-protection scripts use these session variables
to allow or deny access to a page. But you can take advantage
of these variables in other ways. You can add MM_Username
to the Bindings panel (see Section 22.2.1), for example. You can then add it to your pages like other dynamic data for customized
pages: "Welcome back, Kotter176@aol.com."
Furthermore, since each user name is unique梛ust like a
primary key梱ou can use the session variable to filter records
in a recordset (Section 22.1.3). You could use this technique,
for instance, when a logged-in user wishes to see all of his
contact information. Create a recordset that filters the user
table by the session variable.
You can also use the MM_UserAuthorization variable
(MM_UserGroup for PHP) to control the display of certain
areas of a page. For example, while regular members of your
Web site might see a simple listing of products on a dynamic
catalog page, administrators might see additional items like
"Edit this product" and "Delete this product" buttons. The
tutorial in this chapter has an example of this scheme in
action (Section 24.4.3).
|
There are several ways a visitor can log out. You can log him out when a page loads
or when he clicks a link. You'd use this behavior when you want to automatically
log someone out when they reach a specific page. For example, say you create an
online testing application, where students would sit at a computer and answer page
after page of questions. When students reach the last page of the quiz梞aybe
a page summarizing their results梱ou could automatically log them out. The
next student sitting down at the same computer would have to log in, preventing
the testing application from thinking the new test taker is the same person as the
previous student.
Most Web sites let visitors log themselves out by clicking a link, so the menu starts
out reading, "Create new link: 'Log out'," which adds a new link with the words
"Log out" to the page. After adding the behavior, you can then edit the page and
change Log out to any text you like, or even add a graphic button to the link.
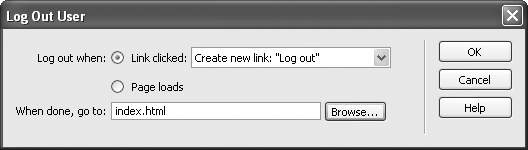
Click Browse; navigate to and select a page from your site.
Good choices for this page are the login page梥o the next visitor can log in梠r
the home page. Click OK.
You've just applied the link and server behavior.
24.1.5 Protecting Individual Pages
To password-protect a Web page, apply the Restrict Access to Page server behavior. You
have to do this for each page you wish to protect, and you can only apply it to dynamic
Web pages. In other words, you can't password-protect regular HTML files, text files,
graphics, or any other file that isn't first processed by the application server.
NOTE
Although some Web servers let you password-protect an entire folder's worth of files, Dreamweaver
doesn't provide any tools to do so. (If your site runs on an Apache Web server, however, you can use .htaccess
files to password-protect an entire folder. Visit
apache.org/docs/howto/htaccess.html
for more
information.)
The Restrict Access to Page behavior works like this: When someone attempts to load
a password-protected page, programming code in the page determines whether he's already logged in. If the page also requires a particular access level梐dministrators
only, for instance梚t checks to see whether the visitor has the proper clearance; if so,
then the browser displays the page. If the visitor isn't logged in, however, or doesn't
have the proper access level, then he's redirected to another page條ike an "Access
Denied" page or the login page.
To apply this server behavior, proceed as follows:
Open the dynamic page you wish to protect.
It must be a dynamic page that uses the site's server model (Section 21.2.1). Open the Server Behaviors panel (WindowServer Behaviors). Click the + button
and choose User AuthenticationRestrict Access to Page.
The Restrict Access to Page window appears (see Figure 24-5).
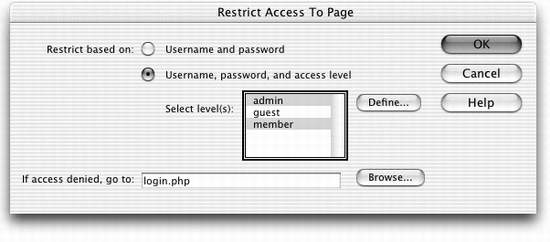
Turn on one of the two radio buttons.
If you want to allow access to anyone in the users table, then select the Username
and Password button. However, if you want to limit the page to users with a particular
access level, then turn on the second button. The first time you use this behavior, you'll have to define the different access levels,
so click Define. You must type in each access level exactly as they appear in the
database?span class="docEmphasis">admin , member, and guest, for example. Capitalization counts.You need to define these access levels only once. Dreamweaver will remember these
settings for other dynamic pages in the same site.
Click Browse; navigate to and select the page people will see if they aren't logged
in.
It's often a good idea to simply dump unregistered users onto the login page. That
way, if they're legitimate customers, they can simply log on and return to the page.
(Dreamweaver can help with this. See step 8 in Section 24.1.3.) Click OK to apply the link and server behavior.
Like the other server behaviors, Dreamweaver lists the Restrict Access to Page behavior
in the Server Behaviors panel after it's applied. If you wish to change any of its
properties, double-click its name in the panel. To delete the behavior, select it in the
Server Behaviors panel and click the - button.
|