Debugging and Tracing StatementsTwo important programming operations that help you debug and monitor applications are debugging and tracing. Debugging enables you to observe and correct programming errors. Tracing is a form of debugging that enables you to keep track of the health and sanitary conditions of our applications. Whereas debugging provides you with the ability to examine the state of data at any given line of code, tracing enables you to record information from events as they occur. Tracing is an extremely powerful feature and should not be ignored as a potential tool not only for debugging, but also for providing information on test systems during load tests, and much more. The .NET Framework provides built-in support for various tracing mechanisms. In legacy languages and in COM, there are no facilities already written for you; traditionally, you had to write your own logging, tracing, and debugging code. In .NET, a trace listener is an object that receive the trace output and redirects it to a location that is described in the listener's configuration. You could configure a trace listener to output information; for example, into a window in the IDE, a file, the event log, a SQL Server database, and so on. A trace listener is just that: a listener. It listens for information from your application, and then sends that information to whatever persistence medium you've chosen. In a typical application, your code makes use of the TRace class and writes information. The listener hears the information arrive on the listener, and then forwards it to the persistence medium using configured rules. Using this process, you can trace any information, such as object instantiation, database operations, exceptions, user authentication, and much more. All tracing-related interfaces, classes, structures, enumerations, and other languages' constructions are contained in the System.Diagnostics namespace. This namespace contains two classes, called TRace and Debug, which are used for writing errors and other application information to some persistence format. These classes are helpful during development (to output debug messages and so on) and after deployment (to output performance-related issues and so forth). When you create a new project, you could define the DEBUG symbol to enable output with the Debug class and the TRACE symbol to enable output with the trace class. If you create a project in Visual Studio .NET, its Debug version already has these symbols defined (see Figure 43.1). Figure 43.1. Debug symbols. There are several predefined trace listeners in the System.Diagnostics namespace. The default trace listener is System.Diagnostics.DefaultTraceListener. The Write and WriteLine methods of this class route the tracing information to the OutputDebugString and to the Log method of the attached debugger. Also, the .NET Framework contains a mechanism called trace switches. A trace switch is a variable that contains a value that helps you configure an application's debugging from an outside process. You could set values of trace switches outside of an application (in a configuration file), so you don't have to recompile each time the application's executable code changes this value. The only place you have to change the value is in the XML configuration file (.config). To be more precise, trace switches are simple objects that can be controlled externally through the application configuration files. The code in Listing 43.1 uses the trace and Debug classes to write log information. Listing 43.1. A Simple Example of Using the trace and Debug Classes
using System;
using System.Diagnostics;
namespace DebuggingTracing {
class DebuggingTracing {
[STAThread]
static void Main(string[] args) {
This example uses the WriteLine, Indent, and Unindent methods of the Debug and TRace classes The following is a list of the common methods used in tracing: You also could use the following methods of these classes for log writing:
To test how Listing 43.1 works, you could start to debug your application by using the Debug/Step Over command (see Figure 43.2). Figure 43.2. Stepping over code.
Listing 43.2 provides you with tracing information (see Figure 43.3). Listing 43.2. Trace of the Example in Listing 43.1
Some Trace information
    Indented Debug information
    Indented Trace information
Some Debug information
Figure 43.3. Trace information. NOTE There is a very important point in using trace and Debug classes: If you change the compilation mode to Release, all the methods on the Debug class simply will be ignored. As mentioned earlier, the trace class performs tracing only when the compilation symbol TRACE has been defined. Likewise, Debug calls are performed only when the DEBUG symbol has been defined. For information on which configurations support Debug and trace, examine your project's configuration settings. Trace ListenersAs mentioned earlier, trace listeners are objects that receive the trace information, store it, and then route it to its final target (file, event log, database, and so on). The final target of the tracing information is decided by the trace listener. There are several predefined trace listeners in .NET: All trace listeners are derived from the abstract TRaceListener class. This class declares the methods that each trace listener should implement. If you want to inherit from this class, you must at least implement the Write and WriteLine methods. Both the trace and the Debug class have a property called Listeners, which holds a reference to a collection of listeners. The collection object is of type traceListenerCollection and represents a collection of type TRaceListener. That means trace information can be consumed by more than one listener and those listeners have the full control on where to direct the tracing information. The trace and Debug classes share the same traceListenerCollection object. Therefore, if you add a listener to a trace object, it will also be available to a Debug object and vice versa. All trace listeners have the following functions. Their functionality is the same except that the target media for the tracing output is determined by the trace listener.
The DefaultTraceListener is the default trace listener that is added to the traceListenerCollection object of the TRace and Debug classes. You don't have to manually add this listener into the Listeners list in a configuration file. The Fail method displays a message box provided that the application is running in user-interface mode. This class redirects all output generated by trace and Debug classes to the console of the .NET IDE. If it's necessary to use other target media, you must use another trace listener (predefined or your own). TextWriterTraceListener redirects trace output to an instance of the TextWriter class or to any object that is a Stream class, such as a log file, network stream, or console. The first step that should be done is adding an App.config (application configuration file) to your project. You can add it by choosing the File, Add New Item menu item and selecting the Application Configuration File item in the list that appears (see Figure 43.4). Figure 43.4. Adding a configuration file.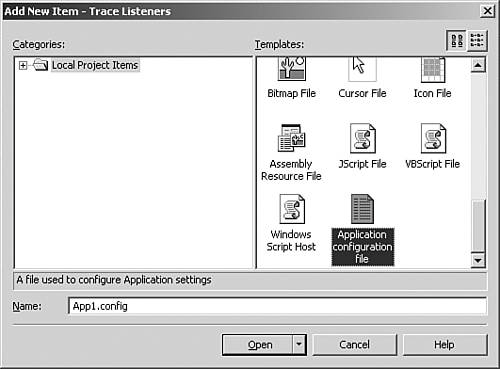 Then add the XML fragment in Listing 43.3 into the App.config configuration XML file. Listing 43.3. Example of Registration of Listener in the Application's Configuration XML File
<system.diagnostics>
  <trace autoflush="true">
   <listeners>
    <remove name="Default"/>
    <add name="TextWriterListener"
      type="System.Diagnostics.TextWriterTraceListener" initializeData="trace.log"/>
   </listeners>
  </trace>
 </system.diagnostics>
The following section briefly describes the tags used in the configuration section above. The definitions of the XML elements are as contained in the MSDN Library for the .NET Framework.
In the preceding XML, the default Trace Listener has been removed and the predefined TextWriterTraceListener (called TextWriterListener) has been added. Also we have initialized this listener with the name of the file (trace.log) to which information will be written. After you've run the application, you can find the trace.log file in the folder where the application's execution file is located. NOTE You can define several similar listeners in the configuration file. If a developer defines several TextWriterTraceListeners, all log information will be written in all files that are mentioned in these listeners. For example, if you register another TextWriterTraceListener with the initializeData attribute set to the value "another.log", all output information will be written in both the trace.log and the another.log file. So, you could direct information to several targets simultaneously. The generated content of TRace.log is the following: Some Trace information Indented Debug information Indented Trace information Some Debug information There is another way to use TextWriterTraceListener, which is discussed following the source code example in Listing 43.4. Listing 43.4. Using TextWriterTraceListener
using System;
using System.IO;
using System.Diagnostics;
namespace AnotherTraceListeners {
        class AnotherTraceListeners {
                [STAThread]
                static void Main(string[] args) {
                        FileStream someStream =
                          new FileStream("trace.log", FileMode.OpenOrCreate);
                        TextWriterTraceListener traceListener =
                          new TextWriterTraceListener(someStream);
                        Trace.Listeners.Add(traceListener);
                        Debug.WriteLine("Some Debug information");
                        Trace.WriteLine("Some Trace information");
                        Trace.Flush();
                        someStream.Close();
                }
        }
}
This example explicitly creates an instance of TextWriterTraceListener and initializes it with an instance of the FileStream class. This listener is registered by using the trace.Listeners.Add() method. As mentioned earlier, you could initialize TextWriterTraceListener with all stream classes. Our FileStream instance is initialized with the filename equal to trace.log (with open or create mode). So, after the calling of some write method of the trace or Debug class, all log information will be redirected through the trace listener to the FileStream class's instance. It will write this information into the trace.log file (the location of this file is the same as the location of the application's execution file). NOTE You are allowed to register several trace listeners that are initialized with different target media. In that way, log information could be written in several destinations simultaneously. EventLogTraceListener is used to redirect tracing and debug information to the Windows event log. One of the most important benefits of this class is that it can even output tracing and debugging information to the event log of a remote computer. This makes this class useful for machines that do not support the event log, such as Microsoft Windows Me, Microsoft Windows 98, and so forth. Before using this class for writing tracing or debugging information to the event log, you must associate it with an event log. For that, you should use the third constructor of this class for passing the name of the event source. Doing so will automatically associate it to that event source. Listing 43.5 shows how to use EventLogTraceListener. Listing 43.5. Using EventLogTraceListener
using System;
using System.Diagnostics;
namespace EventLogTraceListenerSample {
        class EventLogTraceListenerSample {
                [STAThread]
                static void Main(string[] args) {
                        EventLogTraceListener traceListener =
                          new EventLogTraceListener("EventLogTraceListenerSample");
                        Trace.Listeners.Add(traceListener);
                        Debug.WriteLine("Some Debug information");
                        Trace.WriteLine("Some Trace information");
                        Trace.Flush();
                }
        }
}
After execution of this code, you could see two new records in the event log (see Figure 43.5). Figure 43.5. Two new records in the event log.
Trace SwitchesYou've reviewed how to use the trace and Debug classes for outputting log information. Also, you've seen how to redirect this information into some persistence mechanism by using trace listeners. But you haven't yet seen how to manage the tracing behavior of an application after it is in production. .NET enables us to manage the tracing behavior of an application with the help of trace switches. These objects can be controlled by an application's configuration file, eventually eliminating the need to change, compile, and distribute your code each time you want to change the tracing behavior. The main idea is to manage application tracing only at the configuration file level, without recompiling the source code. Trace switches are always assigned a name and description. The name of the switch object is important because it is used to look up the corresponding entry in the .config file. There are two types of trace switches: BooleanSwitch and TRaceSwitch. Both are explained in detail in the following sections. BooleanSwitch supports just two modes: true (enabled or on) and false (disabled or off). If you want to use BooleanSwitch in your code, you have to create an instance of it in the source code. You have to set the name of BooleanSwitch that is equal to one of the names of the switches that are registered in your .config file. If an instance of switch in your code has a name that is different from the name registered in the configuration file, this switch will be disabled by default. Listing 43.6 shows part of a configuration file that defines a trace switch. Listing 43.6. Example of Registration of Trace Switch in the Application's Configuration XML File
<system.diagnostics>
        <switches>
                <add name="SomeBooleanSwitch" value="1" />
        </switches>
</system.diagnostics>
The preceding XML code contains several predefined tags (some of them have already been discussed):
After you've defined a switch in the configuration file, you can refer to it and query its status in the source code. Look over the example in Listing 43.7. Listing 43.7. BooleanSwitch Example
using System;
using System.Diagnostics;
namespace BooleanSwitchSample {
class BooleanSwitchSample {
[STAThread]
static void Main(string[] args) {
BooleanSwitch booleanSwitch = new BooleanSwitch("SomeBooleanSwitch",
In Listing 43.7, we create an instance of the BooleanSwitch class by using a constructor with two parameters. The first parameter contains the name of the switch. As mentioned earlier, this name should match one of the names registered in the configuration file. The second parameter contains a description of the switch. After the instantiation of the BooleanSwitch, we use the WriteLineIf method of the trace and Debug classes. In the configuration file (refer to Listing 43.6), we registered the SomeBooleanSwitch switch with its value equal to 1. So, our switch is enabled. Because of this, only the trace.WriteLineIf method will be performed. The Debug.WriteLineIf method's invocation will be ignored. The following section explains how to use the second trace switch, called TRaceSwitch. The traceSwitch class has more to offer than the simple BooleanSwitch class. TRaceSwitch provides support for multiple levels instead of the simple on/off control offered by the BooleanSwitch class. traceSwitch works with the following tracing levels:
An instance of the traceSwitch class is constructed just like the BooleanSwitch object. Tracing is enabled for a traceSwitch object through the Level property. When you set the Level property of a switch to a particular level (one of the values from the preceding list), it includes all levels from the indicated level down. For example, if you set a TRaceSwitch's Level property to traceLevel.Info, all the lower levels, from traceLevel.Error to TRaceLevel.Warning, will be included. In addition, notice that the TRaceSwitch class exposes several properties that give you the ability to determine the current level of the trace switch:
Before you review a code example that shows how to use traceSwitch, you should see how to register traceSwitch in the application's configuration file, as in Listing 43.8. Listing 43.8. Example of Registration of Trace Switch in the Application's Configuration XML File
<system.diagnostics>
        <switches>
                <add name="SomeTraceSwitch" value="2" />
        </switches>
</system.diagnostics>
In Listing 43.8, we have registered a trace switch called SomeTraceSwitch with a level of 2 (traceLevel.Warning). So, all informational and verbose messages will be ignored by trace listeners using this trace switch. Now examine the code in Listing 43.9, which instantiates traceSwitch with name equal to SomeTraceSwitch (which is registered in the configuration file). Listing 43.9. traceSwitch Example
using System;
using System.Diagnostics;
namespace TraceSwitchSample {
   class TraceSwitchSample {
           [STAThread]
           static void Main(string[] args) {
                   TraceSwitch traceSwitch =
         new TraceSwitch("SomeTraceSwitch", "TraceSwitch example");
                   Trace.WriteLineIf(traceSwitch.TraceWarning,
         "Some Warning message");
                   Trace.WriteLineIf(traceSwitch.TraceError, "Some Error message");
                   Trace.WriteLineIf(traceSwitch.TraceInfo, "Some Info message");
                }
        }
}
The preceding example uses a TRaceSwitch called SomeTraceSwitch and Level (refer to the earlier configuration file) equal to 2 (Warning). To filter messages that should be passed to the trace listener, you should use WriteLineIf or WriteIf method of the TRace or Debug class. (You also could perform a simple if statement before calling Write statements of these classes.) We are trying to output three message types: error, warning, and information. In each message, we check the level of the trace switch. Because we have registered the trace switch with the level equal to Warning, only the first two messages will be passed to the trace listener. The first message (with level checking equal to Info) will be ignored. Custom Trace ListenersTrace listeners provided by .NET are enough for most applications. But you might need to redirect output information to some other target media that is not supported by .NET's trace listeners. In such a situation, you should create your own trace listener. .NET provides the ability to write your own trace listeners in the form of the traceListener class. Every trace listener is inherited from this class. Therefore, to implement your own trace listener, you must inherit your trace listener's class from this class. The TRaceListener class provides many virtual and abstract methods. An inheritor of this class should implement at least the Write and WriteLine methods. The Write and WriteLine methods are overloaded. The following is a list of all the overloaded versions of the Write method: public override void Write(string message) public override void Write(object o) public override void Write(string message, string category) public override void Write(object o, string category) There is one-to-one mapping between the overloaded methods of Write and WriteLine. The Write, WriteIf, WriteLine, and WriteLineIf methods of the trace and Debug classes are also overloaded and have the same four versions of each of these methods. Because methods of the trace and Debug classes call Write and WriteLine methods on trace listeners, traceListener has these overloaded methods. So, to implement you own trace listener, you should just create a class that is inherited from the traceListener class and implement the Write and WriteLine methods (and all overloaded versions of these methods). Listing 43.10 shows how to create a custom trace listener. This example creates a trace listener that displays all messages in the modal message box. Implementations of Write and WriteLine methods are the same. Listing 43.10. Example of Custom Trace Listener Creation
using System;
using System.Windows.Forms;
using System.Diagnostics;
namespace CustomTraceListener {
        public class MessageBoxTraceListener : TraceListener {
                public override void Write(string message) {
                        WriteMessage(message);
                }
                public override void Write(object o) {
                        WriteMessage(o);
                }
                public override void Write(string message, string category) {
                        WriteMessage(message, category);
                }
                public override void Write(object o, string category) {
                        WriteMessage(o, category);
                }
                public override void WriteLine(string message) {
                        WriteMessage(message);
                }
                public override void WriteLine(object o) {
                        WriteMessage(o);
                }
                public override void WriteLine(string message, string category) {
                        WriteMessage(message, category);
                }
                public override void WriteLine(object o, string category) {
                        WriteMessage(o, category);
                }
                private void WriteMessage(object message) {
                        WriteMessage(message.ToString(), "");
                }
                private void WriteMessage(object message, string category) {
                        MessageBox.Show(message.ToString(), category);
                }
        }
        class CustomTraceListener {
                [STAThread]
                static void Main(string[] args) {
                        MessageBoxTraceListener
          messageBoxTraceListener = new MessageBoxTraceListener();
                        Trace.Listeners.Add(messageBoxTraceListener);
                        Trace.Write("Some Trace information", "Some Category");
                        Debug.Write("Some Debug information");
                }
        }
}
The preceding example declares the MessageBoxTraceListener class, which redirects all log information to message boxes. The example also contains a CustomTraceListener test class. If you run this application, you will see the results shown in Figure 43.6. Figure 43.6. Results of the sample application.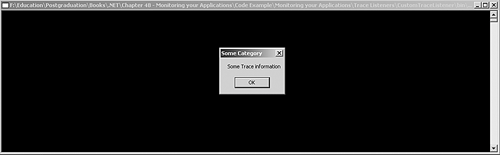 |

