1.2 The Dreamweaver MX 2004 Interface
Dreamweaver's windows let you add and modify elements of a Web page. Macromedia refers to most of these windows as panels, and Dreamweaver has an almost overwhelming number of them.
Many of these windows are used to assist with specific tasks, like building style sheets, and are described in the relevant chapters. But you'll frequently interact with four
main groups of windows: the document window, the Insert bar, the Property inspector,
and Panel groups.
NOTE
The look of these windows depends on what kind of computer you're using (Windows or Macintosh) and what changes you've made to the program's preference settings.
Even so, the features and functions generally work identically no matter what your situation. In this book, where the program's operation differs dramatically in one operating system or the other, special boxes and illustrations (labeled "For Macs Only" or "For Windows Only") will let you know.
1.2.1 The Document Window
You build your Web pages in the document window. As in a word processor, you can simply click inside the document window and type to add text to the page. You'll work in this window as you build a page, and you'll open new document windows as you
add or edit pages for your site.
Several other screen components provide useful information about your document. They may appear in different locations in Windows or on the Mac (see Figures 1-1 and 1-2), but they work the same. For example:
Title bar. The title bar shows the title of the Web page you're currently working on, and, in parentheses, the name of the underlying file and what folder it's in. For instance, in the example shown in Figures 1-1, the Web page called "Welcome to the National Exasperater" is saved as an HTML file called index.html in a folder
called National Ex. (In Windows, the title bar appears on the top of the screen; on
the Mac, it's at the top of the document window.)
|
The first time you use Dreamweaver for Windows, a dialog
box asks you to select a "Workspace"梩hat is, an arrangement
of the various Dreamweaver panels and windows. You
can choose either Designer or Coder layout. (The layout
called Dreamweaver 4 is no longer
available in MX 2004.)
There's no meaningful difference
between the two: The Designer
option places the document
window on the left side of the
screen (because designers are
left-brained?), while the Coder option
places the document window
on the right. In both cases, all the
different panels and windows are fused together, filling the
screen edge to edge and top to bottom. You may be familiar
with this arrangement梜nown as the multiple document
interface (MDI)梖rom programs like Microsoft Outlook.
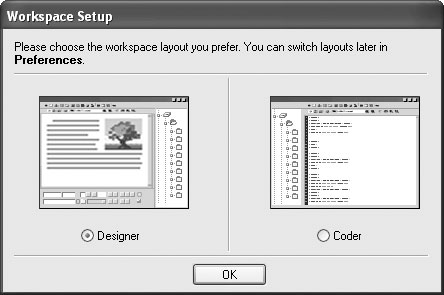
The Coder option is intended for users of HomeSite
(Macromedia's text-editing program), who are accustomed
to panels on the left, documents
on the right. At any time, you can
switch layouts; choose Edit Preferences, select the General
category, and then click Change
Workspace. You can then select
the layout you want from the
window pictured here. Quit and
re-open Dreamweaver to complete
the change.
Preferences, select the General
category, and then click Change
Workspace. You can then select
the layout you want from the
window pictured here. Quit and
re-open Dreamweaver to complete
the change.
For the purposes of retaining sanity (and keeping this book's
length below that price-sensitive 2,500-page barrier), this
book assumes that you're using the standard Designer
Workspace.
|
Document toolbar. The Document toolbar lets you change the title of a page, switch between Design and Code views, preview the page in different Web browsers, access a context-sensitive reference (help) system, and change the look of the document
window. You'll be reading about its various buttons and menus in the relevant
chapters of this book. (To make the toolbar visible if it's not already, choose View
ToolbarsDocument.)
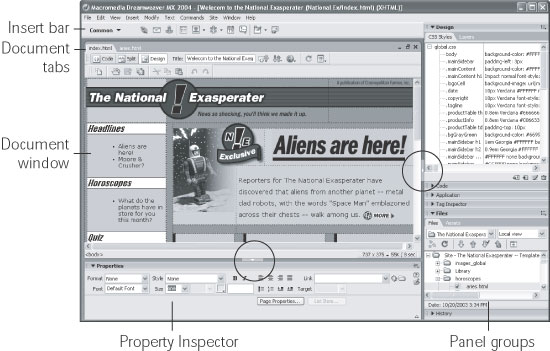
The Standard toolbar. The Standard toolbar includes buttons for frequent file and editing tasks like creating a new page, opening a page, saving one or all open documents, cutting, copying, pasting, and undoing and redoing actions. (This toolbar
is hidden until you summon it by choosing ViewToolbarsStandard.) Head content. Most of what you put on a Web page winds up in the body of the page, but some elements are specific to the region of the page called the head. Here you put things like the title of the page, meta tags (keywords) that provide information for some search engines and browsers, JavaScript scripts, and Cascading
Style Sheet information (Chapter 6). None of this information is actually visible on your Web page once it's "live" on the
Internet. But while working in Dreamweaver, you can have a look at it by choosing
ViewHead Content. You'll see a row of icons representing the different bits of
information in the head.
|
Creating pages that look good on different monitors set to
a wide range of resolutions is one of the most difficult tasks
facing Web designers. After all, not everyone has a 21-inch
monitor or views Web sites with the browser window maximized
to fill the whole screen. Nothing is more dispiriting
than spending a solid week designing the coolest looking
Web page, only to have your client call up to say that your
design doesn't fit his 15-inch
monitor (a painfully common
story).
You can simulate browser
windows of different sizes by
dragging the resize handle at
the lower-right corner of the
document window, of course.
But Dreamweaver has a better
tool for such experiments:
the Window Size Pop-Up
Menu on the status bar at the bottom of your document
window. Clicking the black arrow next to the window-size
stats lets you choose a different setting for the document
window, as shown here. Use this feature to test how your
page will look inside different-size browser windows. The
numbers indicate the width and height in pixels.
(Windows note: If your document window is maximized,,
this feature doesn't work. Choose WindowCascade to "unlock" the document window from its space on the screen.
Now you're free to resize the window and use the Window
Size Pop-Up Menu.)
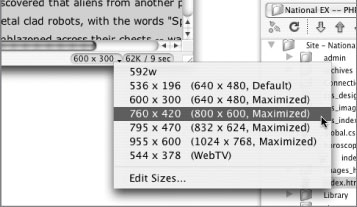
The first pair of numbers indicates the amount of usable
space in the document window; the numbers in parentheses
indicate the resolution of the monitor. The fourth option
shown here, in other words, indicates that if someone
has a 800 x 600 monitor
and maximizes the browser
window, there are 760 by
420 pixels of space to display
a Web page. (Even though a
monitor's resolution is, say,
800 x 600, after you subtract
the space required to display
the browser's toolbar, location
bar, status bar, and other
"chrome," 760 x 420 pixels of
space will be visible when a Web page is opened.)
In any case, note that the window size pop-up menu doesn't
actually set the size of your Web page or add any code to
your page; Web pages are usually fluid, and can grow or
shrink to the size of each visitor's browser window. For
techniques that let you exercise greater control of your page
presentation, see Chapter 7.
|
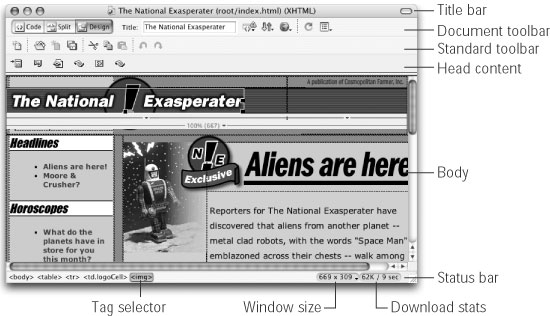
The status bar provides useful information about your page. It appears at the bottom of the document. The tag selector (shown in Figure 1-2) is also extremely useful. It provides a sneak peek at the HTML codes that, behind the scenes, compose your Web page. It indicates how tags are nested in the document, based on what you've selected or where
the insertion point is. You can also use the tag selector to select an HTML tag and
all of the information nested inside it. For instance, clicking the <p> selects the
paragraph and everything inside it. This feature is very useful when you want to
set properties (see the Property inspector below), add Behaviors (Chapter 12), or
precisely control the application of styles (Chapter 6). You'll make good use of the tag selector in the tutorials to come. For experienced
Dreamweaver fans, it's one of the program's most popular tools.
 |
In Design View, clicking the <body> tag in the tag selector is the same as pressing Ctrl+A ( -A): it selects everything in the document window. After selecting everything this way, for example, you could press the Delete key to instantly get rid of everything in your document. -A): it selects everything in the document window. After selecting everything this way, for example, you could press the Delete key to instantly get rid of everything in your document.
Careful, though. The same operation in Code view selects all of the code. Deleting this gives you an empty file梐nd an invalid Web page.
|
|
1.2.2 The Insert Bar
If the document window is your canvas, the Insert bar holds your brushes and paints, as shown in Figure 1-3. While you can add text to a Web page simply by typing in the document window, adding elements like images, horizontal rules, forms, and multimedia
elements is simplified by the click-to-add approach of the Insert bar. Want to
put a picture on your Web page? Just click the Image icon.
NOTE
Adding elements to your Web page this way may feel like magic, but the Insert bar is really just a
quick way to add code to a page, whether it's HTML, XHTML, JavaScript, or server-side code like Visual Basic
(see Part VI of this book). Clicking the horizontal rule icon, for instance, simply inserts the <hr> tag into the
underlying HTML of your page. Of course, Dreamweaver's visual approach hides that messy code, and
cheerfully displays a gray horizontal bar on the page.
When you first start Dreamweaver, the Insert bar is open (see Figure 1-3). If you ever close it by mistake, you can open it again by choosing WindowInsert or by pressing Ctrl+F2 (-F2). On the other hand, if space is at a premium on your screen, you can close the Insert bar and use the Insert menu instead. Its commands duplicate all
of the objects available from the Insert bar.
Eight different sets of objects are available from the Insert bar, each available from the pop-up menu at the left end (see Figure 1-3). Select a category from the menu to see the corresponding category of objects worth inserting:
Common objects. In addition to images, tables, and horizontal rules, which you'll use frequently in everyday Web design, this category of the Insert bar offers access to Dreamweaver's Template features. Templates let you build basic Web page designs that you can use over and over again in your site, speeding up your production
process and facilitating easy updates. See Chapter 18 for details. Layout objects. The objects in this category help you control the layout of a Web page by organizing a page's contents using HTML tables or layers. In addition, this
panel lets you use Dreamweaver's Layout view梐 customized approach to building
complex table designs that's covered in Chapter 7.
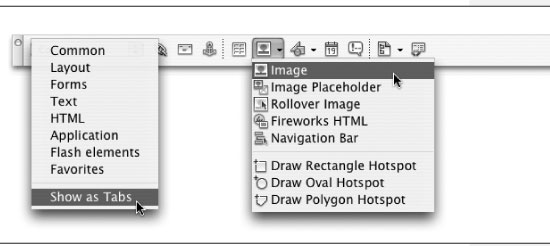
Form objects. Want to get some input from visitors to your Web site? You can use forms to receive their comments, collect credit card information for online sales, or gather any other kind of data. The Forms tab lets you add form elements like
radio buttons, pull-down menus, and text boxes (see Chapter 11). You'll also use this tab when building the dynamic Web pages discussed in Part VI. Text objects. For formatting type, making it bold or italic, for instance, you can turn to the Text category. Most of the buttons on this tab aren't technically objects; they
don't insert new objects onto the page. Instead, they format text already present
on the page. For the most part, the Property inspector offers the same formatting
options and is a more common tool for formatting text.
|
Using the Text objects tab can be disorienting. Some "text objects" create incomplete HTML and actually dump you into the raw HTML of the page, leaving the nice visual Design view behind. In general, the Property inspector and Text menu let you do everything in this tab梞ore quickly and more safely.
|
|
HTML objects. This grab bag inserts elements that appear only in the <head> of a document (like keywords used for search engines), tags used for building tables
and frames and objects to insert JavaScript code, and horizontal rules. Like text
objects (above), some of these work only in Code view. Application objects. Dreamweaver makes connecting your Web pages to databases as easy as clicking a few buttons. (OK, almost as easy; see Part VI.) The Application
tab adds many powerful tools for building dynamic pages: controls that add records
to your database, for example, or that update information already in a database. Flash elements. Although nearly empty, this category (new in Dreamweaver MX 2004) is intended to hold future Flash elements桭lash movies that you can customize with Dreamweaver. At this writing, only one object shows up here桰mage
Viewer, which lets you build Flash slideshows (Section 13.2). Favorites. Perhaps the most useful category, Favorites can be anything you want
it to be. That is, after you've discovered which objects you use the most (like the
Image command, if you work with a lot of graphics), you can add them to this
personal category. You may find that once you've customized this tab, you'll never
again need the other categories in the Insert bar. For instructions on adding objects
to your Favorites tab, see the box in Section 4.3. ASP, PHP, JSP, .NET, Cold Fusion. If you're building database-driven Web pages,
you'll discover yet another category of objects. The exact name of the category
depends on the server model you're using (Microsoft's Active Server Page, or
Macromedia's Cold Fusion server, for example), but it always contains frequently
used code snippets for that programming language. See Chapters 21 through 24 for more on working with databases.
1.2.3 The Property Inspector
After dropping in an image, table, or anything else from the Insert bar, you can use
the Property inspector to fine-tune its appearance and attributes. Suppose, for example,
that your boss has decided he wants his picture centered in the middle of the
page. After highlighting his picture in the document window, you would then use the
Property inspector to change its alignment.
The Property inspector (Figure 1-4) is a chameleon. It's aware of what you're working on in the document window梐 table, an image, some text梐nd displays the appropriate set of properties (that is, options). You'll use the Property inspector
extensively in Dreamweaver.
For now, though, here are two essential tips to get you started:
Double-click any blank gray area in the Property inspector梠r striped area in Mac OS X梩o hide or show the bottom half of the palette, where Dreamweaver displays
an additional set of advanced options. (It's a good idea to leave the inspector fully
expanded most of the time, since you may otherwise miss some useful options.)
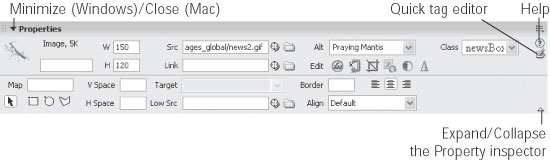
At its heart, the Property inspector is simply a display of the attributes of HTML
tags. The src (source) attribute of the <img> (image) tag, for instance, tells a Web
browser where to look for an image file. The best way to make sure you're setting the properties of the correct object is to
click its tag in the tag selector (see Section 1.2.2).
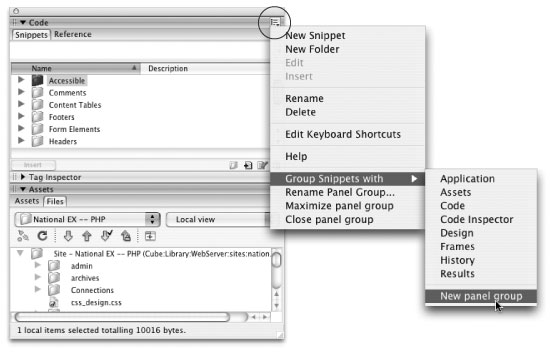
1.2.4 Panel Groups
So far, this chapter has described the Insert bar, Property inspector, and document
window梑ut those are just the beginning of Dreamweaver's windows. In Dreamweaver
MX 2004, most of the remaining windows梒alled panels梥it in tidy groups
on the right edge of your screen.
For example, a panel group named Code harbors panels for working with Snippets
and viewing Web References (see Figure 1-5).
|
To view the panels in a group, click the expander arrow or the panel group's name; to hide the panels, click the arrow (or name) again.
|
|
The various panels and their uses will come up in relevant sections of this book. But
a few tips concerning Dreamweaver's panels are worth noting here:
Double-click anywhere in a panel group's gray title bar to open that panel group and expand it to fill the maximum space available. This is really the best way to open a panel group. Not only is the title bar a larger target, but most panels contain a lot of information. You'll want to see as much
of it as possible. You can even rename a panel group. Maybe the name Code doesn't make sense as the name of a panel group; after all, there are plenty of different kinds of codes
involved in building Web sites. To rename a group, open its contextual menu, either by clicking the menu icon (see Figure 1-5) or by right-clicking (Windows) or Control-clicking (Mac) the title bar.
In the contextual menu, choose Rename Panel Group. Type the new name in the
resulting window?span class="docEmphasis">HTML, in this example梐nd then click OK. If you want to hide all windows except for documents, choose WindowHide Panels or press F4梐 useful trick when you want to maximize the amount of your screen dedicated to showing the actual Web page you're working on. To bring back
all of Dreamweaver's administrative windows, press F4 again or choose Window
Show Panels.
|
Dreamweaver for Windows includes a button for hiding only the panel groups. See Figure 1-1 for this handy trick.
|
|
If you've really made a mess of your screen by dragging Dreamweaver windows all over the place, you can make them snap back into a tidy arrangement by choosing
WindowArrange Panels. (Unfortunately, this command arranges only tool
panels and inspector windows. It doesn't arrange your document windows or, on
the Mac, the Site window.)
|