11.4 Validating Forms
It can be frustrating to look over feedback that's been submitted via a form on your
Web page, only to notice that your visitor failed to provide a name, email address, or
some other piece of critical information. That's why, depending on the type of form,
you might want to make certain information mandatory.
For instance, a form used for subscribing to an email newsletter isn't much use if the
would-be reader doesn't type in an email address for receiving it. Likewise, if you
need a shipping address to deliver a brochure or product, you'll want to be sure that
the visitor included her address on the form.
Luckily, Dreamweaver provides a Behavior梐 ready-made JavaScript program梩hat
accomplishes this exact task. Called Validate Form, this Dreamweaver behavior alerts
visitors when they haven't filled out a form properly. You can specify that a particular
field can't be left blank, or that it must contain numbers only, or that it must contain
a proper email address. If someone attempts to submit the form without the correct
information, a small dialog box pops up identifying the mistake. No more blank
forms!
Unfortunately there's a built-in limitation to this Dreamweaver behavior: you can
only validate text fields. In other words, you can't check to see whether anyone clicked
a particular checkbox or made a selection from a pull-down menu. Nor can you see
if they chose a file to upload or clicked a radio button.
Nonetheless, the Validate Form behavior is a great tool for making sure you get the
right information from your site's visitors. (Dreamweaver Behaviors are discussed in
depth in Chapter 12.)
To validate a form:
Select the form or a text field you wish to validate.
You can validate form fields in two ways: one field at a time, or all fields at once. The first option involves adding the Validate Form behavior to each text field you
wish to validate. The form will check to see if the field contents are valid (using one or more of the criteria you set using the steps below), after the visitor exits
the field either by tabbing out of it or by clicking anywhere else on the page. In
this way, you can validate a particular field immediately, as soon as your visitor
has finished entering information into it. (Of course, if they never click into the
field to type, the validation never occurs, so it's usually a good idea to combine
this with the option described in the next paragraph.) If you choose to validate the entire form, no checking takes place until your visitor
clicks the Submit button. At that moment, the browser checks all the fields you
specified; an error message appears if any of them don't meet the criteria you've
specified. To select a form, click its red dashed border or click <form> in the document
window's tag selector. Choose Window Behaviors. Behaviors.
The Behaviors panel appears. On the Behaviors panel, click the + button; choose Validate Form from the
menu.
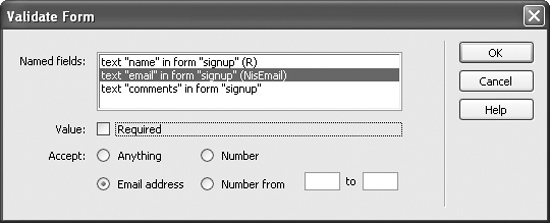
The Validate Form dialog box appears, showing the names of all text fields in the
form. In this box, you can set up validation criteria for any text fields in a form.
For example, in Figure 11-13, the text field "name" must have a value in it; the field
"email" is not required, but if the visitor does fill out this field, it must contain an
email address.
Select the field you wish to validate from the list.
You can click it with the mouse, or press the up and down arrow keys to highlight
the one you want. Turn on the Required checkbox if completing a certain field is mandatory.
Using the Accept radio buttons, choose one of the four validation types.
Anything accepts any value梟umbers, letters, or symbols. Number means that only numbers will be accepted in the field. You might turn
this option on, for example, for text fields labeled "How old are you?" or "How
much do you weigh?" Email Address is for fields that require an email address. Note that this feature
checks for the correct email address format, not for a valid email address梚t can't
go out on the Internet and determine whether or not your visitor is trying to fool
you by typing in a bogus address. In fact, this feature only checks to see if an @
symbol was used in the field. You can also specify a range of acceptable numbers using the Number from option
by entering starting and ending numbers. Use this for questions on your form that
run along the lines of, "Rate this service from 1 to 10."
|
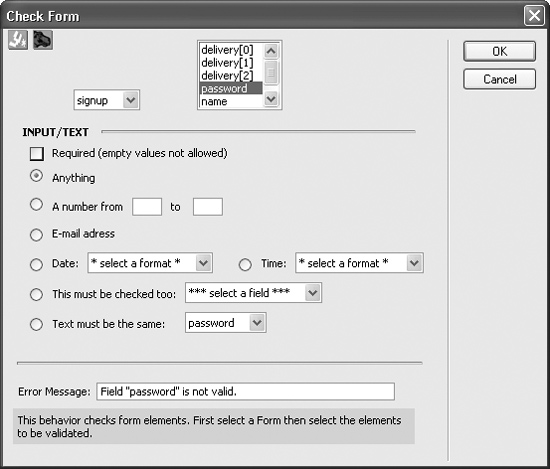
The Validation options Dreamweaver offers are rather rudimentary.
The email validation option, for example, doesn't
even really check for a correctly formatted email address; it
just looks for at least one character followed by an @ symbol
followed by one more character.
Fortunately, renowned
extension developer
Jaro von Flocken has
written the ultimate
extension for validating
forms: Check Form
MX. It can validate not
just text fields but
menus, checkboxes,
and radio buttons. And
unlike Dreamweaver's
behavior, von Flocken's
extension makes
sure an email address
is properly formatted.
This extension offers
many more validation
options than Dreamweaver
MX's built-in behavior. Best of all, you can define your
own error messages for each validation error. To get it, visit
www.yaromat.com/dw/?t=Behavior&r=validation
.
You'll also find many other form-related extensions on the Macromedia Exchange Web site (Section 20.2). Once you're
on the Dreamweaver exchange page, perform a search for
the word validate. For example, you'll find three extensions
by developer Massimo Foti. With these add-ons to Dreamweaver,
you can check your form fields for Zip codes, phone
numbers, Social Security
numbers, and
much more. You can
also validate a form on
the server, after your
visitor has submitted
it. This type of validation
isn't instantaneous
like JavaScriptbased
validation, but
it's another common
way to validate a form.
It has the advantage of
being more secure?
turning off JavaScript
is one way to bypass
Dreamweaver's built
in Validation behavior
梐nd letting you add error messages directly into the
Web page. For example, it can be more elegant to return the
form page to the visitor, with all missing form information
highlighted in red, bold, letters. Section 23.1.1 lists some extensions
for adding server-side form validation.
|
As you go, Dreamweaver helps you remember your selections by adding a letter in
parentheses after each field name in the dialog box. R means that a value is required;
N means that the field can be left blank; isEmail means that the field should contain
an email address; isNum means that the value should be a number; and isRange
means the value must be a number within a certain range. If you're validating the entire form, select additional fields and add validation
criteria, if you like. Click OK to apply the behavior.
You return to your document window, where your fields are now ready to use and
equipped to check themselves for accurate entries. To see if they work, press F12 to
preview the page in a Web browser. Try clicking the Submit button without filling
out any of the text fields.
|