11.5 Forms Tutorial
In this tutorial, you'll build a simple newsletter signup form for The National Exasperater
Web site.
NOTE
Before you begin building the page, you'll need to download the tutorial files from this book's Web
site. Using your Web browser, visit
www.sawmac.com/dwmx2004/
. Click the Tutorials link; then, under Forms
Tutorial, click Windows or Macintosh, depending on the kind of computer you're using. The files download
to your computer.
When the files have downloaded and uncompressed, you should have a folder named DWForms on your
hard drive, containing the Web pages and graphics needed for this tutorial. (If you're having difficulties, the
Web site contains detailed instructions for downloading.)
11.5.1 Getting Started
You need to direct Dreamweaver's attention to the new Web site folder you've just
downloaded. Full details of this process begin in Section 1.3.1, but here's the Reader's Digest
version:
In Dreamweaver, choose Site Manage Sites. Manage Sites.
The Manage Sites window opens. Click New; from the pop-up menu, select Site.
The Site Definition window opens. Make sure the Advanced tab is selected. In the Site Name field, type Forms.
This is the name that Dreamweaver will use while you're working on this tutorial. Click the folder icon next to the Local Root Folder field; browse to and single-click
the folder DWForms, and then click Choose. Click OK.
If you see a message that Dreamweaver is about to create a cache for this site,
click OK. Click Done to close the Manage Sites window.
You've just defined the site you'll be working on in this tutorial. Defining Web
sites and using Dreamweaver's site management features are discussed in depth
in Part IV of this book.
11.5.2 Inserting a Form and Creating a Structure
The first step to building a form is inserting a <form> tag. This tag encloses all of the
different fields in the form and indicates where the form begins and ends. As noted
earlier in this chapter, you can also insert other HTML elements, like text and tables,
within the form. In fact, you'll be using a table to make this form look better.
Choose FileOpen. Double-click the file called signup.html in the DWForms
folder.
The page is partly designed already with a banner, sidebar, and footer. Click in the empty white space below the headline Newsletter Signup. On the
Insert bar, select the Forms option (see Figure 11-2).
The Insert bar now shows you the Forms icons you'll need. Click the Form button on the Insert bar (see Figure 11-2), or choose Insert
FormForm.
A red dashed rectangle appears in the document window, indicating the boundaries
of the form. In the Property inspector, type signup in the Form Name field (Figure 11-14).
You've just named your form. In the Action field, type
www.sawmac.com/ne/signup.php
.
(Leave off the final period, as shown in Figure 11-14.)

A form's Action property identifies the address of the program that will process
the form's submitted data. In this case, you've been spared the effort of writing
(or hiring a programmer to write) the required form-processing software. Such
a program already exists on the Web site whose address you've just specified, and
it's waiting to process the form you're about to design. You may be creating your own form-processing programs if you're using Dreamweaver
MX 2004's dynamic Web-building tools described in Part VI. See the tutorial
in Section 23.5 for an example. Make sure POST is selected in the Method menu. Leave the Target and Enctype
fields blank.
The Method indicates how the form sends information to the form-processing
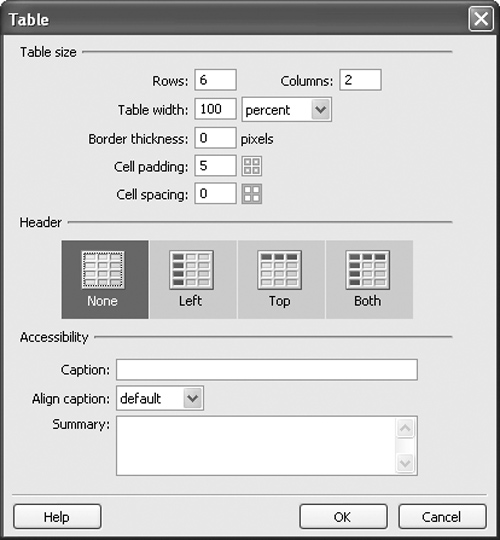
program (Section 11.2). Now you're ready to begin building a table to design your form. Choose InsertTable.
The Insert Table dialog box opens. (See Chapter 7 for the full story on tables.) Use the following settings for this table: 6 rows, 2 columns, width 100 %, Border
thickness 0, Cell padding 5, Cell spacing 0 (see Figure 11-15). Select None for
Header, and leave the Accessibility information blank. Click OK.
Dreamweaver pops your empty table onto the screen. Next, you'll add the labels
and form elements to the table, and then add a little Cascading Style Sheet information
to make it look beautiful.
11.5.3 Adding Labels and Form Elements
Now that your table is in place, it's time to start adding the different parts of the form.
Since text fields, radio buttons, menus, and other form elements aren't always selfexplanatory,
it's a good idea to add labels explaining the purpose of each element.
Click the top-left cell, and then type What is your Name?
This text identifies what your visitors should type into the text field you'll add in
the next step. Press Tab to move the insertion point to the next cell, and then click the Text Field
button on the Insert bar (Figure 11-16).
Alternatively, you can choose InsertFormText Field.
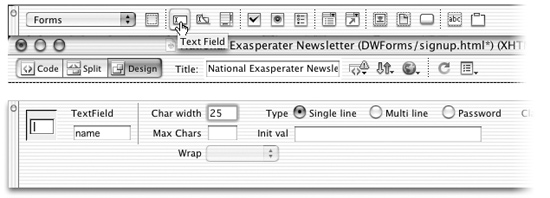
Type name into the TextField box (Figure 11-16, lower left).
Every form element must have a name that describes the information it collects. NOTE
Most programs that process forms won't work correctly if the name of the form element differs from
its programming. In other words, if you mistyped "name" in step 3 as "mame," the form-processing program
won't work correctly. If, when you've finished this tutorial, the form response isn't what you expected, first
check to make sure you named each form field exactly as described here.
Type 25 into the Char Width (character width) field.
You've just specified, in characters, how wide the field will be. Setting a width does
not limit the amount of text someone can type into it; it only controls the display
of the field in the browser. You can also use CSS to set the width of a form field,
which you'll do later in the tutorial. In the left-hand column of the table, click the second cell from the top and type
What is your Email Address? Press Tab, and then click the Text Field button on
the Insert bar.
Alternatively, choose InsertFormText Field. You've just inserted another text
field. In the Property inspector, type email into the TextField box. Type 25 in the Char
Width field.
You've just specified the name and width of your email address field. Click the cell just below the "email" question. Type Vote for your favorite
boogeyperson. Press Tab; in the Insert bar, click the Radio Button button.
Alternatively, choose InsertFormRadio Button. In this cell, you'll be adding three grouped radio buttons. Your visitor will only
be able to choose one of the three options. In the Property inspector, type vote in the RadioButton field, and Big Foot in the
Checked Value field (Figure 11-17).

In the document window, click to the right of the radio button and type Big
Foot.
It's important to label each radio button, so your visitors know what they are
selecting. Click the Radio Button object in the Insert bar to insert a second button. In the
Property inspector, type vote in the RadioButton field, and Loch Ness Monster
in the Checked Value field.
Radio buttons in the same group share the same name; this is what prevents a
visitor from selecting more than one button at a time. In the document window, click to the right of the radio button. Type Loch Ness
Monster.
You've just given this button an onscreen label. On the Insert bar, click the Radio Button button to insert the last button. In the
Property inspector, type vote in the RadioButton field, and El Chupacabra in the
Checked Value field. Finally, in the document window, click to the right of the
radio button and type El Chupacabra.
Your three radio buttons are all set. Choose FileSave. Press F12 to preview your page.
Once in your browser, try out the radio buttons. Check to make sure you can only
select one at a time. If you're able to select two or more buttons, you've probably
typed slightly different names.
11.5.4 Adding a Menu and Submit Button
Only a few more elements are required to produce a fully functional form.
Return to Dreamweaver. Click in the left column cell just below the "Vote for your
favorite boogeyperson" question. Type Where did you hear about the National
Exasperater?
In the next step, you'll build a pull-down menu, from which visitors can select a
response. Press Tab to jump to the next cell. On the Insert bar, click the List/Menu button
(or choose InsertFormList/Menu).
Dreamweaver inserts a small box with a selection arrow梐 menu梚nto the cell. In the Property inspector, type referral in the name field. Click the List Values
button.
The List Values dialog box appears. You'll use this box to add items to your
menu. Type -- Select One -- .
The first item on the list is actually an instruction, which lets your readers know
what they need to do with the menu. Press Tab.
The cursor jumps to the Value column. As noted earlier, list items can have separate
labels and values. If you don't specify a value, your form will simply send the selected
label to the form-processing program. For this tutorial, you won't add a value. Press Tab again to add an additional list item.
You can click the + button in the dialog box, if you prefer.
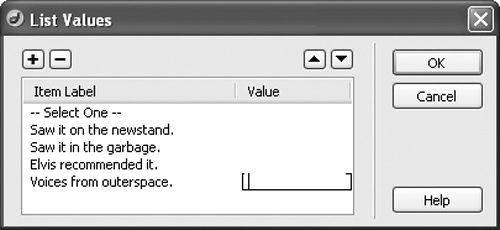
Type Saw it on the newsstand, and then press Tab twice. Complete the list as
shown in the Figure 11-18.
Click OK.
You've just built a working menu. You'll find that it doesn't operate in Dreamweaver,
however. You must preview the form in a Web browser to see the menu
in action. All in good time. Click in the left table cell, below the last question you added, Type Add any comments
here.
You'll add one last text field to the form, so that your visitors can submit their
comments and suggestions. Press Tab. On the Insert bar, click the Textarea button (see Figure 11-2).
Alternatively, you can choose InsertFormTextarea. Either way, Dreamweaver
inserts a text box. In the Property inspector, type comments into the TextField field. Type 25 in the
Char Width field (Figure 11-19).
Doing so establishes the width of the text box, in characters. Type 4 in the Num Lines (number of lines) field.
This setting controls how tall the text box appears on the Web page. It doesn't
limit the amount of text that can be typed into it, however. From the Wrap menu in the Property inspector, choose Virtual (see Figure 11-
19).
The Wrap option determines what happens to lines of text that are longer than
the width of the text field.

Click in the cell directly below this new text field. On the Insert bar, click the
Button button.
Don't confuse the Button button with a Radio Button; they're two different beasts
(see Figure 11-2). In the Property inspector, change the button's Label to Sign Up.
The default label is Submit (see Figure 11-20), but since this is a newsletter signup
form, you should add a more accurate label. (You don't need to change what Dreamweaver here calls Button Name, which also says "Submit." It doesn't show
up on your Web page and isn't used by the form-processing program.) Choose FileSave.
Congratulations. You've just created a fully functional Web form!

Press the F12 key to preview the form.
Go ahead梖ill it out (with bogus information, if you like). Click the Submit button
when you're finished to see what happens. If you're online, your Web page
sends the form information to the waiting form-processing program specified
at the beginning of the form creation process. The program sends you back a
Web page reflecting your entries, exactly as though you had built a professional,
working Web site. If nothing happens, make sure the Action property of the Form is set correctly
(see Section 11.2).
11.5.5 Styling the Form
At this point, the form is rather plain looking. It would be nice if the text labels were
a bit bolder and lined up with the form elements. Also, a few graphical touches條ike
a line dividing the questions and some text formatting for the form elements梬ould
add a lot. You'll use Cascading Style Sheets to do this.
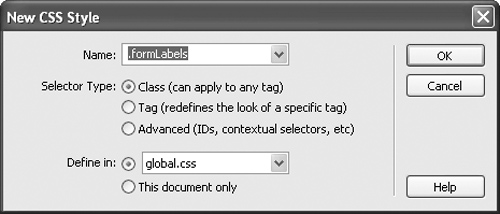
Make sure the CSS Styles panel is open (choose WindowCSS Styles); click the
+ button on the Styles panel to create a new style.
Alternatively, you can choose TextCSS StylesNew Style. Either way, the New
CSS Style window opens (see Figure 11-21). (For a refresher on creating styles,
see Section 6.2.) Make sure the Class radio button is selected, and type .formLabels in the Name
box (see Figure 11-21).
You'll create a class style which will define the look of each table cell containing a
form label. This page already has an external style sheet attached to it, filled with
styles used to format the page. You'll add a couple more styles to it. Make sure global.css is selected in the "Define in" menu and click OK.
The CSS Style Definition window opens, ready for you to set formatting properties
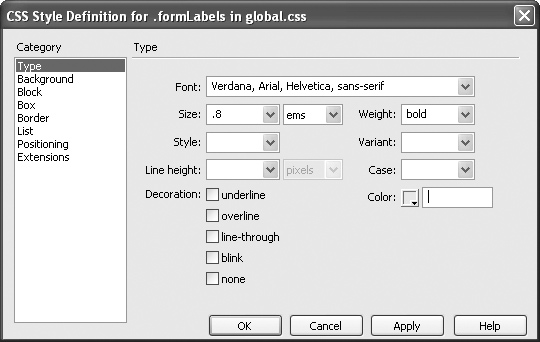
for the new style. Under the Type category, set the font to "Verdana, Arial, Helvetica, sans-serif,"
the size to .8 ems, and the weight to "bold" (see Figure 11-22).
This sets the basic text formatting options for the labels. Next, you'll make the text
align to the right, so that the labels sit next to the form elements they describe.
Click the Block category and choose "right" from the Text align menu.
As things are now, the column of cells containing the labels takes up half the
table. That's too much. You'll shrink that down to make the form fields more
prominent.
Click the Box category, and in the width box, type 200.
You'll apply this style to the table cells containing the labels. You can use CSS to
set properties of table cells梚ncluding their width. In addition, you can use CSS
to add a decorative border to the bottom of each of these cells. Click the Border category and turn off the three "Same for all" boxes.
You won't add a border to all sides of the cell, just the bottom. For the bottom border properties, set the style to solid, the width to 1 pixel, and
the color to #CCCCCC. Click OK to finish creating the style.
You're finished with this style. Now it's time to apply it. Select the five table cells containing the labels.
Click in the top cell and drag to the last cell with a label, for example. (See Section 7.5 for more cell-selection techniques.) From the Style menu in the Property inspector, choose formLabels (the style
you just created).
The column of cells should get thinner; the text should become bold and should
align to the right of the cell. In addition, though it's hard to see if the table outline
is visible, a light gray line should appear at the bottom of each cell. The cells with
the form elements could use a little help too, so you'll apply an already created
style to them. Select the five table cells to the right of the column of labels, and from the Style
menu in the Property inspector, select the "formCell" style.
A light gray line appears under these cells as well, and the text in those cells changes
to another font. Finally, you'll create a new style to add some pizzazz to the form
elements themselves. You can style form elements just as you would text or other
parts of a Web page. You'll change the font used inside of these form elements, as
well as set their width and background colors. Repeat steps 1-3 above to create a new class style called formElement.
In the Type category, set the font to "Verdana, Arial, Helvetica, sans-serif."
To make all the little boxes in your form a uniform width (they'll look more
consistent that way), you'll set a specific width. Click the Box category, and in the width box, type 200.
Now every form element to which you apply this style will be 200 pixels wide.
Finally, you'll add a background color to make the form really jump out. Click the Background category and set the Background Color property to
#CCCCCC. Click OK to close the window and complete the style.
Applying this groovy new style to your form is just a matter of selecting the form
element and using the Property inspector. Select the first text field, and from the Class menu in the Property inspector,
select the "formElement" style.
The text field grows to 200 pixels, takes on a gray background, and (although you
can't see this in Dreamweaver) when you preview the page and type something
in the field, you'll notice that the font has changed as well. NOTE
Mac users won't see the gray background color in Dreamweaver梟or will you see it if you preview
the page in Safari (which doesn't support background colors for form elements). However, if you preview
the page in Internet Explorer 5 for the Mac, you'll see it.
Repeat step 15 for the email field, pull-down menu, and comment box.
When you're done, preview the page in a Web browser (press F12) and see all the
changes you just made.
11.5.6 Validating the Form
Now that you have a working form, you'll add the finishing touches. Since this form
will be used to sign up for an email newsletter, a couple of pieces of information are
crucial, including the name and email address of the person who's subscribing. Using
one of Dreamweaver's Behaviors, you can make sure that no one submits a form
without these two important pieces of information.
Return to Dreamweaver. Click anywhere on the form's red line boundary to select
it.
Check to make sure the Property inspector says Form Name in the upper-left
corner. Alternatively, you can click anywhere inside the table and then use the tag
selector at the bottom of the document window to select the form梛ust click on
the tag labeled <form#signup>. Choose WindowBehaviors.
This opens Dreamweaver's Behaviors panel, which you can use to add interactive
effects to a Web page. You'll probably find it in the upper-right corner of your
screen.
From the + menu, choose Validate Form.
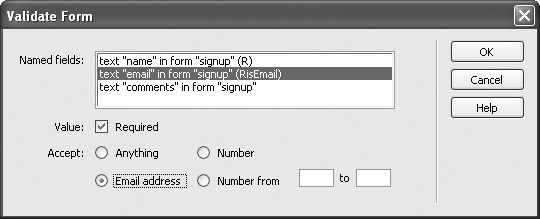
The Validate Form window opens, listing the three text fields in your form.
Click the first item in the list ("name"). Turn on the Required checkbox (see Figure
11-23).
"Required" means that your visitors can't submit the form unless they type something
into this field. Click the second item in the list ("email").
For the email field, you'll not only specify that it's mandatory, but also that its
contents must look like an email address, complete with an @ symbol. Turn on the Required checkbox. Then, from the Accept group of radio buttons,
select "Email Address." Click OK.
Choose FileSave. Press F12 to preview and test the page.
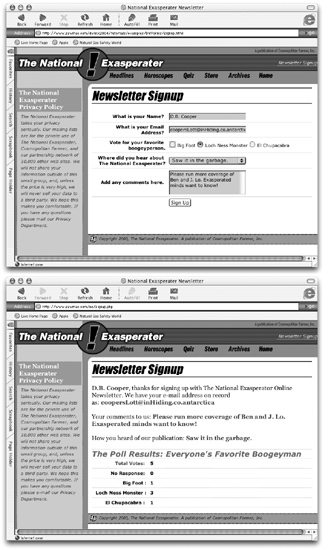
See Figure 11-24 for details.
|