|
|
< Day Day Up > |
|
18.5 Nested TemplatesLarge sites may have many different sections or types of pages. Each section of the site or type of page may have its own unique look. A Frequently Asked Questions page may have distinct areas for a question, an answer, and links to further resources, while a product page may have a picture, a product description, and ordering information. You could create different templates for each type of page, but even that may be more work than necessary. While many pages in a site may have subtle differences, they share very basic design features. The overall structure of every page, for example, may be the same: same logo, banner, and navigation bar. Even the basic layout may be the same. And there lies the problem with creating individual templates for each section: If you need to make a very basic sitewide change, like adding a new button to the site's overall navigation system or altering the banner, you need to edit each template individually, adding extra time, effort, and risk of making a mistake. Fortunately, Dreamweaver offers a tool to solve just this problem: nested templates. A nested template is a template you make from another template, which then becomes the master template (see Figure 18-13). Imagine a basic software company Web site with three sections: Support, Our Products, and Downloads. Each section has its own brand of information and specific layout needs. However, all three sections share the same banner and navigation. Nested Templates (middle row) let you build templates that share common sitewide design elements while providing precise control for particular types of pages or sections of a Web site. A page built from a nested template (bottom row) contains both elements from a master template (top row)條ike a banner and a sitewide navigation bar梚n addition to elements specific to its nested template條ike a section-specific secondary navigation bar. Changes you make to the master template are passed on to all pages of the site, including nested templates. Changes to a nested template, by contrast, pass on only to pages based on the nested template.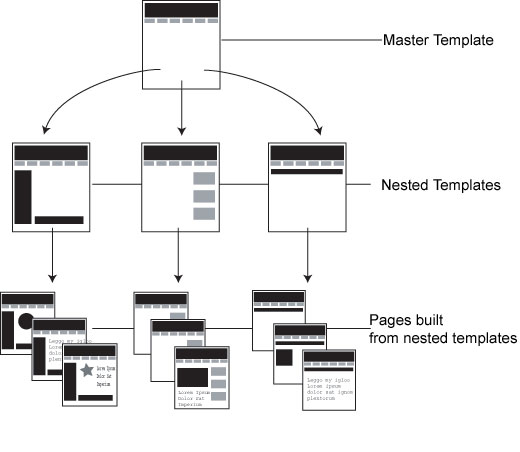
To create a template system for this site, you must first create a very basic template that includes elements (including editable regions) shared by all pages梩he master template. You would then create a nested template based on the master. On the nested template, you could add further design refinements and additional editable regions for the areas that can be changed on pages created from the nested template. Yes, this process sounds complex梐nd yes, it is. But when the alternative is hours or days of manual template updating, you can see why serious Web designers are willing to spend the time to master any shortcut they can get. To create a nested template:
18.5.1 Customizing Nested TemplatesWhen you first create a nested template, there's no difference between it and the master template. They share the same design, content, and template regions. The next step is adding the design elements that are specific to pages built from that template. For example, you might add a special type of table for displaying a product photo, description, price, and other information. This table will appear only in pages built from this nested template, not from the master template or any other nested template. There are a few things you should keep in mind:
18.5.2 Using Nested TemplatesHere's an example of how you might use nested templates. Suppose you want to create a uniform design for your site where every page of the site has a logo as well as a sitewide navigation bar. Each page within one section of the site also has a sidebar containing a secondary navigation bar containing navigation buttons for just that section. Finally, every page has a large content area to hold the information specific to that page. Using nested templates, creating a Web site like this couldn't be easier. Create a master template containing the site banner and navigation bar. This template will also include editable regions for the sidebar and main content area. Next, create a nested template for one section of the site, leaving the content area as it is. Since each page will have its own content in this area, you don't need to do anything to this region. Then add the secondary navigation bar to the sidebar area. To lock this region so no one can tinker with the sidebar (in pages built from the nested template), add an empty editable region, or see the Tip below. If desired, you can build similar nested templates for the other sections of the site. Now you're ready to start building the pages of your site. Create a new page based on one of the section templates. Add text or graphics to the editable content area of the page. Should you need to change the site logo or add a button to the sitewide navigation bar, open the master template, make the changes, save the file, and let Dreamweaver update all of the pages of your site with the new look. If you simply need to change the secondary navigation for one section of the site, then open the appropriate nested template, change the sidebar, save the template, and let Dreamweaver update all the section pages.
|
|
|
< Day Day Up > |
|
 Save as Template).