|
|
< Day Day Up > |
|
18.3 Define Editable RegionsYour next project is to specify which parts of your template are locked, and which are editable. By default, everything on a page is locked. After all, the main reason to use templates is to maintain a consistent, unchanging design and structure between pages. To make a template usable, you must define the area or areas you can change.
The Templates category of the Assets panel lists the name, file size, and location of each template in the current local site. The Apply button applies a template to the current open Web page. The Refresh Site List button updates the list of templates. (In general, Dreamweaver does a very good job of keeping the list up to date, so you'll rarely need this button.) The New Template button creates a new blank template in the Templates folder. Select a template from the list and click the Edit Template button to open the template for editing.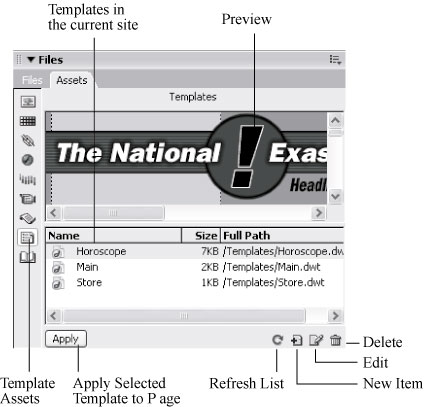
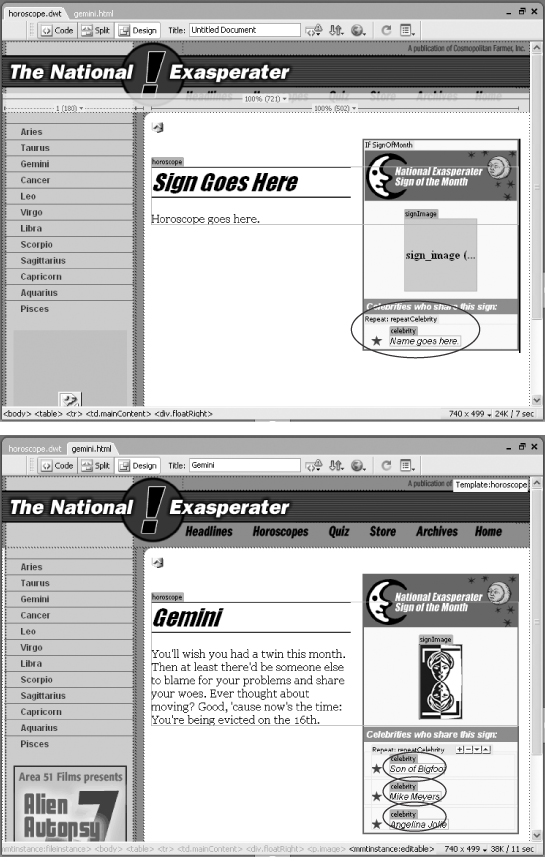
This page is based on a template called Horoscope, as you can tell from the little tab in the document window's upper-right corner. You can modify editable regions, which are labeled with small tabs. In this example, the editable regions are called horoscope and signImage. An additional editable region appears within a repeating region條abeled repeatCelebrity? which lets you duplicate editable regions to form a list of items. The title of any page created from a template is also editable. All other parts of the page are locked; you can only make changes to the original template file.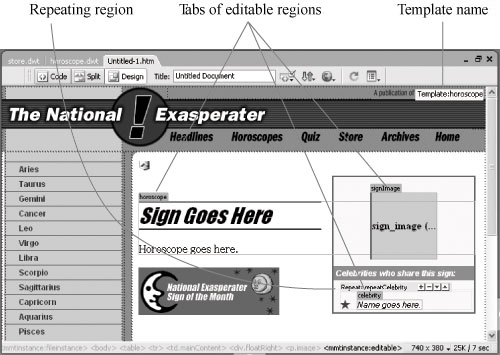
18.3.1 Adding a Basic Editable RegionTo add an editable region to a template, start by selecting the part of the page you want to make changeable. You can incorporate anything in the document window (any HTML between the <body> tags). NOTE
The <head> of a page is always editable. You can add Custom Style Sheets, JavaScript and meta tag information freely to any page created from a template. In fact, there's no way to prevent anyone from messing around with the page's head. Drag across your page to select the elements you wish to make editable, or, for greater precision, use the tag selector (Section 1.2.2) to make sure you select the exact HTML you want. Now tell Dreamweaver that the selected elements are to be editable. You can use any of these techniques:
When the New Editable Region dialog box appears, type a name for the region (you can't use the same name twice) and click OK. You return to your template, where the name you gave the region appears in a small blue tab above the editable region (see Figure 18-5).
You may find that a single editable region is all you need梖or example, a single table cell containing the text for a product review. However, if you need to edit multiple areas of a Web page, just add more editable regions to the template. For instance, when you create a template for an employee page, you might create editable regions for the employee's name, telephone number, and photo. If you change your mind and want to lock a region again, select the editable region
and choose Modify A repeating region lets page authors add
multiple selections of repeating information.
Top: In this example, the template has
one repeating region, labeled repeatCelebrity
(circled).
|
|
Some Web pages contain lists of items. A catalog page might display row after row of product information梡icture, name, price, and description. An index of Frequently Asked Questions might provide a list of questions and the dates they were posted.
If you were to make a template for either of these pages, you would add an editable region to the area of the page where these lists appear. Just creating an editable region, however, wouldn't give you any ability to enforce (or easily update) the design of these lists, because everything within an editable region can be changed.
Fortunately, Dreamweaver provides a pair of template tools to overcome this problem: repeating regions and repeating tables. Both let you create areas of a page that include editable (and uneditable) regions that can be repeated any number of times (see Figure 18-6).
Adding a repeating region is similar to adding an editable region. Select the area of the template page you wish to make repeatable, which usually contains at least one editable region. Most often, this area will be a table row, so you could select the row (<tr> tag) with the information to be repeated. You could just as easily select a paragraph or a list item (<li> tag).
|
Now tell Dreamweaver that the selected elements are part of repeating region. You can use any of these techniques:
On the Common tab of the Insert bar (Figure 18-2), select the Repeating Region option from the Templates menu.
Choose Insert Template ObjectsRepeating Region.
Right-click (Control-click) the selection and choose TemplatesNew Repeating
Region from the contextual menu.
When the New Repeating Region dialog box appears, type a name for the region and click OK. You return to your template, where the name you gave the region appears in a small blue tab above the editable region (see Figure 18-6). (See Section 18.6.1 for a discussion of using a repeating region when building a new template-based page.)
|
The new repeating table tool is essentially a shortcut to creating a table with one or more repeating rows in it. If you had a lot of time on your hands, you could achieve the same effect by adding a table to a page, selecting one or more rows, and applying a repeating region to the selection. To use the repeat table tool:
Click on the template page where you wish to insert the table.
You can't insert a repeating table into an already defined editable, repeating, or optional region, as explained in the box below. You must be in an empty, locked area of the template.
On the Common tab of the Insert bar (Figure 18-2) , select the Repeating Table option from the Templates menu.
Alternatively, you can choose InsertTemplate ObjectsRepeating Table. Either
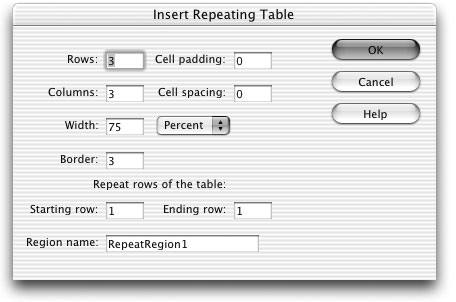
way, the Insert Repeating Table window appears (Figure 18-7).
Fill out the basic properties of the table.
The top part of the window lets you set up the basic structure of the table: rows, columns, cell padding, cell spacing, width, and border. Basically, it's the same information you'd provide when creating any table, as described in Section 7.2.7 . You usually start a repeating table with two rows梠ne for a heading, and another to contain the information you wish to repeat.
FREQUENTLY ASKED QUESTION
|
In the Starting Row box, type the number of the row where the repeating region should begin.
Often you'll just have one repeating row: one row of product information, for example. You might want to use the top row for labels indicating the information contained in the rows below. If that's the case, enter 2 at this step, leaving the first row as an uneditable part of the template.
It's conceivable, however, that you might want each entry to take up two rows. The first would list Name and Description; the second would contain a cell for a photo and a cell for the price. You set up this effect in this step and the next.
In the Ending Row box, type the number of the last repeating row.
If you only wish to repeat a single row, enter the same number you provided for step 4. If you're creating a double repeating row, add 1 to the number you provided in step 4. If you need three rows for each repeating entry, add 2 to the number from step 4.
Type a name for this repeating region.
Don't use the same name as another template region. You'll run the risk of unpredictable results on template-based pages.
Click OK.
Dreamweaver inserts a table into the page. A blue tab with the name of the repeating region appears (see Figure 18-6), as do blue tabs in each cell of each repeated row. These tabs indicate new editable regions梠ne per cell.
Since these new editable regions have uninformative names like EditRegion4, you might want to rename them. Click the blue tab and type a new name in the Property inspector. (But do so before you create any pages based on the template梥ee the Warning in Section 18.3.2.)
To remove a repeating region, select it by clicking the blue Repeat tab and choose
ModifyTemplatesRemove Template Markup. A more accurate way to select a
repeating region is to click anywhere inside the region and then click "<mmtemplate:
repeat>" in the tag selector. (See Section 1.2.2 for more on using the
tag selector.) If you want to rename a repeating region, heed the Warning in
Section 18.3.2.1.
An editable region lets you change areas of HTML條ike a paragraph, image, or entire table梠n new pages you create from a template. However, when you're creating a template for others to make pages from down the line, you may want to limit these page authors' editing abilities. You may want to allow budding Web designers to change the color of a table cell without changing other properties like cell width or paragraph alignment. You can use Dreamweaver's Editable Tag Attribute to specify which tag properties your successors can change.
|
To make a tag attribute editable:
Select the tag whose property you wish to make editable.
Using the tag selector (Section 1.2.2) is the most accurate way.
Choose ModifyTemplatesMake Attribute Editable.
The Editable Tag Attributes window opens (Figure 18-8).
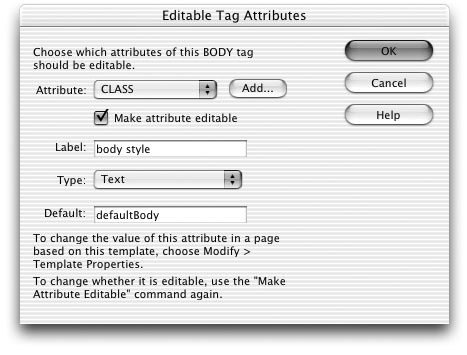
Select an attribute from the menu or add a new attribute with the Add button.
Only properties you've already set for the selected tag appear in the Attribute menu. In other words, if you've selected an image, you'll probably see the Src, Width, and Height properties listed. But unless you've set the image's border, the Border property won't appear.
To add a property, click the Add button. In the window that appears, type the appropriate property name. For example, to make the path to a graphics file editable, you'd set the <img> tag's Src attribute by typing src here. (If you're not sure of the property's name, check out Dreamweaver's built-in HTML reference, described in Section 10.5.)
|
Make sure the "Make attribute editable" box is turned on.
If you decide that you no longer want to allow editing of this property, you can return to this dialog box and turn off editing, as described in Section 18.4 .
Type a name in the Label field.
What you type here should be a simple description of the editable tag and property, which will help page authors correctly identify editable properties. For example, you could use Product Image if you're making a particular image's source (Src) property editable.
Choose a value type from the menu.
Your choices are:
Text. Use this option when a property's value is a word. For example, the image tag's Align property can be top, middle, baseline, and so on. Or, when using Cascading Style Sheets, you could make a tag's Class property editable to allow page authors to apply a particular custom style to the tag?span class="docEmphasis">content, footer
, and so on.URL. Use this option when the editable property is a path to a file, like an image's Src property or a link's Href property. Using its site management tools, Dreamweaver will keep track of these paths and update them when you move your pages around your site.
Color. If the property requires a Web color, like a page's background color, select this option. It will make Dreamweaver's color box available to people who build pages from the template.
True/False. You shouldn't use this option. It's intended for Dreamweaver's Optional Regions feature (discussed in Section 18.4 ), and it doesn't apply to HTML properties.
Number. Use this choice for properties that require a numeric value, like an image's Height and Width properties.
Type a default value into the Default field.
This step is optional. The default value defines the initial value for this property, when people first create a page based on the template. They can then modify this value for that particular page. If you've already set this property in the template, its value will appear automatically in this box.
Click OK to close the window.
Dreamweaver adds code to the template page that allows page authors control of the attribute. Setting this attribute on pages created from the template is described in Section 18.6.2.
If you later decide that you don't want a particular tag's property to be editable, Dreamweaver
can help. Open the template file, select the tag with the editable attribute, and
choose ModifyTemplatesMake Attribute Editable. In the window that appears,
turn off the "Make attribute editable" checkbox (Figure 18-8). Unfortunately,
doing
so doesn't remove all of the template code Dreamweaver added. Even after you turn
off editing for an attribute, Dreamweaver leaves behind the parameter used to control
the tag's property. To eliminate this extra code, see the box in Section 18.7.2.
|
|
< Day Day Up > |
|