|
|
< Day Day Up > |
|
5.3 Editing GraphicsNothing's ever perfect, especially when you're building a Web site. Corrections are par for the course梟ot just to a Web page, but to the pictures on it, as well. Perhaps a picture is a tad too dark, or you'd like to crop out the rowdy co-worker being escorted out by security from your company's holiday party photo. In the hands of less-capable software, you'd face quite a tedious switching-and-opening
task each time you wanted to open a graphic. You'd have to open Photoshop, Fireworks,
or whatever graphics program you prefer; choose File Dreamweaver MX 2004 includes tools for performing many basic editing tasks. For more complex work, like changing the text on a button from "Now Firing" to "Now Hiring," you need to switch to a different program. However, Dreamweaver is considerate of your time; it lets you access your favorite graphics program with just a couple of clicks. 5.3.1 The Built-In Editing ToolsDreamweaver MX 2004 includes four new tools for cropping, resizing, sharpening, and adjusting the brightness and contrast of images (see Figure 5-8). Suppose your boss emails you her portrait with instructions to put it on her "Meet the boss" page. Unfortunately, it's too big and too dark. Rather than launch a separate image-editing program, you can simply add the photo to the page and make the corrections within Dreamweaver. The Property inspector now includes tools for editing images directly inside Dreamweaver.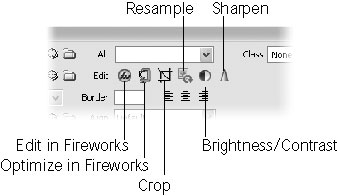
But first, a warning: All of these tools change the original GIF or JPEG image in your site folder. If you shrink a graphic, and then later change your mind, you may be out of luck. It's a good idea, therefore, to make a backup of all of your images before you use these tools. Furthermore, remember that if you use that same file on other pages, your modifications will appear on those pages, too. For instance, if you decide you want to shrink your company logo to a smaller size on one page, you may find that every page on your site now has the smaller logo! If you want to change a graphic on only one page, make a copy of it first, insert the copy on the page you wish to change, and modify just that image file. That way, the rest of your site will keep the original graphic. Of course, if you discover right away that you've made a change you don't want, you
can choose Edit 5.3.1.1 Cropping an imageDreamweaver's Crop tool can remove extraneous or distracting parts of an image. (You can use it to get a closeup of a face, or to get rid of those teenagers making faces in the corner, for example.) To do so, select the graphic you wish to crop, and then click the Crop tool on the
Property inspector (see Figure 5-8). (Alternatively, choose Modify When you're done, double click inside the box, or click Edit on the Property inspector. Dreamweaver crops the image, discarding the unwanted areas of the graphic. To undo a crop that you don't like, simply press Ctrl+Z ( 5.3.1.2 Resampling an imageIf a photo is just too big to fit on a Web page, you could select the image and use one of the resize handles to alter its dimensions (see Section 5.2.3). Unfortunately, graphics that you shrink this way give you the worst of both worlds: They look muddier than they began, yet they still retain all the slow-downloading data of the larger image. You can, however, use this technique in conjunction with the new Image Resample tool to resize the actual graphic file. You'll end up with a trimmed-down file with its appearance intact. To use the Resample tool, select an image on a page, then resize it using the resize handles (Section 5.2.3). (Shift-drag to prevent distortion.) When you're done, click the Resample button on the Property inspector (see Figure 5-8). Dreamweaver resizes the image file. You can even make an image larger than the original using this technique. The end result isn't perfect梕ven Dreamweaver can't create image information that was never there梑ut the program does its best to prevent the image from looking too pixellated. You won't want to enlarge images this way often, but in a pinch it's a quick way to make a photo just a little bit larger. Dreamweaver changes the graphic, altering the width and height of the actual file. If
you change your mind about resampling the image, your only option is the old undo
command, Ctrl+Z ( 5.3.1.3 Brightness and contrastIf an image on a page is too light, too dark, or washed out, you can use Dreamweaver MX 2004's Brightness/Contrast dialog box to fix it. First select the picture, then click the Brightness/Contrast icon on the Property inspector (Figure 5-8) to open the dialog box. Move the brightness slider to the right to lighten the image (great for underexposed interior shots), or to the left to darken the image. The contrast control works in the same way: right to increase contrast (making dark colors darker and light colors lighter); left to decrease contrast (moves all colors toward gray). You'll often use the Brightness and Contrast sliders in conjunction. Brightening (lightening) an image also has a fading effect. By increasing contrast, you can restore some punch to a brightened image. If you've ever used image-editing software like Fireworks or Photoshop Elements, this dialog box should look familiar. Make sure the Preview box is turned on so that you can see your changes right in the document window.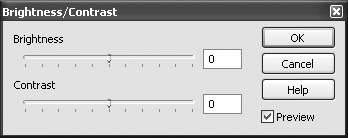
As with the other image editing controls, if you're unhappy with the changes you've
made, choose Edit 5.3.1.4 Sharpening imagesSometimes graphics, even those from some scanners and digital cameras, look a little fuzzy, especially if you've resampled the image (Section 5.3.1.1). Dreamweaver's Sharpen tool on the Property inspector helps restore clarity and make such images "pop." It works like similar tools in graphic editing programs: It increases the contrast between an image's pixels to create the illusion of sharper, more in-focus graphics. (Insert your own Sharper Image joke here.) To use this tool, select the graphic and then click the Image Sharpen icon on the Property inspector (Figure 5-8). The Sharpen window appears, as shown in Figure 5-10. Move the slider to the right to increase the amount of sharpening, or type a number in the box (10 is maximum sharpening; 0 is no change). You probably won't use the maximum setting unless you're going for a special effect, since it tends to highlight "noise" in the image, creating an unappealing halo effect around pixels. Once, you've selected a level of sharpening that you like, click OK. If you're unhappy with the results, just press Ctrl+Z ( The Sharpen box can make fuzzy pictures "pop." Make sure the Preview checkbox is turned on so you can see the effect on the image as you move the slider.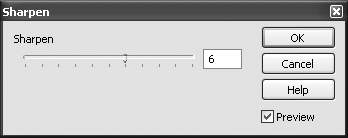
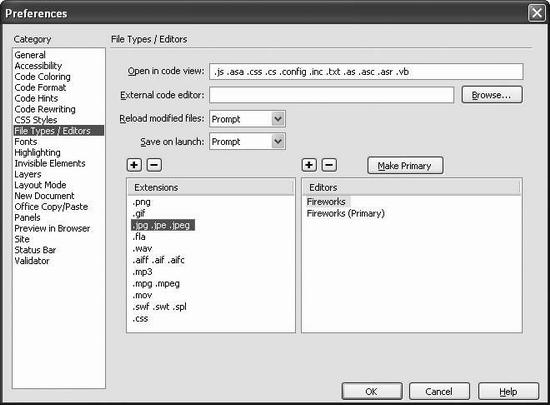
5.3.2 Setting Up an External EditorBefore you can take advantage of this timesaving feature, you need to tell Dreamweaver which graphics program you want to use.
5.3.3 Editing Images with FireworksFireworks is Dreamweaver's companion graphics program梐 powerful image-editing program made specifically to create and optimize Web graphics. You can get it as a stand-alone product, or included with Dreamweaver as part of its Studio MX 2004 package. The engineers at Macromedia have made sure that these sibling programs play well together. You can switch back and forth between them with a single click, for example. And instead of simply opening a GIF or JPEG file when you click the Edit button in the Property inspector, Fireworks can open the original Fireworks file. That's good, because most Web graphics don't start life as compressed GIF or JPEG files. Very often you'll have a higher quality image in your image editor's native format? psd for Photoshop or ImageReady, for example, or .png for Fireworks. This source file may contain lots of additional information that doesn't need to be in the final image you use on the Web. For example, in most image-editing programs, text can remain editable, so that it's easy to modify the link description on a button, say. In other words, most often you'll want to make changes to the original Photoshop or Fireworks file and then export it as a GIF or JPEG. If you're using Fireworks, Dreamweaver makes this process easier. When you export a GIF or JPEG graphic from Fireworks, save it into your Web site folder梚nto a subfolder called Images, for instance. (See Section 14.1 for strategies to help you organize your site's files.) When you do so, Fireworks creates a folder called _notes in the same folder. This folder contains small files whose names end in .mno梖or Macromedia Note梩hat tell Dreamweaver where to find the original Fireworks PNG file on your computer. When Dreamweaver opens a Web page, it checks for this folder and any notes that are associated with the graphics on the page. When you select an image created with Fireworks, Dreamweaver displays this information in the Property inspector (see Figure 5-10). The Property inspector displays special logos (circled) when you're working with a graphic created in Fireworks.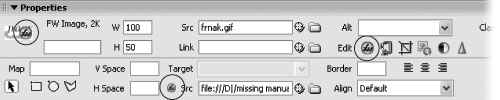
To edit a Fireworks graphic, just click it in the document window, and then click the
Fireworks logo (the Edit button) in the Property inspector. Or, if you're in a hurry,
just Ctrl ( In Fireworks, make any changes you wish to the image. When you're finished, click Done. Fireworks exports the image, closes the file, and returns you to Dreamweaver. The updated graphic appears on your page. 5.3.3.1 Optimizing an image with FireworksIf you have Fireworks, you can also click a button on the Property inspector to open Fireworks' Optimize Image dialog box (see Figure 5-8). This new feature offers a quick, easy way to compress an image, making it smaller for quicker download over the Internet. With JPEG images, you control file size by adjusting the quality setting on a scale of 1 (lowest quality?span class="docEmphasis">too low for most purposes) to 100 (highest quality, and also the largest file size). A setting of 80 is a good compromise between quality and size. However, you can never make a JPEG image higher in quality than its original. In other words, if you take a JPEG image that starts out with a quality setting of 60 and increase the quality to 80, the picture won't look any better, but the file will get larger. In fact, Dreamweaver's optimization settings work best on high quality Photoshop or Fireworks files rather than existing JPEGs. The more times you optimize a JPEG file, the worse it looks, as you lose pixel information with each compression. The size of a GIF file is mainly controlled by the number of colors in it梩he size of its palette. Fewer colors means a smaller file size. The "number of colors" menu on the optimize window lets you select from 2 to 256 different colors (256 is the maximum for a GIF image). As with JPEG images, if your GIF image starts out with only 64 colors, choosing 256 won't add colors or quality to the GIF, only file size.
Once you've made your optimization changes, click the Update button. Fireworks
changes the graphic's compression settings and returns you to Dreamweaver. You can
choose Edit |
|
|
< Day Day Up > |
|
 Open; navigate to your Web
site folder; find the graphic that needs touching up (if you can even remember its
name); then open it to make your changes.
Open; navigate to your Web
site folder; find the graphic that needs touching up (if you can even remember its
name); then open it to make your changes.