|
|
< Day Day Up > |
|
8.4 Applying the Layer StyleIn most cases, a layer will include a variety of HTML elements梚mages, paragraphs, headlines, and so on. Unlike a normal style that you usually apply to a single tag or even a single word, all the elements inside a layer are wrapped inside a <div> tag. Dreamweaver MX 2004 adds a simple tool to make adding the <div> tag easy. Available from the Layout tab of the Insert bar, the Insert Div Tag tool is a one-click
tool for wrapping content in a CSS style (Figure 8-5). To use it, select all of the content
you want to include in the layer and then click the button on the Insert bar (alternatively,
you can choose Insert Once you've applied an ID style to add a layer to the page, that ID's name will no longer appear in the ID menu on subsequent visits to this dialog box. That's because you can use an ID only once per page.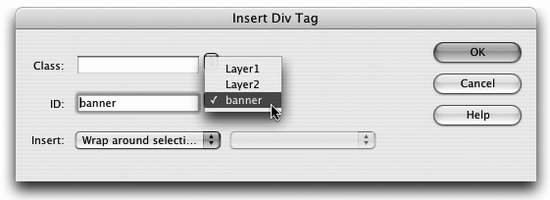
You can select the name of a class or ID style from either menu. In the case of a layer, you'll most likely select the name of the layer style you created from the ID menu; the Insert menu reads "Wrap around selection." Click OK to wrap the selected content in a <div> tag. The layer appears on the page with the ID style applied to it. NOTE
The Insert menu includes a few other options as well. You can insert the <div> before or after a particular tag, and if you simply clicked in the document window, you can insert the <div> at the cursor position by selecting the At the Insertion Point option. Alternatively, you might start with a blank page, create your layer styles, insert the layers, and then add content to each layer. The process is the same as above, except instead of selecting your page content and then inserting a <div> tag, place the cursor on the page where you want the HTML code for the layer to appear. Then use the Insert Div Tag tool and, from the Insert Div Tag window, select the ID name and choose the "At the insertion point" option to insert the layer. Dreamweaver inserts the layer and adds a small amount of dummy text like this: "Content for id 'banner' Goes Here." Later, you can delete this text and then proceed to type or paste text, add graphics, and insert other HTML into the layer. Unless you add a background color or border to your layer, it's difficult to identify its boundaries. And if you insert a layer without wrapping it around any content, it'll be invisible. To make working with layers easier, Dreamweaver provides visual cues in Design view, as shown in Figure 8-7. Unlike other page elements, layers don't appear in the same place on the page as their HTML code. Here, the bottom layer (the cat) appears below the banner layer. But the HTML code for that layer (represented by the gold shield) is above the HTML for the banner. This system gives layers their versatility, but means your learning how to deal with layers and their onscreen visual aids separately.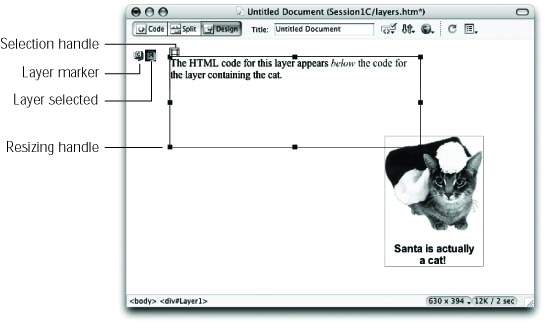
|
|
|
< Day Day Up > |
|
 Layout Objects