9.7 Inserting a Navigation Bar
One of the best reasons to use frames is to keep a navigation bar visible on the screen
at all times. A navigation bar (called a "nav bar" in the trade) is a set of interactive
buttons that let visitors jump to different pages or load pages into different frames.
To make your life easier, Dreamweaver's Navigation Bar object makes quick work of
adding complex interactive navigation bars to your frames.
Like the Rollover object described in Chapter 5, nav bar buttons use Dreamweaver
BehaviorsJavaScript programsto dynamically swap graphics files. Nav bar buttons
also offer two additional styles that help your visitors know where they are in
your site (see Figure 9-12).
|
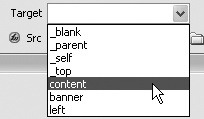
What are the four choices in the Target menu that begin
with the "_" character?
If you're working on a frameset page, the link target menu
lists all named frames. But even when working in another
kind of page, this pop-up menu always offers these four
options for a link you've highlighted:
_blank opens a new, second browser
window when the link is clicked; the
new window loads the linked page.
The original windowthe one containing
the linkremains open. This
feature lets you link to another site, for
example, leaving your own Web site
available in an open window. (To open
a new browser window to an exact size, see Section 12.4.1.2.)
_self loads the linked page into the same window or frame,
replacing the current page. Of course, this is how links work
normally, so there's little point in choosing this option unless
you're trying to get extra exercise.
_top offers a specialized, but very useful feature. Suppose
your Web page contains framesand one of them contains
a link to someone else's Web site. If a visitor clicks the link,
the "foreign" Web site will appear trapped within one of
your frames. This odd-looking effect is widely considered
bad form.
To avoid this HTML social gaffe, choose
the _top option for your link. This
option forces your visitor's browser
to load the linked page into the entire
browser window, which overrides all
frames and framesets, and avoids
imprisoning someone else's Web site
within your own.
_parent replaces the current frameset page with the linked
page, exactly as the _top target does. The difference is visible
only when the frameset page is itself loaded into a frame in
another frameset page. In that case, this option will replace
only the first frameset. (Beware: Netscape Navigator's support
for this feature is notoriously flaky.)
|
To create a navigation bar:
Create graphics for the buttons in your navigation bar.
You'll need to create multiple graphic files for each button, using a graphics program
like Fireworks or Adobe ImageReady. Since a navigation button can have
multiple appearancesstatesdepending on how the user interacts with it (Figure
9-12), you need a separate graphic file for each state. And, as with rollover images,
make sure that each button graphic is exactly the same size. Otherwise, you'll get
distortion (see Section 5.5).
Place the cursor in the frame where you'd like to add a navigation bar.
It's usually a sidebar, header, or footer. Choose Insert Interactive ImagesNavigation Bar. Interactive ImagesNavigation Bar.
Alternatively, from the Common tab of the Insert bar, click the Navigation Bar
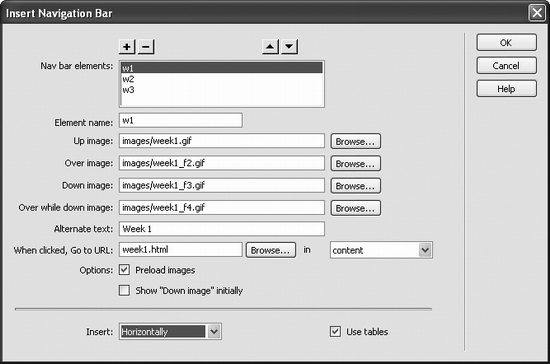
object. Either way, the Insert Navigation Bar window opens (see Figure 9-13). Don't be
overwhelmed. There are a lot of options in this window, but they're straightforward. Just remember that a navigation bar is simply a collection of buttons. You add one
button at a time to create a complete navigation system. Each button has a name,
up to four different images, and a link. The window starts out with a single element called unnamed1. Type a name for the first button in the Element Name field.
This name is just for behind-the-scenes use in the Web page. It won't appear on
the button or anywhere on the screen. If you like, you can even skip this step and
use Dreamweaver's default names: unnamed1, unnamed2, and so on. Click the Browser button next to the Up Image field to select a graphics file for
the up state of the button.
This is the image you created in step 1. Choose graphics for one or more states for the button.
At a minimum, include an over image. But including images for the other two
states of the button will add zing to your navigation bar. These different state images are good for helping your visitors understand where
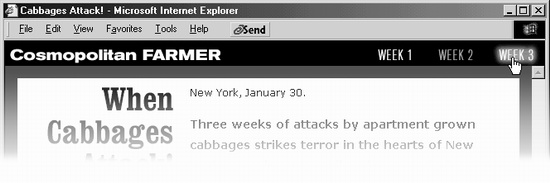
they are. For example, in Figure 9-12, the frameset loads the first of three pages
covering a story about killer cabbages. The Week 1 button in the right corner is in
its down state, meaning that "You are at this spot in the story." The Week 2 button
is in its up state, meaning that it's clickable, and the Week 3 button is highlighted
in its over state, since the mouse is hovering over it. Because these buttons consist
of ordinary graphics files, you can make their different states look like anything
you want. Type a text description for this button in the Alternate text field.
This optional step can be a help to those viewing the page with their graphics turned
off or those who have vision impairments as described in Section 5.2.2. Using the "When clicked, Go to URL" field, specify the page you want the button
link to open.
Since this is a navigation bar, clicking the button should take your visitor to another
Web page. You can click the Browse button to select a file from your site, type in
a path to a page in the site, or, to link to a page outside of the current site, type an
absolute URL beginning with http://.
|
Can I use the Navigation Bar object without using
frames?
Yes, but you'll lose most of the benefits of the Navigation Bar
feature and add unnecessary code to the page.
One of the cool aspects of a Dreamweaver nav bar is its
ability to indicate where the visitor is within the site, thanks
to the button's down state.
Imagine this scenario. You've built two frames: a top frame
for a nav bar, and bottom frame for the main content. The
buttons in the nav bar are all in their up states. Moving your
mouse over the first button causes it to glow, and clicking it
loads a new page in the bottom frame.
At the same time, the button you just clicked changes to
its down state, letting your visitor know what section of
the site he's seeing. Only the page in the bottom frame
changes, because the top frame with the nav bar simply uses a Dreamweaver behavior to swap the graphics used
for the buttons.
Now imagine that you didn't use frames, so that you just
inserted the navigation bar on the same page as the main
content. When you click a button in the navigation bar, the
browser loads a new page, completely replacing the page
that had the navigation bar! You'd have to rebuild the navigation
bar on every single page of your site.
Moreover, the down state of the button would never appear,
because as soon as you click the button, a new page
replaces it.
In other words, there's not much point to using the Navigation
Bar object in Dreamweaver unless you're also using
frames. If you want to create a frame-free site, it's probably
best to just stick with Rollover objects (see Section 5.5) for
building navigation buttons.
|
Select a Target from the pop-up menu.
Since you're including the navigation bar in a frame of its own, the linked Web
page should load into another frame, leaving the nav bar exactly where it was.
Select the name of the frame from the menu, as described in Section 9.6. The Main
Window option makes the Web browser replace the frameset and frames with
the linked page. (The names of the other frames in a frameset appear only if the current frameset
is open and you're adding the navigation bar to one of the pages in a frame. If, for
example, you've opened the navigation bar page by itself, Dreamweaver doesn't
know the page is part of a frameset, or what the other frames' names are.) NOTE
Don't turn off the Preload Images checkbox. As noted in Section 5.5, preloading images prevents a
delay when a visitor moves the mouse over the navigation image.
If you like, turn on Show "Down image" initially.
The down image can function like a "You are here" sign, letting visitors know
their location in the site. You should select this option only for one button in the
navigation bar, and only if that button links back to the original frameset. For instance, say your home page is a frameset, and one frame contains a navigation
bar. Select this option for the Home button on the navigation bar. In this way,
when visitors peruse your page, that button is already highlightedindicating
where they are. Click the + button. Repeat steps 4-10 for each additional button in the navigation
bar.
The - button deletes the highlighted button. The up and down arrow buttons
let you rearrange your buttons by shuffling a highlighted button up or down in
the list. Choose the orientation of the bar from the Insert menu.
Navigation bars can run horizontallyperfect for headers and footersor vertically
the right choice for a sidebar.  |
To help control layout, turn on the Use Tables checkbox. By containing your graphics within the cells
of a table, this feature keeps your graphics together on a page and prevents them from moving around if
someone resizes the browser window.
|
|
Click OK to insert the navigation bar.
You can only insert one navigation bar per Web page. Once inserted, you can edit it
only by choosing ModifyNavigation Bar. The Modify Navigation Bar dialog box
looks just like the one shown in Figure 9-13, so that you can edit, delete, and rearrange
your navigation buttons. To modify a button, select it in the "Nav bar elements" list. You can then assign new
images, settings, and links to it.
|