|
|
< Day Day Up > |
|
5.5 Rollover ImagesRollover images are among the most common user-interface elements on the Web, especially when it comes to navigation buttons. You've almost certainly seen rollovers in action, when your mouse moves over a button on some Web page and the image lights up, or glows, or turns into a frog. This simple change in appearance is a powerful way to inform a visitor that the graphic is more than just a pretty picture梚t's a button that actually does something. Rollovers are usually used to announce that the image is a link. Rollover graphics appear frequently in navigation bars, like the one shown at top. As your cursor touches a rollover button (top), the button changes appearance (bottom) to indicate that the graphic has a functional purpose梚n this case, "I'm a link. Click me."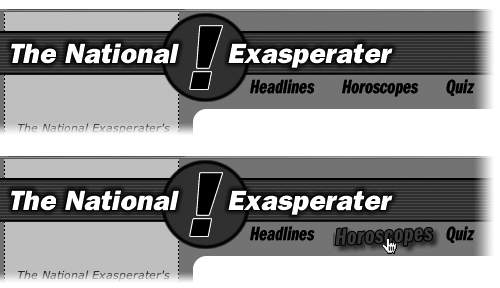
Behind the scenes, you create a rollover by preparing two different graphics?before" and "after." One graphic appears when the Web page first loads, and the other appears when your visitor's mouse moves over the first. If the cursor then rolls away without clicking, the original image pops back into place. This dynamic effect is achieved with the use of JavaScript, a programming language that most Web browsers use to add interactivity to Web pages. Fortunately, you don't need to be a programmer to take advantage of this exciting technology. Dreamweaver's many prewritten JavaScript programs, called Behaviors, let you add rollover images and other interactivity to your pages. (More about Behaviors in Chapter 12). To insert a rollover image, start by using a graphics program to prepare the "before" and "after" button images. Unless you're going for a bizarre distortion effect, they should be exactly the same size. Store them somewhere in your Web site folder. Then, in the document window, click where you want to insert the rollover image. Frequently, you'll use a table to lay out your rollover buttons (Chapter 7), and insert the image within a table cell. If you're using CSS to lay out your pages, as described in Chapter 8, you might place the buttons inside a <div> tag, as in the CSS Layout tutorial in Section 8.9. Choose Insert This box lets you specify the name, link, and image files to use for the rollover effect. "Preload Rollover Image" forces the browser to download the rollover image file along with the rest of the page, avoiding a delay when the mouse moves.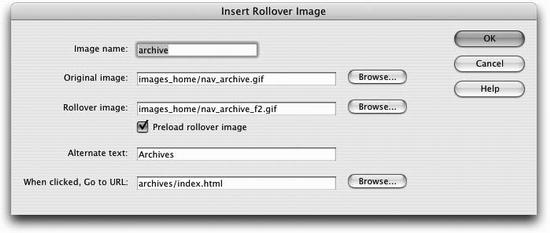
When you click OK, you return to your document window, where only the "before" button image appears. You can select it and modify it just as you would any image. In fact, it's just a regular image with a link and a Dreamweaver Behavior attached. To see your rollover in action, preview it in a Web browser by pressing the F12 key or
using the File |
|
|
< Day Day Up > |
|
 Interactive Images