Set the Time Range:
Before adding Lifeline elements to your Timing diagram, set a time range. To do this, follow the steps below:
| 1. | Right-click on the diagram. The context menu displays. |
| 2. | Select the option. The Set Timeline Range dialog displays.

|
| 3. | In the and fields, type the numeric values for the start and end points of the timeline; for example, set the range to . |
Note: The start time must be less than the end time.
| 4. | In the field, type the unit in which the time is measured; for example, or . |
| 5. | If you do not want to show the time range on the diagram, select the checkbox. |
| 6. | Click on the button. If you have not suppressed it, the time range displays underneath the Lifeline elements that you create on the diagram. |
Adding and Editing a State Lifeline element:
From the Enterprise Architect UML Toolbox drag a State Lifeline element onto your diagram. The element displays on the diagram.
To define the name of the State Lifeline, follow the steps below:
| 1. | Right-click on the element. The context menu displays. |
| 2. | Select the option. The Timeline <name> dialog displays, showing the General tab. |
| 4. | Click on the button and the button. |
Sizing and Scale:
In the top left corner of a selected Lifeline element are the left and right quick sizing buttons ( ). These buttons increase or decrease the width of the Lifeline element, which in turn controls the scale width of each time unit. By increasing the width of the element you increase the resolution when adding transitions, which makes them easier to edit.
Note: In order to edit the State Lifeline element, you must click on it to select it.
States:
Add States:
| 1. | Click on the State Lifeline element. The button ( ) displays at the bottom left of the element. ) displays at the bottom left of the element. |
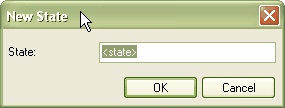
| 2. | Click on the button. The New State dialog displays.
|
| 3. | In the field, type the name of the state. |
Note: You must add at least two states; for example, On and Off.
| 5. | As you add states, increase the height of the element by dragging a handle-box ( ) on the edge of the element. ) on the edge of the element. |
Note: You can also add states using the States tab of the Configure Timeline dialog. Add either:
Set Timeline Start Position
You might require more space at the start of your timelines; for example, to use long state names. To insert this space in all the timelines on a diagram, follow the steps below:
| 1. | Right-click on the diagram background to display the context menu. |
| 2. | Select the menu option. The Set Timeline Start Position dialog displays. |
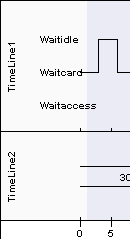
| 3. | The field defaults to as the minimum distance in pixels between the start of the timeline element and the start of the timeline itself. Type a new value up to 300 pixels and click on the OK button to increase the space at the start of the timeline, as shown below. |
 80 Pixels
  150 Pixels
Edit States:
| 1. | Click on the State Lifeline element and click on the required state. The Edit State dialog displays. |
| 2. | In the field, change the name as required. |
| 4. | If necessary, change the order of the states by clicking on the up or down arrows ( and and  ) beside each state name. ) beside each state name. |
Note: You can also edit the states using the States tab of the Configure Timeline dialog.
Delete States:
| 1. | Click on the State Lifeline element. |
| 2. | Hold down and move the cursor over the state name. The cursor changes form (7). |
| 3. | Click the mouse button. The state name is deleted. |
Transitions:
Add and Move Transitions:
After you have added states, you can add transitions via the diagram. As you move the cursor over the timeline, the cursor changes to one of three shapes:
| · | The move cursor ( ) displays when it is directly over the timeline. Hold down the mouse button and drag the line to move the timeline to a state above or below the current position. You can move the transition more than one state up or down, if necessary. ) displays when it is directly over the timeline. Hold down the mouse button and drag the line to move the timeline to a state above or below the current position. You can move the transition more than one state up or down, if necessary. |
| · | The new transition up cursor ( ) displays when it is just below the timeline, and there is another state above the line. Press and hold and click to create a new transition to the state above the line. To push the transition up more than one state, then move the cursor onto the line and drag it up. The transition is for one interval unit; to make it longer, see Change Transition Time below. ) displays when it is just below the timeline, and there is another state above the line. Press and hold and click to create a new transition to the state above the line. To push the transition up more than one state, then move the cursor onto the line and drag it up. The transition is for one interval unit; to make it longer, see Change Transition Time below.
If you do not hold , the whole timeline from the transition onwards moves up. |
| · | The new transition down cursor ( ) displays when it is just above the transition line, and there is another state below the line. Press and hold and click to create a new transition to the state below the line. To push the transition down more than one state, then move the cursor onto the line and drag it down. The transition is for one interval unit; to make it longer, see Change Transition Time below. ) displays when it is just above the transition line, and there is another state below the line. Press and hold and click to create a new transition to the state below the line. To push the transition down more than one state, then move the cursor onto the line and drag it down. The transition is for one interval unit; to make it longer, see Change Transition Time below.
If you do not hold , the whole timeline from the transition onwards moves down. |
Edit Transitions:
Follow the steps below:
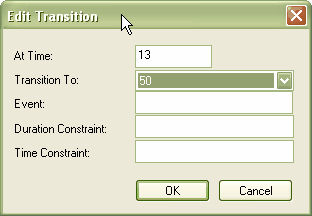
| 1. | Click directly on the appropriate transition line, after the transition begins. Alternatively, right-click on the transition line to display the context menu, and select the Edit menu option.
The Edit Transition dialog displays. The fields in this dialog are all optional.
|
| 2. | In the field, type the point on the timescale at which the transition occurs. |
| 3. | In the field, type the name of the state to which the transition occurs. |
| 4. | In the field, type the name of the event that the transition represents; this displays on the Timeline element just above the transition line. |
| 5. | In the field, type any constraint on the duration of the transition; this displays on the Timeline element, along the top of the element over the transition. |
| 6. | In the field, type any constraint on the start of the transition. This displays on the Timeline element at the start of the transition. |
| 7. | Click on the OK button. |
Note: Once , or are displayed on the diagram, you can edit them directly by clicking on them to display their specific dialog. You can also delete them by pressing and holding as you click on them; the cursor changes form (7) when you press .
Note: You can also edit transitions using the Transitions tab of the Configure Timeline dialog.
Change the Transition Time:
Move the cursor over one or other of the vertical transition lines and drag the line left or right to change the time of the transition. While on the line, the cursor shape changes to the horizontal movement cursor ( ).
).
Merge Transitions:
If necessary, you can 'push' a transition to merge it with the next or previous transition point on any Lifeline element on the diagram.
Position the cursor off the appropriate side of the transition line; the cursor changes form ( or
or  ). Click the mouse button. The system locates the nearest transition in the required direction, on any element on the diagram, and merges the current transition with that transition.
Delete Transitions:
Transitions are automatically deleted when you move the transition to the same state as the previous transition state, and release the cursor.
Alternatively, right-click on the transition line to display the context menu, and select the menu option.
See Also
Add and Edit a Value Lifeline Element
From the Enterprise Architect UML Toolbox drag a Value Lifeline element onto your diagram. The element displays on the diagram.
To edit the Value Lifeline name, follow the steps below:
| 1. | Right-click on the element. The context menu displays. |
| 2. | Select the option. The Timeline <name> dialog displays, showing the General tab. |
| 4. | Click on the button and the button. |
Sizing and Scale:
In the top left corner of a selected Lifeline element are the left and right quick sizing buttons (). These buttons increase or decrease the width of the Lifeline element, which in turn controls the scale width of each time unit. By increasing the width of the element you increase the resolution when adding transitions, which makes them easier to edit.
Note: In order to edit the Value Lifeline element, you must click on it to select it.
States:
Add States:
This is similar to adding states to a State Lifeline element.
Note: For a Value Lifeline, only the first state displays on the diagram. The other states are added to a list to access when creating transitions; they only display on the Lifeline element as you create transitions to those states.
Note: You can only edit or delete states in a Value Lifeline element using the States tab of the Configure Timeline dialog.
Transitions:
Add Transitions:
After you have added states to the Value Lifeline element, you can add transitions via the diagram. To do this, follow the steps below:
| 1. | Move the cursor above the transition line. The cursor changes form ( ). ). |
| 2. | Click the mouse button. The New Transition Event dialog displays.
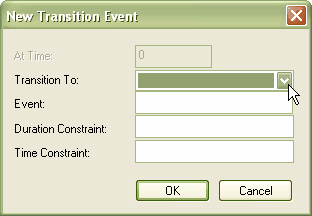
|
| 3. | In the field, click on the drop-down arrow and select a state from the list of available states; this displays on the Lifeline element within the transition box. The remaining fields on the dialog are optional. |
| 4. | In the field, type the name of the event that the transition represents; this displays on the Lifeline element just below and at the start of the transition line. |
| 5. | In the field, type any constraint on the duration of the transition; this displays on the Lifeline element, along the top of the element over the transition. |
| 6. | In the field, type any constraint on the start of the transition. This displays on the Lifeline element at the start of the transition, just after the Event name. |
| 7. | Click on the button to create the new transition. |
Edit Transitions:
To edit a transition, follow the steps below:
| 1. | Click on the state name in the transition. Alternatively, right-click on the state name to display the context menu, and select the Edit menu option.
The Edit Transition dialog displays; this is the same as the New Transition Event dialog, except that the field is enabled. |
| 2. | If necessary, overtype the At Time field to define a different start point. |
Note: You cannot change the field for the first state in the timeline; this is always .
| 3. | Edit the remaining fields as necessary. |
| 4. | Click on the button to save the changes. |
Change the Transition Time:
To change the start or end time of a transition, click on the start or end point of the transition and drag it to the new position. While on the line, the cursor shape changes to the horizontal movement cursor ().
Delete Transitions:
To delete a transition, press and hold and click on the transition state name. While you hold on the transition state name, the cursor changes form (7).
Alternatively, right-click on the state name to display the context menu, and select the menu option.
See Also


