12.2 Applying Behaviors
Dreamweaver makes adding behaviors as easy as selecting a tag and choosing an action
from a drop-down menu in the Behaviors panel.
12.2.1 The Behaviors Panel
The Behaviors panel is mission control for Dreamweaver's Behaviors (Figure 12-1).
On it, you can see any behaviors that are applied to a tag, add more behaviors, and
edit behaviors that are already applied.
You can open the Behaviors panel in any of three ways:
In any case, the panel appears on your screen.
NOTE
Dreamweaver includes two different types of behaviors, and it's important not to get them confused.
This chapter describes JavaScript programs that run in your audience's Web browsers. The server behaviors
listed in the Application panel group, on the other hand, run on the Web server to let you access information
from a database. These are described in Part VI.
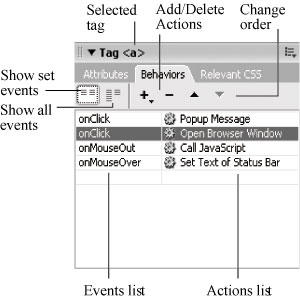
The currently selected tag is indicated at the top of the Behaviors panel, and a list of
all of the behaviors applied to that tag, if any, appears below. Each behavior is listed
in two parts: Events and Actions, as described earlier.
In Dreamweaver MX 2004, the Behaviors panel offers two different views ( Figure 12-1). You switch between them using the buttons at the upper left of the panel:
Show set events ( Figure 12-1) gets down to the specifics: which behaviors you've
applied to the tag, and which events trigger them. When you're working on a Web
page, this view moves extraneous information out of your way. Show all events lists all of the events available to a particular tag. Someday, should
you decide to memorize which events apply to which tags (see Section 12.3) you may
no longer need this view.
12.2.2 Behaviors, Step by Step
Open the Behaviors panel, and then proceed as follows:
Select the object or tag.
You must attach a behavior to an HTML tag, such as a link (indicated by the
<a> tag) or the page's body (<body> tag). Take care, however: It's easy to apply a
behavior accidentally to the wrong tag. Form elements, like checkboxes and text
fields, are easy梛ust click one to select it. For other kinds of tags, consider using
the tag selector, as described in Section 1.2.2, for more precision.  |
Tip: You can be sure which tag the behavior is applied to by looking to the right of the + and - buttons on
the Behaviors panel. The tag's name is listed there, as shown in Figure 12-1.
|
|
In the Behaviors panel, add an action.
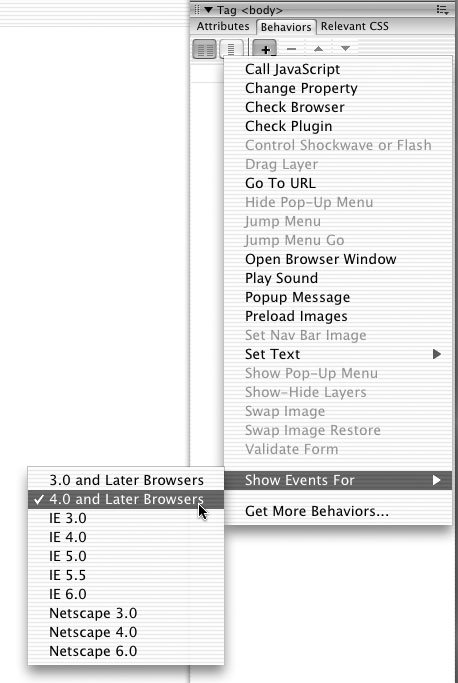
Click the + button in the Behaviors panel and, from the Add Action menu, select
the action you wish to add (see Figure 12-2). You'll find a complete list of these
behaviors and what they do beginning in Section 12.4. Some actions are dimmed in the menu because your Web page doesn't have elements
necessary for the behavior to work. For instance, if you haven't included
a form in your Web page, the Validate Form behavior is grayed out. Others are
dimmed because they must be applied to a particular page element. For example,
Jump Menu is off-limits until you've added a list/menu field to the page and
selected it. In the dialog box that opens, set options for the action.
Each action has properties that pertain specifically to it, and you set them to your
liking in the dialog box that now appears. For instance, when you choose the Go
To URL action, Dreamweaver asks what Web page you want to load. (Once again,
the following pages describe each of these actions.) Click OK to apply the action.
At this point, Dreamweaver adds, to the underlying code of your page, the HTML
and JavaScript required to make the behavior work. Your behavior's name appears
in the Behaviors panel. Unlike HTML objects, behaviors usually add code to two different places in a
document. For behaviors, Dreamweaver usually adds JavaScript code to the head
of the document and to the body of the page. Change the event, if desired.
When your newly created action shows up in the Behaviors panel, Dreamweaver
displays, in the Events column of the panel, a default event (trigger) for the selected
tag and action. For example, if you add a Set Text of Status Bar behavior to a link,
Dreamweaver suggests the onMouseOver event. (The target browser you select梥ee
Figure 12-2梞ay affect which event Dreamweaver chooses). However, this default event may not be the only event available. Links, for instance,
can handle many different events. An action could begin when your visitor's cursor
moves over the link (the onMouseover event ), clicks the link (the onClick event),
and so on. To change the event for a particular behavior, click the Events pop-up menu (the
down-pointing arrow) next to the event name (see Figure 12-2). Select the event
you want from the list of available events that appears for that particular tag. (See Section 12.3 for a list of all available events in current versions of the most popular browsers.)
|
To ensure that your new behavior works on a particular browser and version, choose a browser's name
from the Show Events For submenu (see Figure 12-2). Selecting older browsers from this list limits the number of events you have to choose from. Until you pick a different browser, this global, set-it-and-forget-it choice
applies to all behaviors.
|
|
When you're done, you can leave the Behaviors panel open to add more behaviors
to the tag, or to other tags. Select another tag, using the document window or tag
selector, and repeat steps 2 through 5.
12.2.2.1 Adding multiple behaviors
You're not limited to a single behavior per HTML tag. You can, and often will, apply
several behaviors to the same tag. For instance, when a page loads梩he onLoad event
of the <body> tag梚t might preload images to be used in rollover effects, open a
small browser window displaying a pop-up advertisement, and put a small text message
in the browser's status bar.
Nor are you limited to a single event per tag. For instance, you can add to a link any
number of actions that are triggered by different events such as onMouseOver, on-
MouseOut, and onClick.
For example, if you set things up for a link as shown in Figure 12-1, when you click
the selected link in the browser window, a Pop-up Message appears first, then a new
browser window opens, and finally a message appears in the status bar.
12.2.3 Editing Behaviors
Once you've applied a behavior, you can edit it anytime. Double-click the behavior
in the Behaviors panel to reopen the Settings dialog box, as described in step 3 of the
previous instructions. Make any changes you like, and then click OK.
To remove a behavior from your Web page, select it in the Behaviors panel and click
the - button, or press Delete. (If you accidentally delete a behavior, just choose Edit Undo Remove Behavior.)
12.2.4 A Quick Example
This brief example is designed to give you a clear overview of the behavior-creation
process. In it, you'll use a behavior that makes an important message appear automatically
when the Web page opens.
Choose FileNew to create a new untitled document.
You'll start with a new page. Choose FileSave and save the file to your computer.
It doesn't matter where you save the page, since you won't be including any graphics
or linking to any pages. You'll start the process of adding a behavior by selecting a specific tag梚n this
case the page's <body> tag. In the tag selector at the lower-left corner of the document window, click
<body>.
Once the tag is selected, you can apply one or more behaviors to it. But first, make
sure the Behaviors panel is open. If you don't see it, choose WindowBehaviors.
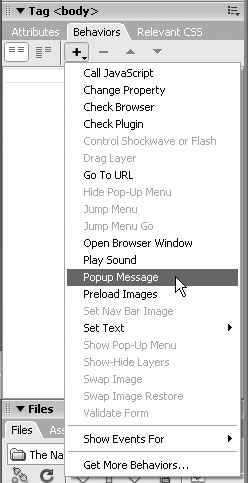
The Behaviors panel generally appears under the Design panel group on the right Click the + button on the Behaviors panel. From the Add Action menu, choose
Popup Message (see Figure 12-3).
The Popup Message dialog box appears. In the message box, type Visit our store for great gifts! Then click OK.
Dreamweaver adds the required JavaScript code to the page. Notice that the Behaviors
panel lists the action called Popup Message next to the event called onLoad.
The onLoad event triggers an action after a page and everything on it梘raphics,
and so on梙ave downloaded.
|
I applied a behavior to a link, but the only event available is
onMouseOver. What happened to all the other events?
You may have accidentally selected 3.0 and Later Browsers in
the Events pop-up menu (see Figure 12-2). Browser versions
prior to 4.0 don't work with many events.
To make sure your behavior works in as many browsers
as possible, check out the Show Events For submenu (also shown in Figure 12-2). The earlier the browser version you
choose here, the fewer events you'll see listed. On the other
hand, choosing an earlier browser version ensures that your
behavior will work for more of your visitors. Keep in mind,
however, that the vast majority of Web surfers use at least a
version 4 browser, making the 4.0 and Later Browsers option
a safe (and rewarding) standard choice.
|
To see the page in action, preview it in a Web browser. Press the F12 key to preview the page.
See Section 1.3.5 for more on using this preview function.
|