15.5 Cleaning Up HTML (and XHTML)
You've been reading about what great HTML code Dreamweaver writes, and how
all you hand-coders need to get on the WYSIWYG bandwagon. But there are exceptions
to every rule. In the process of formatting text, deleting elements, and梚n
general梑uilding a Web page, it's quite possible to end up with less-than-optimal
HTML coding. While Dreamweaver usually catches potentially sloppy HTML, you
may nonetheless run across instances of empty tags, redundant tags, and nested tags
in your Dreamweaver pages.
For example, in the normal course of adding, editing and deleting content on a page,
you can occasionally end up with code like this:
<div align="center"> </div>
This empty tag doesn't serve any purpose and only adds unnecessary code to your
page. Remember, the less code your page uses, the faster it loads. Eliminating redundant
tags can improve the download speed of your site.
Another possible source of errors is you. When you type HTML in Code view or
open pages created by another program, you may introduce errors that you'll need
to clean up later.
NOTE
If you're creating XHTML documents (Section 0.2.2) and using Dreamweaver Behaviors (Chapter 12), it's a
good idea to run the Clean Up XHTML command. Dreamweaver occasionally inserts uppercase letters in the
names of JavaScript events梠nLoad or onClick, for example)梐 no-no in the land of all lowercase XHTML.
Aware of its own limitations (and yours), Dreamweaver comes with a command
that's designed to streamline the code in your pages: Clean Up HTML (if you're
using Dreamweaver's XHTML mode, the command is called Clean Up XHTML).
This command not only improves the HTML in your page, it can also strip out
other nonessential code such as comments, special Dreamweaver markup code, and
eliminate a specific tag or tags.
 |
The Clean Up HTML command is extremely useful. Once you've tried it a few times, you'll probably
want to use it on all your pages. Unfortunately, it doesn't come with a keyboard shortcut. This is a classic case
when Dreamweaver's keyboard shortcut editor is just the white knight you need; using it, you can add a key
combination to trigger this command from the keyboard. See Section 20.1 in Chapter 20 for details.
|
|
To use this command:
Open a Web page to clean up.
Unfortunately, this great feature only works on one page at a time. No cleaning
up a site's worth of pages in one fell swoop! Accordingly, it's best to first use the
Site Reports feature (see Section 15.6) to identify problem pages. Then open them in
Dreamweaver and run this command. Choose Commands Clean Up HTML (or Clean Up XHTML). Clean Up HTML (or Clean Up XHTML).
The Clean Up HTML/XHTML window appears (see Figure 15-10). Turn on the checkboxes for the options you want.
Here's a rundown: Empty Tags deletes any tags that don't actually modify anything. For example, you
might delete some text that had been set in boldface, leaving behind opening and
closing bold tags without any text in between: <b></b>. Or you might delete an
image within a link, leaving behind a useless pair of <a> tags. It's always a good
idea to turn on this option. Redundant Nested Tags deletes tags that appear within other tags of the same type,
like this: <b>You can't get any <b>bolder</b> than bold</b>. The second set of
bold tags does no good, so choosing this option would produce this: <b>You can't
get any bolder than bold</b>梐n extremely useful option.
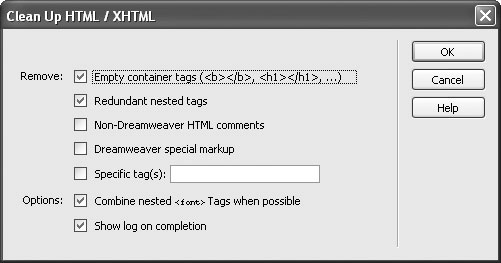
Non-Dreamweaver HTML Comments deletes any comments not inserted by someone
using Dreamweaver. Web designers place notes within code to give directions
or explain parts of the code. (These comments are invisible in a Web browser. They
appear only in the Code view, or as a gold comment icon in Dreamweaver's document
window.) Since comments are often added as an aid for maintaining a Web
page, you may not want to choose this option. However, if the page is finished, and
you doubt you'll need the information the comments contain, you can decrease
the file size of a page by using this option. Dreamweaver Special Markup deletes any special code Dreamweaver inserts.
Dreamweaver relies on certain code in some of its features, including tracing images
(Chapter 7), Templates (Chapter 18), and Libraries (Chapter 17). Choosing
this option also eliminates the special code that enables those features, so use this
option with care. (Since the Template feature adds a great deal of this specialized
code, Dreamweaver MX 2004 includes a Template Export command that lets you
export an entire site with all Template code removed. See Section 18.7.3). Specific Tag(s) deletes HTML tags you specify. Type the name of the tag (without
brackets) in the field like this: font. To remove multiple tags at once, separate each
tag name by a comma like this: font, blink. Be careful with this option. Since it lets you remove any tag from a page, it's easy
to delete an important and necessary tag (like the <body> tag) from your page by
accident. Furthermore, Dreamweaver's Find and Replace command provides much
more powerful tools for performing this kind of surgery (Section 19.3). Combine Nested <font> Tags when Possible combines multiple font properties
into a single tag, as in the example above. This, too, is a useful option to turn on
if you aren't using Cascading Style Sheets to format your text. If you want to see a report of all the changes Dreamweaver makes to a page, turn
on Show Log on Completion. Click OK to clean up the page.
If you selected Show Log on Completion, a dialog box then appears, listing the types
of changes and the number of changes that Dreamweaver made to the page.
NOTE
When running this command on an XHTML page, Dreamweaver also checks to make sure the syntax
of the page matches the requirements of an XHTML document (Section 0.2.2). Among other concerns, in XHTML
all tags must be lowercase, and any empty tags must be terminated correctly?lt;br /> for the line break tag,
for example. Dreamweaver fixes such problems.
As long as you keep the page open, you can undo changes Dreamweaver made. Suppose
you asked Dreamweaver to remove any comments, and suddenly realized you
really did need them. Ctrl+Z ( -Z) will do the trick. You can also use the History
panel, which lists this step as Clean Up HTML/XHTML (Section 15.5). -Z) will do the trick. You can also use the History
panel, which lists this step as Clean Up HTML/XHTML (Section 15.5).
|