|
|
< Day Day Up > |
|
16.1 Defining a Remote SiteAs you create your Web site on your computer, you keep it in a local site folder (Section 14.1.1.4), often called a local site for short. You can think of a local site as a work-in-progress. As your site is under constructionwhether you're building it from scratch or adding and modifying pagesyou'll routinely have partially finished documents sitting on your computer. Then, when you've perfected and tested your pages using the techniques described in Chapter 15, you're ready to transfer them to a Web server that's connected to the Internet. Dreamweaver refers to the Web-server copy of your files as the remote site, and the program provides five methods for transferring files between it and your local site:
16.1.1 Setting Up a Remote Site with FTPYou can set up a remote site only if you've first set up a local site on your computer. Even if you're just putting up a temporary site while working on your real Web site, you must at least have the temporary site constructed and defined in Dreamweaver (see Section 14.1.1).
NOTE
Dreamweaver MX 2004 lets you edit directly on pages located on a Web server, using an FTP connection (or if you're working with Cold Fusion files, an RDS connection). This new feature isn't always the best way to go: It's slow, and leaves your works-in-progress open for the world to see on the Internet. Once that's done, here's how you go about creating an Internet-based mirror of your local site folder:
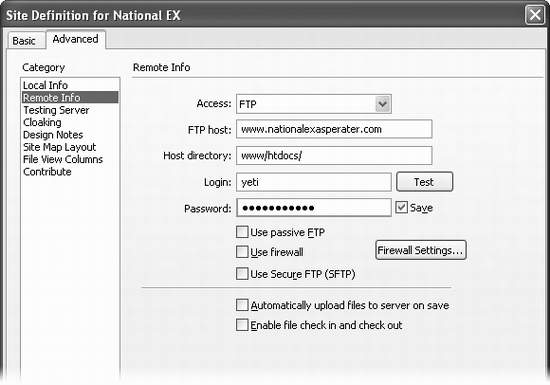
If your Web server uses SFTP (a secure, encrypted form of FTP), turn on the Use Secure FTP box. The Secure FTP option, new in Dreamweaver MX 2004, replaces the SSH Login feature of Dreamweaver MX (which was tricky to use and didn't provide good security). Secure FTP encrypts all of your data, not just your user name and password, so information transferred in this way is unintelligible to Internet snoops. It's ideal if your site isn't open to the public (password protected) and contains sensitive information like personnel records. Unfortunately, unless you can set it up on your own Web server, few Web hosting companies offer this advanced option. By the way, leave Automatically upload files to server on save turned off. Because it makes Dreamweaver upload the file each time you save, it slows you down and runs the risk of putting half-finished Web pages on your server for all the world to see. It's better to just upload the page after you're completely finished with it. Turn on "Enable File Check In and Check Out," if you like. Turn it on if, for example, you and your team of Web developers all use Dreamweaver. Fill in the corresponding options (see Figure 16-2). If you do wind up using the "checking out" feature (Section 16.3), you can save yourself some clicks by turning on Check Out File when Opening. (Fill in your name and email address, too, as shown in Figure 16-2.) Now you can "check out" a file from the remote server just by double-clicking its name in the Site Files list. If you work on the site in several different locations (for example, from home and your office), use a different name for each location (BobAtHome and BobAtWork, for example). In this way, you can identify which files you've checked out to your home computer and which to your computer at work.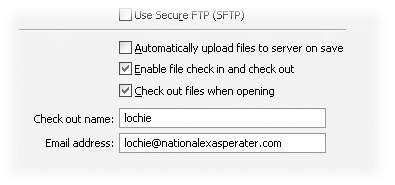
Click OK to return to the Manage Sites dialog box; click Done. The Manage Sites dialog box closes, and the Files panel opens. At this point, you're ready to connect to the Web server and transfer files. If you're the only person working on the site, Dreamweaver's Get and Put commands will do the trick (Section 16.2). If, however, you're part of a development team, use Dreamweaver's Check In and Check Out feature, described in Section 16.3, instead. 16.1.2 Setting Up a Remote Site over a Local NetworkIf you're working on an intranet, or if your company's Web server is connected to the company network, you may also be able to transfer your Web files just as you'd move any files from machine to machine. Dreamweaver provides the same file transfer functions as with FTP, but setup is simpler. Follow steps 1 and 2 of the previous instructions; but in step 3, click the Remote Info category, and then choose Local/Network from the Access pop-up menu. Menus and fields for collecting your connection information appear in the Site Definition box (see Figure 16-3). Now click the folder icon next to the Remote Folder field. In the resulting dialog box, navigate to and select your site's remote root folder. On a local network, this folder functions as the root folder on your company's Web server (see Section 14.1.1.4), even though it's actually still within the walls of your building. (For differences on selecting root folders on Windows and Macs, see Section 1.3.1.) Wrap up with steps 10 and 11 of the previous instructions. At this point, you're ready to connect to the Web server and transfer files. Clicking the Refresh Remote File List Automatically box updates the list of files in the Files panel. Changes to the remote site, such as when someone adds a file, are listed automatically. Because automatic updating slows down the process of moving files to the remote site, however, you may want to deselect this option when you begin a session of moving many files. You can always refresh the file list manually by clicking the Refresh button on the Files panel (Section 14.1.5).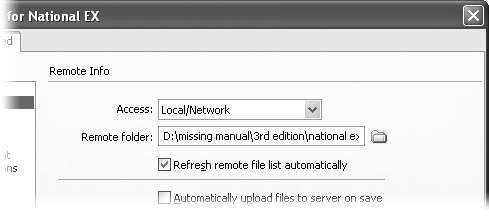
16.1.3 Setting Up a Remote Site with RDSRDS (Remote Development Service) is a feature of Macromedia's Cold Fusion Server. It lets designers work on Web files and databases in conjunction with a Cold Fusion application server. If you aren't using Cold Fusion, then this option isn't for you. To create a remote site in Dreamweaver that will work with RDS, follow steps 1 through 3 in Section 16.1.1. In step 4, click the Remote Info category, and then choose RDS from the Access pop-up menu (see Figure 16-1). The Remote Development Service, is a feature of the Cold Fusion application server. However, even if you use Cold Fusion, you may not be able to use RDS, since most Web hosting companies that offer Cold Fusion servers turn off RDS due to potential security problems.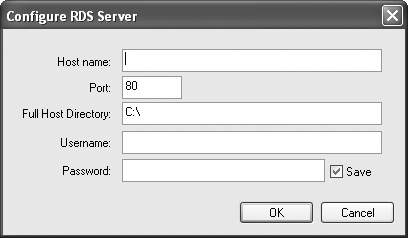
NOTE
For more information on RDS, visit: www.macromedia.com/support/ultradev/programs/rds/rds02.html. The Site Definition window displays a version number, a short description, and a Settings button. Click Settings to open the Configure RDS Server window, shown in Figure 16-4. Fill in the dialog box as directed by your server administrator or help desk. 16.1.4 Setting Up a Remote Site with WebDAVDreamweaver includes two other methods of accessing a remote site: WebDAV (an open-source program, meaning a collaborative effort by volunteer programmers all over the world) and Microsoft's Visual SourceSafe. Both technologies are designed to address one of the biggest problems when collaborating on a Web site: file management and version control. For instance, all kinds of havoc can result if two people edit a page simultaneously; whoever uploads the page to the Web server second winds up wiping out the changes made by the first person. What you need is a way to prevent more than one person from working on the same file at the same time. WebDAV, short for Web-based Distributed Authoring and Versioning, provides one such solution. It integrates seamlessly with Dreamweaver's Check In and Check Out feature, described in Section 16.3. NOTE
Both WebDAV and SourceSafe are advanced options usually used by large organizations that require a good deal of technical expertise. Consider using them only if you have someone on staff who can guide you in setting them. (Or, of course, if you happen to be a technical wiz.) Both Microsoft Internet Information Server (IIS) and Apache Web Server can work with WebDAV. To find out if your Web server can handle WebDAV (and to find out the necessary connection information), consult your Web server's administrator. WebDAV, short for Web-based Distributed Authoring and Versioning, is a powerful tool for working on a large site with other people. It's built into several Web server packages.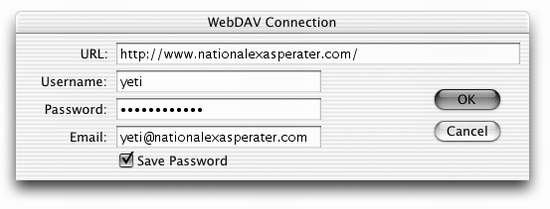
To create a remote site in Dreamweaver that will work with WebDAV, steps 1 through 3 in Section 16.1.1. In step 4, click the Remote Info category, and then choose WebDAV from the Access pop-up menu. The Site Definition window displays a version number, a short description, and a button labeled Settings. Click Settings to open the WebDAV Connection window, shown in Figure 16-5. In this dialog box, type the URL of the root directory on the WebDAV server (beginning with http://), your user name, email address, and password. (If you don't know these three bits of information, ask the server administrator or help desk.) Click OK. As a final step, turn on the Check Out Files when Opening checkbox in the Site Definition dialog box. Click OK, then Done. You're ready to connect to the Web server and transfer files, as described in Section 16.2. 16.1.5 Setting Up a Remote Site with SourceSafeMicrosoft originally created Visual SourceSafe for managing team software development. Like WebDAV, SourceSafe makes sure you don't accidentally stomp on someone else's hard work by overwriting a Web page they just modified. In addition, this sophisticated program tracks different versions of files and lets an administrator "roll back" to previous versions of a Web page, or even an entire site; it's the granddaddy of Undos. To take advantage of this power, however, you need a Visual SourceSafe (VSS) server and VSS database already set up. In addition, Windows users need to install Microsoft Visual SourceSafe Client version 6 on their PCs. NOTE
The Visual SourceSafe option is not available to Mac users of Dreamweaver MX 2004. Once you've installed the VSS Client software, and you've created and defined a local site (see Section 14.1.1), you're ready to configure Dreamweaver for SourceSafe using the Site Definition window. Basically, you tell Dreamweaver where to find the SourceSafe database and how to sign on to the server. Once again, follow steps 1 though 3 in Section 16.1.1. But in step 4, click the Remote Info category, and then choose SourceSafe Database from the Access pop-up menu. In the resulting dialog box, click Settings to reveal the Open SourceSafe Database dialog box, shown in Figure 16-6. Dreamweaver supports Microsoft's Visual SourceSafe system. Many corporations use this powerful file-control system to control access to files in large projects involving many people.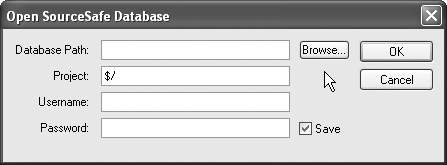
Click Browse to select the Visual SourceSafe (VSS) database file on your computer (or type in the file path, if you know it, into the Database Path field)the srcsafe.ini file that Dreamweaver uses to initialize SourceSafe. Then, in the Project field, fill in the name of the project within the VSS database that you wish to use as the remote root folder. (A VSS database can have many projects and Web sites listed in it. Make sure you enter the right project name for this site. If in doubt, contact the administrator of the Visual SourceSafe database.) Type your user name and password into the appropriate fields; again, ask the administrator for guidance. Click OK. But before dismissing the Site Definition dialog box, turn on Check Out Files when Opening, so that Dreamweaver's Check In and Check Out feature (see Section 16.3) will work with the VSS system. Click OK, then Done. You're ready to connect to the Web server and transfer files. Both WebDAV and SourceSafe use Dreamweaver's Check In and Check Out process, described in Section 16.3.1, for transferring files. |
|
|
< Day Day Up > |
|
 Manage Sites.