|
|
< Day Day Up > |
|
16.3 Check In and Check OutIf you're the sole developer for a Web site, the Files panel's Get and Put buttons are fine for transferring your files. But if you're on a team of developers, these simple tools can get you in trouble. For example, suppose your boss emails you an important announcement that she wants posted on the home page immediately. So you download the home page from the Web server and start to edit it. At the same time, your co-worker Bob notices a typo on the home page. He downloads it, too. You're a much faster worker than Bob, so you've added the critical news to the home page and moved it back to the Web server. But now Bob transfers his corrected home page to the Web server, overwriting your edits and eliminating that urgent notice you just uploaded. (An hour later, your phone rings. It's the boss.) Without some kind of system to monitor who has what file, and to prevent people from overwriting each other's work, collaborative Web development can be a chaotic mess. Fortunately, Dreamweaver's Check In and Check Out system provides a civilized answer to this problem. It works like your local public library: When you check a file out, no one else can have it. When you're finished, you check the file back in, releasing control of it, and allowing someone else on the team to check it out and work on it. To use the Check In/Check Out feature effectively, it helps to keep a few things in mind:
NOTE
Visual SourceSafe and WebDAV users are free of these last two constraints. As long as everyone working on the site uses programs that support the Visual SourceSafe client or the WebDAV protocol, they can work seamlessly with Dreamweaver users. And vice versa. 16.3.1 Checking Files OutWhen you want to work on a file in a collaborative site, you check it out from the Web server. Doing so makes sure that you have the latest version of the file, and that nobody else can make changes to the file. If you're used to creating sites by yourself, this business may feel a little strange; after all, your local site (the files on your computer) contains the latest versions of all files. When working with a group, however, you should consider the remote site梬here everyone can access, edit and add new Web pages梩o be the master copy of your site's files. NOTE
There's nothing to check out when you're creating a new page for the site. Since the only version of the file in the universe is on your computer, there's no fear that someone else might work on it at the same time as you. In this case, you only need to check the file into the site when you're done (see Section 16.3.2). You check out a file using the Files panel; if it's not open, press F8 or use any of the methods described in Section 14.1.4. Then choose the remote site you wish to work on from the Site pop-up menu (shown at top Figure 16-11). Now you're ready to begin. From the Local Folder file list in the Files panel, click to select the files you wish to check out from the Web server梠r, to check out an entire folder and every file inside it, just select the folder. You may in some instances want to select a file from the Remote Site list as well. For example, maybe you need to modify a page that you didn't create, and which you've never before checked out. In this case, the file isn't in your local folder, so you must select it from the Remote Site list. First, connect to the Web server by clicking the Connect button (Section 16.2). After Dreamweaver connects to the server, the remote files appear in the Remote Site list. Select the ones you wish to check out.
In any case, now just click the Check Out files button on the Files panel (see Figure
16-11), or use the keyboard shortcut Ctrl+Alt+Shift+D (Shift-Option- Dreamweaver asks if you wish to also check out any dependent files (see Figure 16-8). Be careful checking out dependent files; clicking Yes here locks all of those files so that nobody else can modify them. If you check out both a page and its linked external style sheet, for example, whoever's responsible for maintaining your site's styles won't have access to the sheet. When she needs to add a new style, she'll be stuck until you check the style sheet back in.
When you check files out, Dreamweaver copies them to your computer and marks them as checked out so others can't change them. As when uploading and downloading files, checking out files can take time, depending upon how fast your computer can communicate with the Internet. After you've checked out a file, a green "checked-out" checkmark appears next to its name in the Files panel (see Figure 16-11). You can now open and edit it, and (when you're done) check the file back in. If you attempt to check out a file someone else has already checked out, Dreamweaver tells you as much. It also gives you the option to override their checkout; but unless you're the boss, resist the temptation, for two reasons. First, your colleagues may have made some important changes to the page, which will be wiped out by your shenanigans. Second, because you so rudely stole the file, they may decide to stop talking to you. A better way to work with someone who's checked out a file you need is to use Dreamweaver's email feature. You can see who checked out a file by consulting the Checked Out By column (only visible when you've expanded the Files panel as shown in Figure 16-11). Even better, if you click the name, Dreamweaver opens your email program and addresses an email to that person, so you can say: "Hey Bob, you've had the home page checked out for two days! I need to work on it, so check it back in!"
The name and email address Dreamweaver uses depends on the information your co-workers provided, just as you did when you configured your computer for remote site use (see Section 16.1.2). The Check In/Out buttons transfer files between the local site and the Web server. A padlock identifies files you've checked into the remote site. If a file is currently checked out, a checkmark appears next to its name. A green checkmark indicates you've checked out the file; a red checkmark means someone else has checked it out.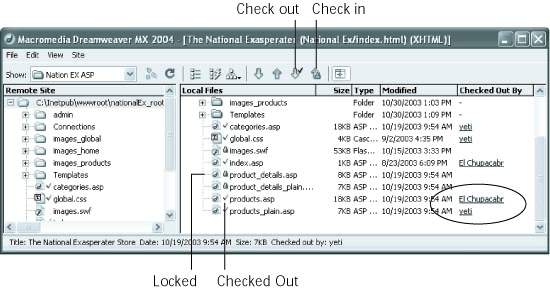
16.3.2 Checking Files InWhen you're ready to move a page you've edited back onto the server, you check it in. (You also check in new files you've created.) To check in files, open the Files panel (press F8), choose the site you're checking into from the Site pop-up menu, and (using the Local Folder file list in the Files panel) select the files you wish to check in to the Web server. As always, you can click a folder to check it in, along with every file inside it. The files you select should be files you've checked out, or brand-new files that have never been on the Web server. If you attempt to check in a file that someone else has checked out, Dreamweaver warns you with a message box. Click Cancel to stop the check-in procedure, so that you won't overwrite the checked-out file on the server. Dreamweaver also warns you if you try to check in a file that's older than the server copy. Again, unless you're sure this is what you want to do, click Cancel.
You can check in the selected files in any of the usual ways:
NOTE
The Site Dreamweaver asks if you wish to also check in any dependent files (see Figure 16- 8). You should transfer dependent files only if you first checked them out, or if the dependent files are new and have never been uploaded to the server. If you attempt to check in a dependent file that someone else has checked out, Dreamweaver warns you with a message box. After you've clicked through all message boxes, Dreamweaver copies the files to the Remote site. Once you've checked in a file, a padlock icon appears next to its name in the Files panel (see Figure 16-11); checking in locks the file so that you don't accidentally change the local copy. If you wish to modify the file in some way, check it out again (see Section 16.3.1). 16.3.3 Generating a Report on Checked-Out FilesAs described in Chapter 15, Dreamweaver can generate a series of reports on the files in your site. One of those reports lets you see which files a specific person has checked out. In this way, for instance, you can identify all the files you've checked out, or all the files that have been checked out by your co-worker Bob (who has since left the company). To generate a report, follow the steps described in Section 15.6. Turn on the Checked Out By option when specifying the type of report to run. Then click Report Settings. In the dialog box that appears, type the person's name as it appears in the Checked Out By column (Figure 16-11). (To find all checked-out files, leave the box blank.) Click OK, and then click Run to generate the report. Unfortunately, a couple of issues undermine the usefulness of the "Checked Out By" report. First, if you're connected to the Remote server using FTP, you'll wait a while; Dreamweaver needs to download a lot of information, which, even on a small site, can take several minutes. NOTE
If you find the report is taking too long, you can stop it in its tracks by clicking the Stop button (the red stop sign icon) in the Site Reports panel (see Figure 16-12). Running a report to see who has checked out which file is a great idea. Unfortunately, this feature may not produce very useful results.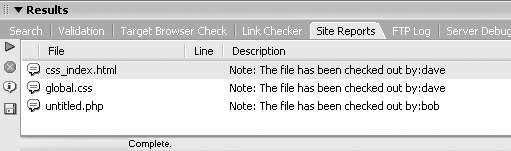
Second, the report you finally get isn't very useful (see Figure 16-12). The operations you're most likely to perform on checked-out files梒hecking them back in, undoing their checkout status, or contacting the person who checked them梤equire you to switch to the Files panel. Because there's no link between the report and the Files panel, you can't, for example, make Dreamweaver highlight the reported files in the Files panel. |
|
|
< Day Day Up > |
|

 Check In menu option checks in only the document you're currently working on, not any
files you've selected in the Files panel.
Check In menu option checks in only the document you're currently working on, not any
files you've selected in the Files panel.