4.2 Adding a Link
If all that talk of links got you confused, don't worry. Links are confusing, and that's
one of the best reasons to use Dreamweaver. If you can navigate to a document on your
own computer or anywhere on the Web, you can create a link to it in Dreamweaver,
even if you don't know the first thing about URLs and don't intend to learn.

4.2.1 Browsing for a File
To create a link from one a page to another on your own Web site, use the Browse for
File button on the Property inspector (see Figure 4-2) or its keyboard shortcut (see
the steps below). To browse for a file in Dreamweaver, you use the same type of dialog
box that you already use to open or save a file, making this the easiest way to add a
link. (To link to a page on another Web site, you'll need to type the Web address into
the Property inspector. Turn to Section 4.2.3 for instructions.)
In the document window, select the text or image you want to use for the link.
You can select a single word, a sentence, or an entire paragraph. When this process
is over, the selected words will show up blue and underlined (depending on your
visitors' Web-browser settings), like billions of links before them. In addition, you can turn a picture into a link梐 great trick for adding attractive
navigation buttons. In the Property inspector, click the folder (Browse for File) icon.
Alternatively, choose Modify Make Link or press Ctrl+L ( Make Link or press Ctrl+L ( -L). In any case, the
Select File dialog box opens (see Figure 4-3). -L). In any case, the
Select File dialog box opens (see Figure 4-3). Navigate to and select the file you'll want the link to open.
The file should be a Web page that's part of your Web site. In other words, it should
be in the local root folder (see Section 1.3), or in a folder therein. If you try to link to a file outside the root folder, Dreamweaver alerts you to this
problem, and offers to copy the file into the root folder. Accept the offer. Remember:
For a Web site, the root folder is like the edges of the known universe; nothing
exists outside it.
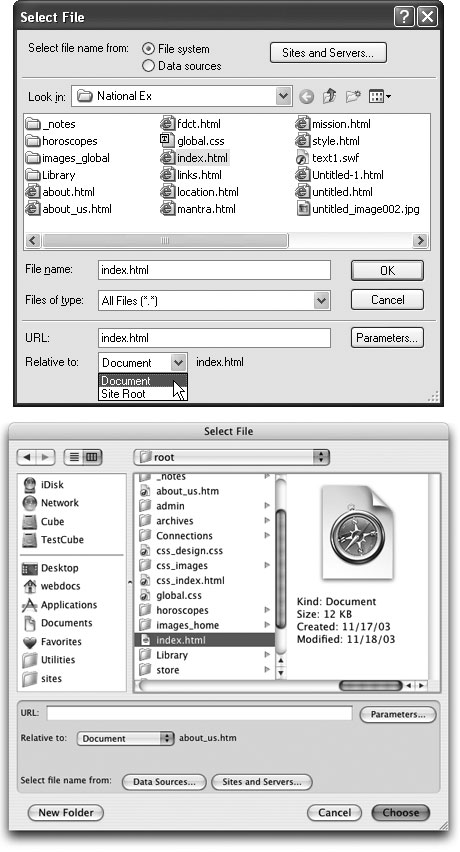
From the Relative To menu, choose the type of link桪ocument or Site Root.
As noted earlier in this chapter, document-relative links are the best choice. Rootrelative
links (which is short for Site Root-relative links) don't work when you
preview the Web site on your own computer. (They do, however, work once you
move them to your Web server.) NOTE
Get in the habit of double-checking this pop-up menu. As discussed in Figure 4-3, Dreamweaver
remembers your selection and uses it the next time you create a link. If you inadvertently choose Site Root
here, Dreamweaver will quietly continue to use Site Root-relative paths for creating hyperlinks and inserting
graphics. Furthermore, you may not realize your mistake; depending on your Preferences setting (Section 4.1.4), root-relative links may work just fine when you press F12 to preview your pages in your Web browser.
However, if you were to open your Web site directly using your Web browser's Open command, the same
root-relative links and graphics would suddenly stop working. To avoid such confusion, use document-relative
links in Dreamweaver.
Click Select (Windows) or Open (Mac) to apply the link.
The text or image now links to another Web page. If you haven't yet saved the
Web page, Dreamweaver doesn't know how to write the document-relative link.
Instead, it displays a dialog box saying that it will assign a temporary path for the
link until you save the page梥ee the box on Section 4.3.
After you apply a link, graphics don't look any different, but linked text appears underlined
and colored (using the color defined by the Page Property window, which
is shown in Figure 1-11). If you want to take the link for a spin, press F12 to preview
the page in your browser, where you can click the link.
4.2.2 Using the Point-to-File Icon
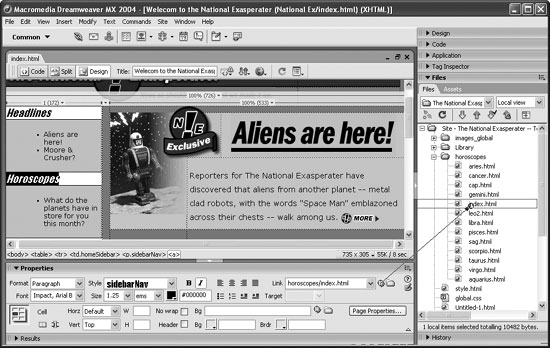
You can also create links in Dreamweaver by dragging from the Property inspector
to the Files panel (shown in Figure 4-4). If your site involves a lot of links, learning
the Point-to-File tool will save you time and energy.
To use this trick effectively, position your document window and Files window sideby-
side, as shown in Figure 4-4.
In the document window, select the text or image you want to turn into a link.
|
What's the Target menu in the Property inspector for?
The Target menu has nothing to do with the accuracy of
your links, nor with shooting ranges. Instead, it deals with
how the destination page appears when you click a link.
The new page can appear (a) right in the browser window,
just the way most links work; (b) in a new browser window
(choose the _blank option); or (c) in a different frame on
the same page (see Chapter 9).
|
Make sure that both the Property inspector and Files window are open. To open
the Property inspector if it's not on the screen, choose WindowProperties. To
open the Files window, choose WindowFiles. (Before using the Files window,
you need to first create a local site, as described on Section 1.3.1.) Drag the Point-to-File icon from the Property inspector onto a Web page in the
Files window (see Figure 4-4).
Alternatively, you can Shift-drag the selected text or image in the document window
to any Web page in the Files panel梐 method that bypasses the Property
inspector altogether.
After dragging over the correct Web page, release the mouse button.
The selected text or image in your Web page turns into a link to the file you just
pointed to.
4.2.3 Typing (or Pasting) the URL or Path
If you need to link to another Web site, or you feel comfortable with how document-
relative links work, you can also simply type the URL or path to the page in
the Property inspector. Note that this is the only way to add a link to a page outside
of the current Web site.
In the document window, select the text or image you want to make into a link.
In the Property inspector, type the URL or path to the file in the Link field (see
Figure 4-1).
If the link leads to another Web site, type an absolute URL梩hat is, a complete
Web address, starting with http://.  |
An easier approach is to copy a complete URL梚ncluding the http://梖rom the Address bar in your
browser window. Then paste the address into the Link field.
|
|
To link to another page on your own site, type a document-relative link (see Section 4.1.4 for some examples). You'll be less prone to error if you let Dreamweaver write
the correct path using the browsing or point-to-file techniques described above;
but typing the path can come in handy when, for instance, you want to create a
link to a page you haven't yet created. |
If you're adding an absolute link to a Web site without specifying a Web page, always add a final / to
the address. For example, to link to Yahoo, type
www.yahoo.com/
. The final slash tells the Web server
that you're requesting the default page (home page) at Yahoo.com.
Although leaving out the slash works too (
www.yahoo.com
), the server has to do a little extra work to
figure out what page to send back, resulting in a slight and unnecessary delay.
Also include the slash when you provide a link to the default page inside a folder on a site like this:
www.sawmac.com/dwmx2004/
.
|
|
Press Enter (Return) to apply the link.
The text or image now links to another Web page.
4.2.4 Using the Hyperlink Object
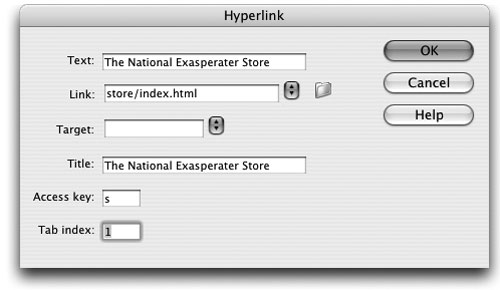
Dreamweaver MX 2004 provides yet another way to add a link. The Hyperlink object
on the Common tab of the Insert bar lets you insert a link with many optional
properties (see Figure 4-5).
|
Dreamweaver makes it easy to add innovative commands
and tools梚ncluding those written by independent, non-
Macromedia programmers梩o your copy of the program.
You can read a lot more about these add-on programs, called
extensions, in Chapter 20.
When you're working with links, one extension that really
comes in handy is called QuickLink. Created by renowned
Dreamweaver guru Tom Muck, this extension instantly turns
text into either a mailto or an absolute URL. You can find
QuickLink at
www.basic-ultradev.com/extensions/
.
Once you've installed the extension, here's how it works.
Suppose you paste the text, "You can download the free
PDF viewer at
www.adobe.com
." To turn
www.adobe.com
into a real link, you can either select the text and then go to the Property inspector and type
www.adobe.com/
梠r, with QuickLink, simply select the text and choose CommandsQuickLink. QuickLink writes the proper code
in the Property inspector, including the initial (and mandatory)
http://, even if those characters were missing from
the original text.
QuickLink also converts email addresses into proper mailto
links: just select the email address (missing@sawmac.com, say), apply the QuickLink command, and watch as the extension automatically inserts the correct code (mailto:
missing@sawmac.com) into your page.
For even faster action, create a keyboard shortcut for this
command; Shift-Ctrl-L is a good one. (See Section 20.1 for more
on keyboard shortcuts.)
|
Unfortunately, only Internet Explorer 6, Mozilla, Netscape 6, and later versions of
these actually understand all of these additional properties, and you can only use the
hyperlink object to create a new text link. You can't use it to add a link to an image or
to text you've already placed on the page.
If you want to give this feature a spin anyway, here's how it works. Start by clicking
on the page where you wish to insert a new link. Then:
Choose InsertHyperlink or click the icon on the Insert bar.
The Hyperlink dialog opens (see Figure 4-5). Type the text you want to appear in the Text box.
This is the text that you'll see on the page, and that your audience will click to
follow the link.
Click the folder icon and search for the page you want to link to.
Alternatively, you can type a URL in the Link box. Set the target for the link.
If you want the link to open in the same window, like most links, don't select anything.
The targeting option works just like a regular link (see Section 4.2.2). The last three options are more interesting. In the Tab Index box, type a number for the tab order.
In most newer browsers (Internet Explorer, Mozilla, Safari, and Opera to name a
few), you can press the Tab key to step through the links on a page (and boxes on a
form). This feature not only provides useful keyboard control of your Web browser,
but it's also important for people who can't use the mouse due to disability. Normally when you press Tab, the browser highlights links in the order in which
they appear in the HTML of the page. The Tab Index, by contrast, lets you control
the order in which links light up as a visitor tabs through them. For example, you can make your main navigation buttons the first things to
highlight when someone presses Tab, even if the buttons are not the first links
on the page. For the first link in order, type 1 here; number other links in the order you want
the Tab key to follow. If you aren't concerned about the order of a particular link,
leave this option blank or type 0. The Web browser will highlight that link after
the visitor has tabbed through all links that do have a Tab index. Type a title for the page you're linking to.
This property is optional. Some Web browsers, like Internet Explorer for Windows
and Netscape 7, display this property in a small tooltip window when you move
your mouse over the link. Many Macintosh Web browsers, on the other hand,
don't display this title at all. Type a key to define an access key.
An access key provides a way to trigger a link from the keyboard. Internet Explorer,
Netscape 6 and later, and Mozilla understand this property in conjunction with
the Alt key. For example, if you type h in the Access key box, a visitor to your page
could press Alt+H to mouselessly open that link. Of course, unless those who visit
your site are psychic, it's a good idea to provide instructions by adding the access
key information to the link: Home Page (Alt+H). In addition, the Macintosh doesn't
recognize access keys at all, so no Mac browsers can use this feature.
|