|
|
< Day Day Up > |
|
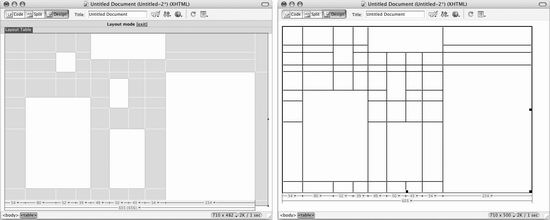
7.2 Layout ModeIn Layout mode, you can start creating a table-based design using either of the two drawing tools梩he Layout Cell drawing tool or the Layout Table drawing tool. Both tools await on the Layout tab of the Insert bar (see Figure 7-3). 7.2.1 How to Draw a Table in Layout ModeDrawing a table is as simple as dragging. Click the Layout Table tool in the Insert bar's Layout tab (see Figure 7-3); the cursor changes to a + sign when you move it over the document window. Drag diagonally to create a rectangular box梩he outline of the table. When you release the mouse button, a gray box appears, complete with green borders and a tab in the upper left labeled Layout Table (see Figure 7-4). NOTE
Although Dreamweaver uses the words Layout Table and Layout Cell, they're still just HTML tables and cells. In other words, a Layout Table is simply a table viewed in Layout mode, and a Layout Cell is just a table cell viewed in Layout mode. In Standard view, the same items are just called tables and cells. In this book, you'll see the terms Layout Cell and Layout Table appear when referring to actions you perform while in Layout mode. This Layout Table tool may be a bit confusing until you learn some of Dreamweaver's rules for drawing tables:
Tables are made up of rows and columns, a structure Dreamweaver helps maintain by making the edges of tables snap against nearby tables or cells as you draw. If the cursor comes within eight pixels of the edge of a cell or another table, the table edge you're drawing snaps to the other table or cell's edge. This behavior helps you accurately align the borders of your tables. But if it bothers you, turn this snapping feature off by pressing the Alt (Option) key as you draw the table.
7.2.2 Layout Table PropertiesAfter drawing a Layout Table, you'll see a rectangular gray square in the document
window. A tab labeled Layout Table appears in the upper-left corner of the table, while
information about the table's width appears at the bottom. (You won't see any of this
helpful information if you've turned on Hide All Visual Aids. To see the measurements,
choose View NOTE
Table and cell width information usually appears at the bottom of the table, as in Figure 7-5. However, when a table is below the top of the document window, this information moves to the top. The Remove Table Nesting button in the Property inspector is available when you select a Layout Table that was drawn (or nested) inside another Layout Table. This button converts the nested table into cells within the outer table. The three other buttons at the right of the Property inspector are described on the following pages. All of these options are also available from the Layout Table's menu (bottom).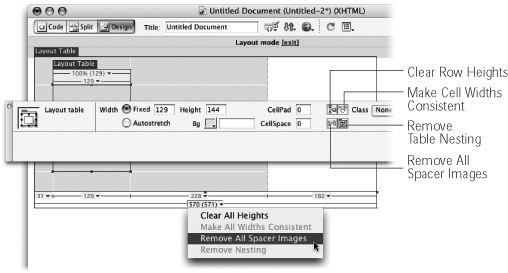
7.2.2.1 Table dimensionsThe width and height of the table appear in the Property inspector. You can adjust these values by typing new pixel-measurement values in the Fixed and Height fields. Alternatively, to resize a table, you can drag one of the three handles that appear on the bottom edge, lower-right corner, and right edge of the table in the document window. Instead of having a fixed width, a table can automatically adjust to fit the available space of your visitor's browser window. To activate this feature, click the Autostretch radio button in the Property inspector. (See Section 7.2.6 for full detail on flexible layouts.)
7.2.2.2 Background colorYou can give your table a background color that's independent of the page color. To pick a background color, click the Bg color box in the Property inspector and select from the pop-up palette. (You can actually select any color on your screen using the eyedropper; see Section 1.3.3.) NOTE
As with most properties that affect the look of an HTML element, CSS now offers an equivalent. You can use the Background Color property (Section 6.7.2) to create a style that applies a background color to a table or table cell. After you click, you may wonder whether Dreamweaver has gone colorblind梩he table's color doesn't match the color you selected. Tables in Layout mode have a light gray background to indicate empty areas of the table (places where no cells have yet been drawn). Dreamweaver mixes this gray with the color you selected, creating a muddy blend. That gray is just for showing you the table's boundaries in Dreamweaver and doesn't appear in a Web browser.
7.2.2.3 Cell padding and cell spacingWhen you add a background color to the cells in a table, you may sometimes want to create a visual gap between them, like the grout between tiles (but without the mold). To add this kind of space between cells in a table (see Figure 7-2), type a pixel value in the CellSpace field. To add margins around all four edges inside a cell, type a pixel value in the CellPad field. This space keeps the text or graphics inside a cell from touching the edges of the cell. By default, both the CellSpace and CellPad values are set to 0, which is appropriate for a design that requires graphics to meet at the edges of cells. Notice, for example, that the chicken in Figure 7-1 is actually made of four different graphics, each in its own cell. Chopping up a graphic in this way is a typical Web design trick that lends special flexibility. In Figure 7-1, for example, the chicken graphic appears to jut straight down into the text area of the Web page梐 feat that would be impossible if the chicken were a single rectangular image. In this case, if either the CellSpace or CellPad were set above 0, there would be visible gaps between the segments of the image. NOTE
Note: There is no CSS equivalent for cell spacing. If you want space between each cell, stick with a table's cell spacing properties. However, CSS does provide a more flexible alternative to cell padding. You can use the CSS Padding property (see Section 6.7.4) to control the padding on each edge of a table cell. In other words, you can indent the left edge 10 pixels, the top edge 20 pixels and leave the other edges alone. You would create either a class style or a tag style (Section 6.1.3) for the <table> or <td> tag, and set the Padding property to the dimension you wish. There's an example of this property in the tutorial in Section 7.12.7. 7.2.3 How to Draw a Layout CellWith the Layout Cell drawing tool, you can add cells to any Layout Table on the page. However, you don't need to draw a table before using the Cell drawing tool. In fact, many people use the Cell tool to sketch out the content areas of their pages, drawing boxes freehand on the screen and letting Dreamweaver create the rest of the table to fit. For example, suppose you have a banner ad that must be placed in the upper-right corner of the page. First, you could select the Cell tool in the Layout tab of the Insert bar (see Figure 7-3); the cursor changes to a + sign when it's over an empty area of a Layout Table or an empty area of the document window. You create a new cell just by dragging diagonally in the document window or inside an existing Layout Table. (If you draw a cell inside an existing Layout Table, Dreamweaver creates a rectangular cell. If you draw a cell in an empty document window, Dreamweaver creates a cell and a Layout Table that encloses it.) Because tables are organized like a grid, Dreamweaver must organize cells in rows and columns. To indicate this underlying grid, Dreamweaver displays white lines projecting from the sides of a cell to indicate the rows and columns of the table (see Figure 7-6). In addition, as you add more cells to a table, the cursor snaps to these guidelines, as well as to table edges, when it's eight pixels away or closer. This snapping feature helps you accurately align the edges of your cells; once again, you can temporarily override this feature, gaining complete dragging freedom, by pressing Alt (Option) as you draw the cell.
As with Layout Tables, there are some limitations to drawing Layout Cells:
7.2.4 Layout Cell PropertiesLike a table, a cell has its own width and height, and can have its own background color. You set these properties in the Property inspector. To see the properties for a Layout Cell, first select it by clicking any highlighted edge of the cell (the edges appear highlighted in red when your cursor approaches). Resize handles appear around the cell, and the Property inspector displays its attributes (see Figure 7-6). When you select a Layout Cell, the Property inspector reflects its size and cell alignment. Turning on No Wrap prevents a cell's contents from wrapping to the next line, usually with ugly results. Dreamweaver MX 2004 adds the ability to apply a CSS class style to the cell using the new Class menu, which lists all class styles for this page.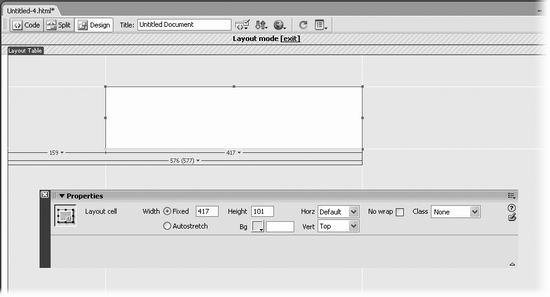
7.2.4.1 AlignmentBy default, content added to a Layout cell aligns with the left side of the cell, and rises to the top of the cell vertically. You can change either or both of these alignment options by setting the horizontal and vertical properties of the cell (see Figure 7-6). To align the content horizontally inside a cell, select the cell, and then choose an alignment option from the Horz (Horizontal) menu in the Property inspector (see Figure 7-6):
The vertical alignment property works the same way; use the Vert (Vertical) menu of the Property inspector:
Top: A cell's horizontal (top row) and vertical
alignment (bottom row) properties affect
how contents are aligned within a cell.
|
|
Once you've moved the cell, Dreamweaver redraws the underlying table to accommodate this change.
Resizing a table or cell is easy: For numerical precision, select the table or cell and use the Property inspector to adjust the Width and Height values. You can also resize a table or cell by dragging the handles that appear when you select it. However, since cells can't overlap one another or extend outside of a table, you can't drag the edge of a cell over another cell or out of a table.
When you set a fixed width for a Layout Table, as described in Section 7.2.2, it remains the same width regardless of your visitor's browser window size. This level of certainty and control is great for making sure elements go where you want them. On the other hand, fixed-width designs leave large areas of empty space when viewed on larger monitors (see Figure 7-9 for an example).
One solution is to build flexible tables with Dreamweaver's Autostretch option. Flexible tables, sometimes called liquid HTML, expand or shrink to fit a browser window's available display area. In this way, your design can accommodate 15-inch and 21-inch monitors. (Imagine if newspapers grew or shrank to fit a reader's arm span!)
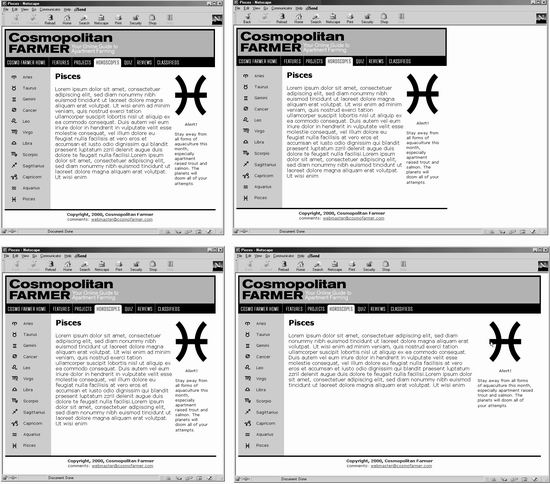
Instead of being a certain number of pixels wide, a flexible table always fills the entire window. To achieve this effect, you must set one column in the table to Autostretch; that column will expand to fill the page. For instance, in the example in Figure 7-9, the column containing the headline "Pisces" expands, while the left-hand column, containing the navigation bar, remains a fixed width.
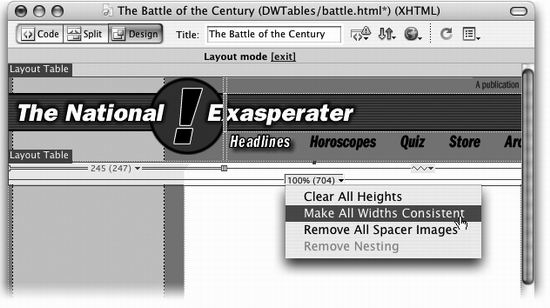
To create a flexible column, click the down-pointing triangle next to the pixel width number in the column header (see Figure 7-10) and choose Make Column Autostretch from the contextual menu. You can also select the cell you wish to make flexible and click the Autostretch button on the Property inspector. (Although you can also create a flexible table by selecting the table and setting its width to Autostretch, it's not necessary to do so. Dreamweaver automatically sets it to Autostretch when you create a flexible column.)
If you want to change the column back to a fixed width size, use the same menu, shown in Figure 7-10, to choose Make Column Fixed Width.
In order for the Autostretch function to work, Dreamweaver uses a transparent image 梐n actual, see-through GIF file called a spacer梩o control the spacing of the columns that don't stretch.
Understanding why Dreamweaver adds these invisible spacer images requires some understanding of the way it thinks. When you ask it to make the autostretch column grow as necessary to fill a browser window, Dreamweaver uses a little trick. It sets the column's width to 100 percent. In other words, the column attempts to take up all the space available, even space used by other columns. This greedy behavior, of course, would ordinarily squish the table's other columns into hyper-thinness. That's why Dreamweaver inserts a spacer image (of the width you've specified) into each fixed width column. The image acts like a steel beam across the walls of the fixed-width column, reinforcing it and preventing it from shrinking smaller than the size of the spacer image (see "Do the Math" in Section 7.7.6.4).
The first time you make a column an autostretcher, Dreamweaver opens a Choose Spacer Image dialog box. It offers you three choices:
Create a spacer image file. If you choose this option, Dreamweaver will create a 1-pixel by 1-pixel, transparent GIF image and prompt you to name the file and save it into any folder of your Web site.
Use an existing spacer image file. If you're already using a 1-pixel by 1-pixel transparent GIF (a standard Web-design tool), choose this option. Dreamweaver then lets you browse to and select the GIF file in your site folder. (For one use for such an image, see "Shrinking Down to a Pixel" in Section 7.7.6.5.)
Don't use spacer images for autostretch tables. This is not a wise choice if you want to use the Autostretch feature; it also doesn't work in Netscape 4. Most likely, your fixed width columns will appear much smaller than you intended.
NOTE
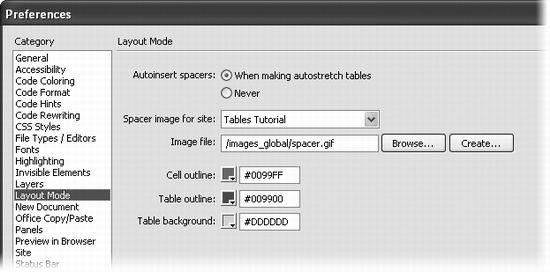
After you've set the spacer image for the site, Dreamweaver continues to use that file whenever
you need one. You can select a different file at any time from the Edit PreferencesLayout mode tab
(Dreamweaver MXPreferencesLayout mode in Mac OS X), as shown in Figure 7-8.
PreferencesLayout mode tab
(Dreamweaver MXPreferencesLayout mode in Mac OS X), as shown in Figure 7-8.
While Dreamweaver automatically inserts spacer GIFs, you can also add them manually by choosing Add Spacer Image from the column header menu (see Figure 7-10). This command is grayed out if you turned on the "Don't use spacer images" option in the Choose Spacer Image dialog box.
To remove a spacer image from a column, choose Remove Spacer Image from the column header menu. You can also remove all of the spacer images on a page by choosing Remove All Spacer Images from the Layout Table menu, or by clicking the Remove Spacer Images button on the Property inspector when a table is selected (see Figure 7-5).
WORKAROUND WORKSHOP
|
Layout mode lets you draw your designs directly in the document window, which is a wonderful feature. However, unless you can visualize the layout you want, you may feel that you're just aimlessly drawing boxes on a blank canvas.
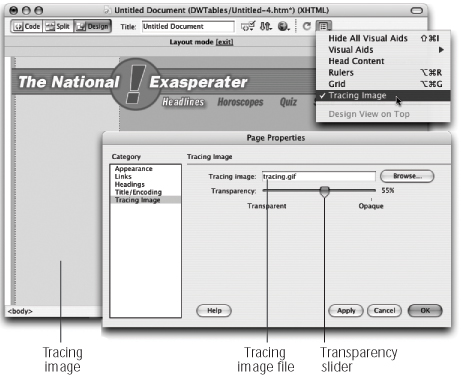
Dreamweaver's Tracing Image feature helps you find your way around the dreaded blank screen. With it, you can import a graphic representation of your finished page design梐 sketch you've created in a more art-oriented program like, say, Fireworks or Photoshop梐nd use it as a pattern for tracing the table and cells of your page. In fact, it's very common in the Web-design biz to work up, in a program like Photoshop, a graphic that looks like a finished Web page梑ut it's one giant image, without individual buttons, tables, or editable text (see Figure 7-11).
To add a tracing image to your page, choose ModifyPage Properties (or choose
ViewTracing ImageLoad); the Page Properties dialog box opens (see Figure
7-11). Select the Tracing Image category and click the Browse button near the bottom
of the window (next to the Tracing Image field); find and open a GIF, JPEG, or PNG
file to use as the background image.
Now use the Image Transparency slider shown in Figure 7-11. To fade the image into the background of the page, move the slider toward the transparent setting, making it easier to distinguish between the tracing image and the actual content on the Web page.
When you click OK, you return to your Web page with the tracing image in place. (The tracing image appears only in Dreamweaver, never on the Web.)
If you want to temporarily hide a tracing image, choose Tracing Image in the toolbar's
View Options menu (shown at top in Figure 7-11); choose the same command again to show it. (The long way: Choose ViewTracing Image and turn off the Show option.)
When you first select a tracing image, it appears against the top and left margins, if you've specified them (see step 12 in Section 1.3.3). If you didn't specify margins, Dreamweaver places the tracing image several pixels from the left and top edges of the document window梛ust where it would put text or graphics into a new Web page.
You can't just drag the tracing image elsewhere on the page. If you need it anywhere
other than the upper-left corner, choose ViewTracing ImageAdjust Position. Type
pixel values in the X and Y fields in the Adjust Tracing Image dialog box; the X value
is the distance from the left edge, and the Y value is the distance from the top edge.
You can also align the tracing image to a selected object on the page, which comes in
handy when you want to use a tracing image to create a portion of a Web page梐
footer or sidebar element, for example. Select the element on the page and then choose
ViewTracing ImageAlign with Selection. The tracing image's upper-left corner
aligns with the upper-left corner of the selected element. (In the case of a table cell,
however, Dreamweaver isn't so smart. It aligns the tracing image with the top-left
corner of the table containing the cell, not the cell itself.)
NOTE
To reset the tracing image to the upper-left corner of the page, choose ViewTracing ImageReset
Position. Unfortunately, this command doesn't place the image in its original position, at the margins of the
page; it merely places it at the very corner (the 0,0 position) of the document window. You'll probably need
to adjust it by choosing ViewTracing ImageAdjust Position. (To restore the default values, use 8 pixels
along the X axis and 11 pixels along the Y axis.)
Once you've finished building the Web page, it's a good idea to remove the tracing image. Not only is it distracting when you view the page in Dreamweaver, but Dreamweaver introduces extra lines of Dreamweaver-specific HTML to accommodate it. These extra bandwidth-consuming bytes are unnecessary once the page is complete.
To remove a tracing image from a page, open the Page Properties dialog box once again, and then select and delete the file name in the Tracing Image field.
|
|
|
< Day Day Up > |
|