|
|
< Day Day Up > |
|
9.5 Frame and Frameset PropertiesAfter creating a frameset, it's time to take charge of the size, look, and contents of its frames. Dreamweaver treats framesets and frames as separate objects, each with its own set of properties. When you select a frameset or frame, using any of the methods described above, you can view and modify its properties in the Property inspector (see Figure 9-9).
9.5.1 Frameset BordersBorders are intended to visually separate one frame from another, but professional Web designers generally shun their amateurish 3-D appearance and the boxy designs they create (see Figure 9-2). If you're a professional Web designer (or just want to come across as one), consider eliminating frame borders entirely. Not only does this free up a few precious pixels of screen real estate, it also lets you create seamless frame designs, so that all your frames appear to be a single, unified Web page. The Property inspector displays different properties when a frame (top) or frameset (bottom) is selected. But all of the frames' properties are stored in the frameset file: their size, border, source, and so on.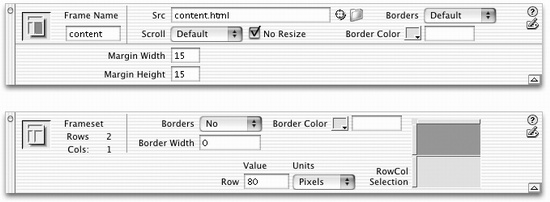
To control frameset borders, start by selecting the frameset itself (see Section 9.3 for selection techniques). Now consult the Property inspector, where you'll find these options:
The next time you save your document, Dreamweaver stores all of the new settings into the frameset file (Figure 9-9). NOTE
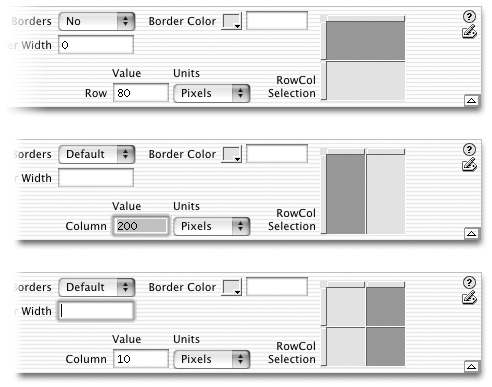
Nested framesets have their own border settings, but you don't have to specify them, since nested framesets inherit the border settings of the frameset they're in. For example, suppose you created a frameset and turned off the borders, and then you inserted another frameset into one of those frames (see Section 9.2.1). The borders in the nested frameset are automatically turned off, having inherited the settings of the outer frameset. You can, however, assign completely different border setting for the nested frameset, overriding any setting inherited from the outer frameset. 9.5.2 Frame SizeYou can make your frames bigger or smaller simply by dragging the frame borders in the document window. But for more precise, numerical measurement, you'll need the Property inspector. Start by selecting the frameset containing the frame in question (see Section 9.3). Now consult the Property inspector's controls, which include:
However, if the visitor's browser is much taller, the top and bottom frames won't be the height you wanted (see Figure 9-11, bottom). You've told it that the total height of the frameset should be 360 pixels (30 + 300 + 30), but the window is actually much bigger梠n the order of 900 pixels. In an effort to make the best of a bad situation, the browser just divides the remaining space among the three frames, adding height to each of the three frames. A relative measurement, therefore, lets you give a frame a flexible size. It will grow and shrink to accommodate changes in the browser window. In addition, it lets you assign absolute (fixed) sizes to certain frames梑anners and navigation bars, for example梩hat always remain fixed in size. You'll usually want to assign a relative width or height to one frame in each frameset. The relative frame grows or shrinks as the browser window is resized. Otherwise, as seen here (before the window is resized, left, and after), all of the frames resize, creating distorted banners and bottom navigation bars. Better: Give the top and bottom frames a set height梥ay, 30 pixels梐nd assign a relative height to the middle frame.
9.5.3 Frame PropertiesOnce you've set the border properties and frame sizes in the frameset, you can modify the properties of each frame. Select the frame and use the tools in the Property inspector, as shown in Figure 9-10. 9.5.3.1 NameEach frame can have its own name, but this isn't the name of the file (or the title of the Web page) that loads into the frame. A frame's name exists solely for identification purposes when working with links or JavaScript scripts梥pecifically, when you want to use a Dreamweaver Behavior (see Chapter 12) or target a link from one frame to another. You'll need frame names, for example, when you wish to use a navigation bar to load pages into another frame (see "Targeting Links," below). Otherwise, frame names are optional.
To set the name of a frame, select the frame by clicking it in the Frames window, and then type a name in the Frame Name field of the Property inspector. 9.5.3.2 SrcWhen you set a frame's source (Src) property, you're simply specifying the path to the Web page file that loads into that particular frame. You can change the path梐nd the Web page that appears in that frame梑y clicking the folder icon and selecting a file from your site folder. You can, if you like, link to a page that's on somebody else's site; just type the absolute URL here, beginning with http://. You won't, however, be able to see the other person's page within Dreamweaver. Instead, inside the frame you'll see only the words "Remote File," plus the URL. You have to preview the frameset in a browser connected to the Internet to see the remote file actually appear within the page. (If you do display someone else's Web page inside a frameset on your site, it's proper etiquette to ask for permission first. In fact, sites have been sued by companies whose pages have been "framed" in this way.) NOTE
Be careful using the Src property. One common mistake is to add the frameset page itself to one of the frames. In other words, it's possible to click the folder icon next to the Src field, and then select the current frameset page, thus creating a reference to itself. When you preview the frameset, the browser loads the page梑ut when it attempts to load pages into each frame, it's trapped: It loads the frameset, which in turn has a frame, which loads the frameset again, which has a frame that loads the frameset again, and so on, and so on. This hall of mirrors continues until the browser crashes and your site's visitors curse your name! 9.5.3.3 ScrollTo create scroll bars for a frame梠r hide them梪se the Scroll property. You'll see four options in the Scroll menu in the Property inspector:
In general, use the Auto option if you know your frame might require some scrolling, or No if not. For example, a frame containing a Web page with a lot of text will probably need a scroll bar, whereas a frame that simply contains the site's logo won't. 9.5.3.4 No ResizeUsually, your Web site visitors can resize the frames you've created just by dragging their borders right in the Web browser. But if you don't want people monkeying around with your designs, turn on the frame's No Resize checkbox in the Property inspector.
9.5.3.5 Margin Width and Margin HeightYou can adjust the top and left margins of a frame by setting its Margin Width and Margin Height properties. These settings control the position of the upper-left corner of a page in a frame, and they work exactly like page margins in a standard Web page do, as described in Section 1.3.3. (In fact, you can set both page and frame margins. Your margins will be the sum of the two. For example, a 10-pixel top page margin and a 10-pixel frame margin height will create a 20-pixel margin at the top of the frame.) Margin width is the amount of space between the left edge of the frame's border and the left edge of the Web page; margin height is the space from the frame's top border and the top of the Web page. These margin settings apply to every page that loads into the affected frame. 9.5.3.6 Border and Border ColorUsing these controls, you can assign a border and border color to each individual frame梘iving one important frame a sky-blue border, say, but leaving all other frames borderless. Unfortunately, Internet Explorer, Netscape Navigator, and Opera all handle this property differently, so you can't assume that it will work for all of your visitors. Furthermore, this option has no effect if you've turned off borders in the frameset (Section 9.5). |
|
|
< Day Day Up > |
|

 Frame command, Dreamweaver
supplies generic names for the frames it creates. But if you use any of the other methods for creating frames,
such as dragging frame borders from the edges of the window, you have to supply frame names yourself.
Frame command, Dreamweaver
supplies generic names for the frames it creates. But if you use any of the other methods for creating frames,
such as dragging frame borders from the edges of the window, you have to supply frame names yourself.