6.8 Cascading Style Sheets Tutorial
In this tutorial, you'll create an external style sheet for a Web page on the National
Exasperater Web site.
NOTE
As usual, this tutorial requires some half-finished starter documents from the Web. Using your Web
browser, visit
www.sawmac.com/dwmx2004/
. Click the Tutorials link to go to the tutorials page. Then, under
Cascading Style Sheets Tutorial, click the link for Windows or Macintosh, depending on your computer.
When the files are downloaded and decompressed, you should have a folder named DWCSS on your
computer, containing the Web pages and graphics for this tutorial.
6.8.1 Creating an External Style Sheet
Once you've downloaded the tutorial files and opened Dreamweaver, choose the
DWCSS folder as your site folder, using the site-definition routine described on Section 1.3.1. (For a shortcut, choose Site Manage Sites, click New and then select Site from
the pop-up menu. In the Site Definition window, click the Advanced tab, type something
like CSS Tutorial into the Site Name field, click the folder icon next to the Local
Root Folder field, navigate to and select the folder DWCSS, and then click Choose or
Select. Finally, click OK.) Manage Sites, click New and then select Site from
the pop-up menu. In the Site Definition window, click the Advanced tab, type something
like CSS Tutorial into the Site Name field, click the folder icon next to the Local
Root Folder field, navigate to and select the folder DWCSS, and then click Choose or
Select. Finally, click OK.)
Now you're ready to begin defining a style sheet. In this example, you'll create a collection
of styles for the headline news stories on the National Exasperater Web site.
Choose FileOpen; navigate to, and double-click, the file in the DWCSS folder
called
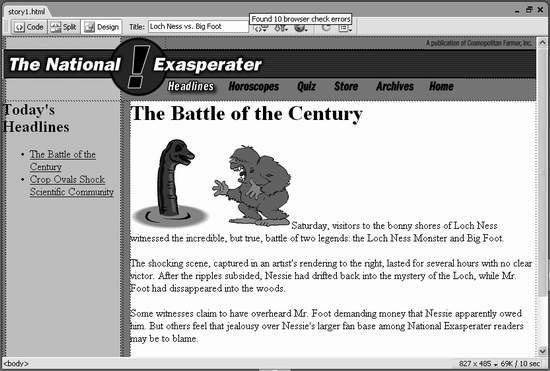
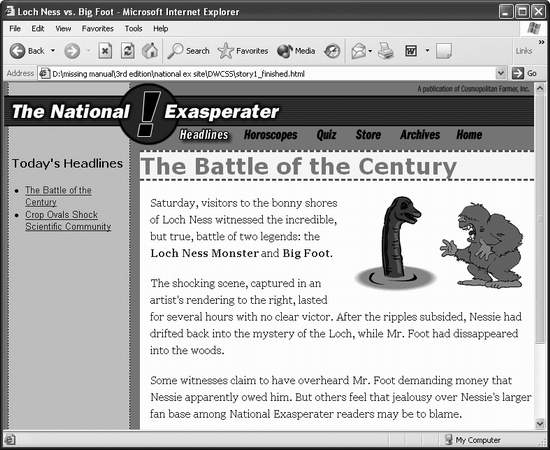
story1.html. The Web page contains a headline news story from the National Exasperater (see
Figure 6-24). The page's text is a bit boring looking, so you'll use CSS to spiff it
up. To start, you'll create a style for basic paragraphs and create an external style sheet
at the same time. If the CSS Styles panel isn't already open, choose WindowCSS Styles (or press
Shift-F11).
The CSS Styles panel opens. On the CSS Styles panel, click the Add New Style (+) button .
The New CSS Style window opens (see Figure 6-25). You'll first pick the type of
style you wish to create.
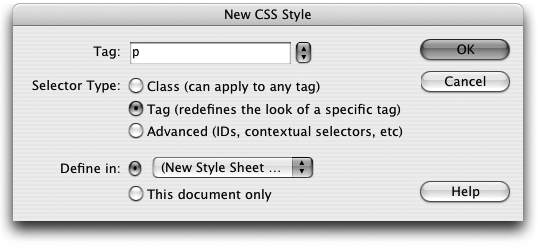
Click the Tag button.
This lets you create a style for a particular HTML tag梚n this case, the <p> tag.
In other words, you're going to create a formatting rule that applies automatically
to every basic paragraph. Type
p
into the Tag box, or choose "p" from the menu.
In the Define In section of the New CSS Style window, the New Style Sheet File
option should already be selected (see Figure 6-25). Click OK.
The Save Style Sheet File As dialog box appears. You're about to create the file梐n
external style sheet梩hat will store the styles for this page. Navigate to the DWCSS folder. Type
headlines.css
in the File Name box (the Save
As field on the Mac), and then click Save to save the file.
Cascading Style Sheet files always end in .css; that's how Web servers and browsers
can tell what kind of file it is. Having created the external style sheet, you can now create the first style, as suggested
by the sudden appearance of the Style Definition window. You'll choose a
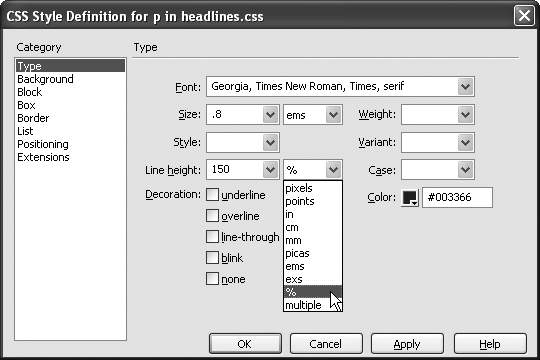
font, set a size, and assign a color to the <p> tag. Choose "Georgia, Times New Roman, Times, serif " from the Font menu; type
.8
in the Size box; select "ems" from the menu to the right; and type
#003366
in
the Color field.
Next, you'll add a little leading (space between lines of text) to the paragraph to
make the page easier to read. In the "Line height" box, type
150
and select "%" from the menu to the right.
The Style Definition window should look like Figure 6-26.
Click Apply.
You can actually preview the look of a tag style without closing the Style Definition
window梛ust drag it out of the way. Click OK.
The Style Definition window closes and the paragraphs of text on the page are
now formatted according to the style you just created. As you may have noticed,
you didn't have to select the text to apply this style. Since it's an HTML tag style,
it's applied automatically wherever the tag appears on the page. Now, you'll create a style for the title of the story, which is an <h1> tag. On the CSS Styles panel, click the New Style button.
The New CSS Style window opens. The Tag button is already selected, and the
menu in the Define In option lists the new external style sheet?span class="docEmphasis">headlines.css . In
other words, Dreamweaver will add the new style to this external style sheet. All
you need to do now is identify which tag you want to redefine.
Type
h1
in the Tag box, or choose "h1" from the menu, and then click OK.
The CSS Style Definition Window appears. From the Font menu, choose "Verdana, Arial, Helvetica, sans serif "; type 2 in
the Size box; from the menu to the right, choose "ems"; in the Color box, type
#669999.
Click Apply again to preview the new headline style. What you've got so far isn't
nearly sophisticated enough for the National Exasperater, so you'll add a background
color and top and bottom borders to the tag. Choose the Background category list on the left side of the CSS Style Definition
window. In the "Background color" box, type
#FFFFCC.
Or, if you prefer, select another color using the color box. You've just set a background
color that will appear behind the text of any <h1> tag on the page. Next,
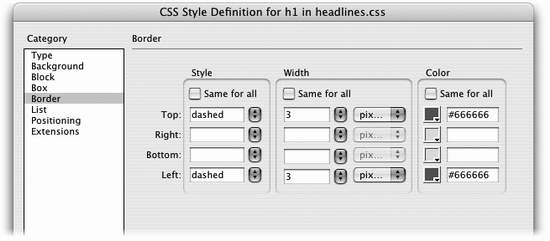
you'll add snappy rules above and below the title. Click Border in the category list.
The CSS Style Definition window now displays all the properties used to put a
border around a style. You can control each border individually or use the same
line style for all four edges. In this case, you'll add lines only to the top and bottom
of the headline. Click to turn off all three "Same for all" checkboxes. From the Style menu, choose
"dashed" for the top border, type
3
in the Width box, and type
#666666
in the
color box. Do the same for the bottom border.
The window should now look like Figure 6-27. Click OK.
The window closes and the title of the story appears in its new formatting. If
there had been other Heading 1 headings on this page, you'd see all of them
change, too.
6.8.2 Editing a Style
The paragraph text is a tad too small, so you'll edit the <p> tag style you just created
to make the text bigger.
Click anywhere inside one of the paragraphs. Make sure the Tag inspector panel
is open (choose WindowTag inspector or press F9). Click the Relevant CSS tab
in the Tag inspector.
The Tag inspector should now look like Figure 6-28. You can use the Relevant
CSS inspector to edit already set properties or set new CSS properties for a style.
You'll change the Font-size property. Click in the "font-size" box to select the .8 ems value. Type
1
and hit Return or
Enter.
The font size of the paragraph increases to 1 em. Another problem with the paragraphs
is that there's no space between the text and the blue-gray sidebar at left.
A little white space would provide some visual breathing room.
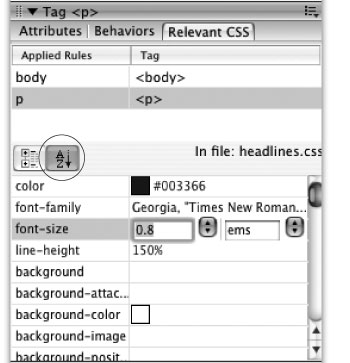
In the Relevant CSS panel, scroll down the list of CSS properties until you see a
property named "margin-left."
Not only can you use this panel to edit already existing properties, but you can
add new properties梥uch as a margin梩o an existing style. Click in the empty space to the right of the name "margin-left" and type
15.
Hit
Return or Enter to apply the change.
The text moves 15 pixels to the right, creating a nice space to the left of the text.
You can also edit a style by selecting the style in the CSS Styles panel and clicking
the Edit Style button (see Figure 6-1). This alternate method opens the familiar
CSS Style Definition window梩he same window you used to create the style in
the first place. You should use whichever method is most comfortable.
6.8.3 Creating a Class Style
Now you'll create a style to highlight the name of famous people mentioned in National
Exasperater stories. This particular story deals with two well known celebrities梟otice
their names in the first paragraph. But since the names consist of just a couple of
words within the paragraph, you can't redefine an HTML tag to format them globally.
Instead, you'll create a class style, which you can then apply to the text.
Click the New CSS Style button (+) on the CSS Styles panel.
The New CSS Style window opens. This time you'll create a class style rather than
an HTML tag style. Click the Class radio button. Type
.celebrity
in the Name box.
Class styles always begin with a period. (If you forget to start with a period, don't
worry. Dreamweaver's smart enough to do it for you.) Since you want to add the style to the external style sheet, you don't need to do
anything else in this dialog box; Dreamweaver already proposes storing it there.
NOTE
Some beginners think that whenever you create a new style, you also need to create a new external
style sheet. On the contrary, you can梐nd should梥tore more than one style in an external style sheet. In
fact, if you're creating a set of styles for an entire site, put them all in the same external style sheet.
Click OK.
The CSS Style Definition window appears. You'll add a few new properties to make
this style stand out. From the Weight menu, choose "bold."
To make this style even more prominent, you'll change its font color. Type
#CC0000
into the Color box.
Or, if you don't normally dream in hexadecimal notation, you can select a color
using the color box. That's enough formatting for the .celebrity style. Now you'll return to the document
and apply it. Click OK.
The Style definition window closes, but this time, nothing's changed in the document
window. Unlike HTML tag styles, class styles don't show up anywhere until
you apply them by hand. In the first paragraph, select "Loch Ness Monster."
This is the first star mentioned in the story. From the Property inspector's Style menu, choose "celebrity" (see Figure 6-29).
Boom桪reamweaver formats the text with the bold, colored style. Now you'll
style Big Foot's name.
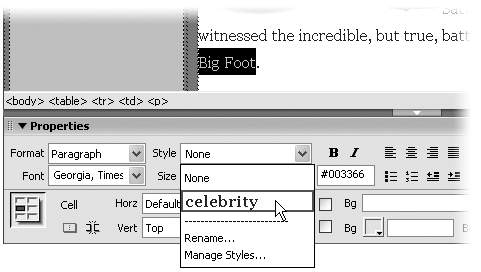
Select "Big Foot" in the first paragraph, and apply the .celebrity style to it, too.
Your document text should look something like Figure 6-30.
6.8.4 Formatting Images
CSS Styles aren't just for text. You can create styles and apply them to anything on a
page梩ables, images, or links, for example. In this next section, you'll improve the
appearance of the story image; specifically, you'll make it hug the right side of the
page and add margins so it has some breathing room around it.
Click the New CSS Style button (+) on the CSS Styles panel.
The New CSS Style window opens. You could redefine the <img> (image) tag, but
this would affect every graphic on your page. Since you only want to create a style for the main story graphic, type
.photo
in
the Name box, make sure the Class style button is selected, and then click OK.
The CSS Style Definition window opens. You'll first make the image float to the
right edge of the page. Click the Box category at the left side of the dialog box.
These properties affect margins, padding, and other attributes of a style (see
Figure 6-31).

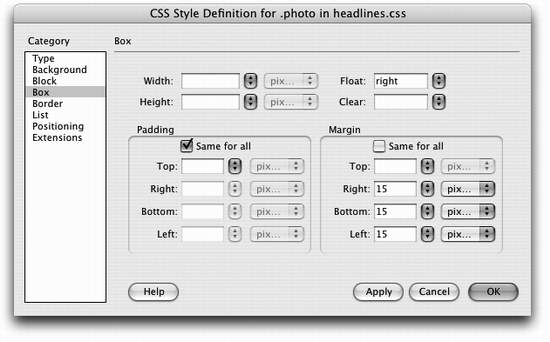
From the Float menu, select "right."
This option works like an image's Align Right property (Section 5.2.4); the graphic
will snap against the right side of the browser window. But because text will wrap around the sides of the photos, you should add a little
space between the edges of the photo and any text around them. The Margin
properties are just the ticket. Turn off the "Same for all" box for the Margin property and type
15
in the Right,
Bottom, and Left margin boxes.
CSS lets you set different margin sizes for each edge of an object. Since browsers
will automatically add some empty space below the headline, there's no reason to
add any margin to the top of the photo. The Style Definition window should look like Figure 6-31. You're done with the
style; now it's time to apply it. Click OK to close the CSS Style Definition window.
To apply this new class style, you'll start by selecting an image. Click to select the graphic梩he battle between the Loch Ness Monster and Big
Foot.
As you can see in the tag selector at the bottom of the window, clicking the photo
automatically highlights the <img> (image) tag to which you'll apply the style. From the Class menu in the Property inspector, select "photo."
When applying a class style to text the Property inspector includes the Style menu.
For non-text objects you use the Property inspector's Class menu located to the
far right of the inspector. (Aside from its name, this menu is identical to the Style
menu.) The photo moves to the right edge of the page and the rest of the text flows around
it. The small gold shield to the left of the word Saturday indicates where the image is
in the flow of the HTML, just as when you align an image to the right as described
on Section 5.2.4. (If you don't see this gold shield, follow the tip on Section 2.1.1.1, and make
sure that "Anchor points for aligned elements" is turned on.) Choose FileSave. Press F12 to preview the page in a Web browser.
Only 4.0 or later browsers display the CSS properties on this page. Depending on
which browser you preview the page in, you may notice a white space above the
headline "Battle of the Century." Some browsers, like Mozilla and Safari, add extra
space above headers. You can get rid of this space, if you wish, by editing the <h1>
tag style and setting its top margin property to 0.
6.8.5 Creating Contextual Selectors
Now it's time to create a few styles for the left side of the page, which includes a heading
and a list of links. You could create tag styles for the <h2> and <ul> tags used
in this part of the page, but those would then affect the same tags in the main area
of the page. They would then look like the sidebar, which is not what you want. Or
you could use separate class styles, but then you'd have to apply them individually
to each element.
A better option, as described in detail on Section 6.6.3, is to use a type of CSS style known
as a contextual selector (or descendent selector). First, you'll create a class style called
.sidebar, which you'll apply to the tag containing all of the text in the sidebar region.
Next, you'll create two contextual selectors to define how the <h2> and <ul> tags
should look梑ut only when they appear inside the sidebar. Here's how to do it.
Click the New CSS Style button (+) on the CSS Styles panel.
The New CSS Style window opens. Click the Class radio button. Type
.sidebar
in the Name box.
Dreamweaver will add the period before the style name if you forget. Dreamweaver also proposes storing it in an external style sheet, which is exactly
what you want. Click OK.
The CSS Style Definition window opens. In this case, you're creating a style which
you'll apply to the tag that holds all of this content梐 table cell. (Tables are a
common technique for laying out pages, and in the next chapter you'll learn how
to create them.) Click the Box category to view CSS options for Padding and Margins.
You'll add some padding to this style to create some space inside the cell, effectively
indenting the text. Leaving the "Same for all" box turned on, type
10
in the Top box for the Padding
property. Click OK to create the style.
You've just added ten pixels of space around the inside edges of the style. But since
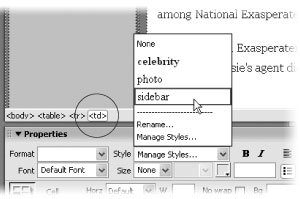
this is a class style, nothing happens until you apply it. Click anywhere inside the left sidebar, and using the tag selector, click the first
<td> tag (see Figure 6-32).
Now that you've selected the table cell, you'll add the style to it. From the Style menu on the Property inspector, select "sidebar" (Figure
6-32).
The text indents ten pixels. Next, you'll create a contextual selector to format the
headline. Click the New CSS Style button (+) on the CSS Styles panel.
The New CSS Style window opens. Click the Advanced radio button. Type
.sidebar h2
in the Name box.
This syntax for a contextual selector simply means that the style you're about
to create will apply to the <h2> tag (a tag style) but only when <h2> appears
in the .sidebar style. In other words, it won't affect any <h2> tag outside of the
sidebar.
Click OK.
The CSS Style Definition window appears. In this case, you'll just make a couple
of style adjustments, but feel free to try other style properties while you're here. From the Font menu, choose "Verdana, Arial, Helvetica, sans-serif." Type
1
in
the Size box and select "ems" from the menu to the right. Click OK to create the
style.
The text "Today's Headlines" becomes smaller and changes to a different font.
Next you'll fix the list, which is indented too far. Once again, click the New CSS Style button (+) on the CSS Styles panel.
The now-familiar New CSS Style window opens. Click the Advanced radio button. Type
.sidebar ul
in the Name box.
You're creating another contextual selector. It will apply to every <ul> tag (meaning
unordered or bulleted list) inside the .sidebar style. Click OK.
The CSS Style Definition window appears. In this case, you'll adjust the font and
margins used to display the list items. Select "Geneva, Arial, Helvetica, sans-serif " for the font and set the size to
.8
ems.
Since the sidebar on this page is rather skinny, the standard indent that Web
browsers add to bulleted lists is too broad for this list. You'll adjust that space
using the padding and margin properties. Click the Box category and turn off the "Same for all" box under both the Padding
and Margin properties. Then type
10
in Left box for both padding and margin
(see Figure 6-33). Click OK to create the style.
The bulleted list changes font, but the indent doesn't look so good. That's just
Dreamweaver being finicky. When you preview the page in a real Web browser,
you'll see that the indent looks great. Choose FileSave to save the page. Press F12 to preview the page in a Web
browser.
Only 4.0 or later browsers display the CSS properties on this page. Your finished
page should look something like Figure 6-34.

6.8.6 Attaching an External Style Sheet
Now that you've created these styles, you may be wondering how you can use them
on other pages梐fter all, that's the beauty of external style sheets. Once created, it's
a simple process to add a style sheet to other pages in the site.
Choose FileOpen. In the DWCSS folder, double-click the file
story2.html.
This is another headline story for the National Exasperater. It has no formatting
yet, so you'll attach the external style sheet you just created. Click the Attach Style Sheet button on the CSS Styles panel (see Figure 6-1).
The Link External Style Sheet window appears. Click the Browse button.
The Select Style Sheet dialog box appears. Navigate to the DWCSS folder and select
the headlines.css file. Click OK to insert the path to the Link External Style Sheet window. Click OK to
attach the style sheet to the page.
Dreamweaver instantly formats the top headline and main text of the story. Pretty
cool梐nd very efficient. You only need to apply the .sidebar class style to the left
table cell to format that text as well. Click anywhere inside the left sidebar, and in the tag selector, click to select the
first <td> tag.
Next you'll add a style to the tag.
Select "sidebar" from the Style menu on the Property inspector (Figure 6-32).
All of the text in the sidebar is instantly formatted. Press F12 to preview the page.
If you'd like to compare your finished product to the professionally completed
version, visit
www.sawmac.com/dwmx2004/tutorials
.
|